
FBX to OBJ: How to Convert Files Without Losing Textures
Your export finishes, the OBJ lands in the shared folder with a textures archive beside it, and two hours later the client replies that the model opens grey and roughly the size of a bus. Nothing in Blender looked wrong when you pressed export.
That's the shape of nearly every failed FBX to OBJ handoff. The conversion itself is trivial. What catches people is the set of things OBJ refuses to carry, and the absence of any check between clicking export and emailing the file.
Treat it as a delivery problem rather than a file operation, and most of the pain disappears. What follows is what OBJ keeps, what it drops, the Blender settings that matter, and the checks worth running before anything leaves your machine.
Table of Contents
- What FBX to OBJ Conversion Keeps and Loses
- How to Convert FBX to OBJ in Blender
- How to Export Textures with the OBJ File
- How to Validate the Converted OBJ File
- Common FBX to OBJ Problems and Fixes
- Handle Rigs Animation and the Delivery Choice
What FBX to OBJ Conversion Keeps and Loses
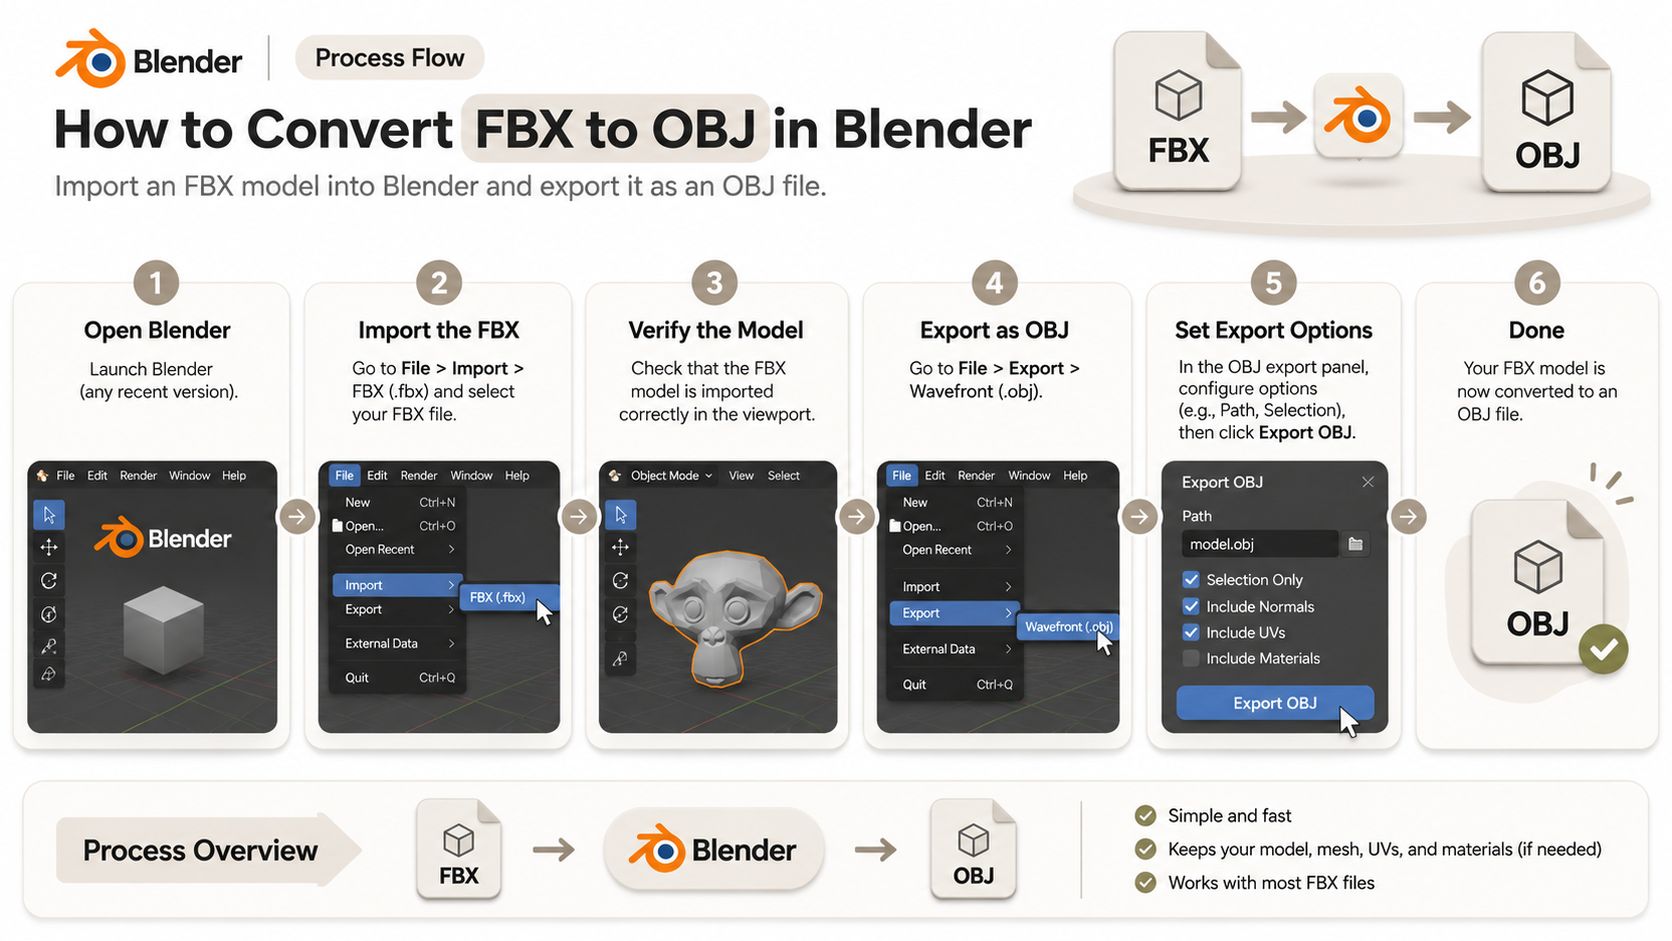
For a static asset, the job takes minutes: import the FBX into Blender, export an OBJ with materials enabled so the companion MTL file lands next to it, then measure the result. Everything else in this workflow is about catching what didn't come through.
FBX was built to move animated productions between applications. Kaydara introduced it as the native format for Filmbox 1.5 in 1996, an object-based format that could store motion alongside 2D and 3D data, audio and video, and Autodesk acquired the technology through its purchase of Alias on January 10, 2006, as the FBX format history records. Files are normally saved in binary, with ASCII storage also available. That lineage explains why an FBX can hold rigs, keyframe curves, cameras, lights, constraints and scene relationships.
OBJ predates all of it and does far less. The Wavefront OBJ format overview traces it to Wavefront Technologies and its Advanced Visualizer software in the late 1980s and early 1990s, with Personal Visualizer shipping for Silicon Graphics workstations in 1988 and the widely circulated specification appearing in Appendix B of the Advanced Visualizer 3.0 manual around 1992. The format is plain text: vertex positions, texture coordinates, normals, polygon faces, and references to separate material files.
What actually crosses over: the mesh. Positions, faces, UV coordinates and vertex normals survive intact, and material references survive when the exporter writes the MTL alongside the OBJ.
Everything structural stays behind. Skeletal rigs, skin weights, keyframe animation, cameras, lights, constraints and embedded scene relationships have no representation in an OBJ, and that same overview notes OBJ has no ISO standard, so implementations differ in how they treat materials, smoothing, groups and non-triangular faces. A rigged or animated asset needs its pose question settled before you export, not after.
If you're still deciding whether OBJ is the right container at all, this comparison of Blender's supported file formats settles it faster than converting twice.
| Data in the FBX file | Survives in OBJ? | What to do instead |
|---|---|---|
| Mesh geometry, UVs and normals | Yes, in the OBJ file | Verify counts after export |
| Materials and texture references | Via the companion MTL file | Export with materials and copy textures into the same folder |
| Skeletal rig and skin weights | No | Keep the FBX as the master rigged asset |
| Keyframe animation | No | Bake the pose or frame you need before export |
| Cameras, lights and constraints | No | Recreate them in the target application |
| Scene hierarchy | Partially, as groups | Export one OBJ per asset for importers with weak group support |
Read the table as a map rather than a warning. Any row you can't answer for your own file is the row that generates the support email three days later.
How to Convert FBX to OBJ in Blender
Blender reads and writes both formats natively and exposes units, axes and texture paths in one place, which makes it the shortest reliable route for most assets. The sequence below is what I'd run on a client file.
Work through the import and the export in one sitting. The transforms you inspect are the transforms you ship, and stopping halfway is how a scale correction gets forgotten.
- Import with units on Automatic. Use File > Import > FBX and leave the axis and unit settings alone unless you know the source convention. A Maya or Unreal asset saved in centimetres needs the centimetre option, and guessing here is what produces the badly scaled model later.
- Check the size before you apply anything. Select the imported objects and read the dimensions in the N panel against something you know, a door height, a print bed, an eye level. Apply Transforms (Ctrl+A, then Scale) only once the number looks right, because applying first bakes the error in.
- Inspect the mesh while it's still FBX. Object count in the Outliner, polygon count in the status bar, and an existing UV map in the UV Editor. If the UVs are missing at this stage, no export option will invent them.
- Choose triangulation deliberately. Keep quads for modelling, sculpting or print preparation. Turn on Triangulate in the exporter when the destination is a game engine or a viewer that only wants triangles. Changing topology without notice is the usual reason a face count doesn't match the source.
- Recalculate normals if anything reads wrong. In Edit Mode, Mesh > Normals > Recalculate Outside, then enable backface culling in the viewport to see inverted faces now rather than under a client's lighting rig.
- Export with materials, normals and UVs switched on. File > Export > OBJ, enable Materials so Blender writes the MTL, set Path Mode to Copy so textures are written beside the file, tick Write Normals and Write UVs, and set Forward and Up for the destination. Blender defaults to Z up and -Y forward, while many game engines and web viewers expect Y up, and that dropdown is cheaper than rotating the mesh afterwards.
- Confirm the folder before you close Blender. One .obj, one .mtl, every referenced image present, in one directory. A missing file now is a missing file at the other end.
If you'd rather watch the export dialog than read it, this walkthrough covers the same ground.
Online converters earn their place for a one-off look at a mesh you don't plan to deliver, but most of them expose neither unit scaling nor path mode, and the preview won't tell you whether the MTL came along. A browser-based studio such as Sculpty writes OBJ directly from the assets it generates, textures included, which removes the FBX step altogether when OBJ is the format your client wants.
Whatever route you take, finish by re-importing the OBJ into an empty scene and reading the bounding box. A swapped axis often looks like a scale error until you compare X, Y and Z, and fixing the axis at export takes a dropdown while fixing it afterwards takes a re-export.
How to Export Textures with the OBJ File
OBJ doesn't contain a single pixel. Material assignments and image paths live in the companion MTL file, written as mtllib and usemtl entries, and the images themselves sit beside it on disk. That separation is why a geometrically perfect OBJ can arrive completely grey.
- Wire every map into the Principled BSDF first. Base Color, Roughness, Metallic and Normal. A map that isn't connected to a node input at export time won't appear in the MTL.
- Leave Materials enabled in the exporter. That single checkbox is what writes the MTL at all. Turn it off and you send geometry with no material assignment whatsoever.
- Set Path Mode to Copy, not Relative or Auto. Copy writes each referenced image into the export folder and rewrites the MTL to point at it. Relative keeps a structure that depends on your own directory layout, which holds until the folder moves to another machine.
- Strip spaces and punctuation from filenames. Some importers truncate at the first space, which turns "oak base colour.png" into a missing reference for "oak".
- Bake anything the MTL can't describe. The format has no standard metallic-roughness model, so node graphs and procedurally generated materials don't travel. Bake to base color, normal, roughness and metallic images at the resolution the job needs: 2K covers most web and print work, 4K when the camera gets close.
- Read the MTL in a text editor before you send it. Every map line should name a file that exists in the folder you're about to zip. Thirty seconds of reading kills the entire category of missing-texture complaint.
| Source map | What to export | Importer risk |
|---|---|---|
| Base color | Image on Base Color, referenced from the MTL | A missing file or broken relative path imports an untextured mesh |
| Normal | Baked normal image in the same folder | A flipped green channel or wrong space looks inside-out |
| Roughness | Baked roughness image beside the OBJ | Classic MTL has no standard roughness model, so confirm the target reads it |
| Metallic | Baked metallic image | Often ignored because MTL has no metallic-roughness set |
| Procedural or AI material | Bake to 2K or 4K images before export | Node graphs do not travel inside OBJ or MTL |
The end state is one folder that opens textured in Blender, in a browser viewer and in the client's CAD tool, with no absolute paths pointing back at your drive. If you're producing the OBJ from Blender rather than from FBX, this guide to exporting from Blender to OBJ covers the settings that differ.
How to Validate the Converted OBJ File
A successful export dialog does not prove a successful handoff. Before delivery, compare the OBJ with its FBX source, then open it in an application other than the one that produced it. Check the geometry, materials, transforms and file references against criteria agreed for the job.
Delivery gate: an OBJ you have not opened in another application is still a draft.
Use a clean Blender scene for a fresh import, a browser-based OBJ viewer to inspect shading and textures, or MeshLab to review mesh statistics. Each test catches a different class of failure. A file can load correctly and still fail the client's requirements if objects are missing, dimensions are wrong or the agreed appearance has changed.
| Check | How to test | Pass criteria |
|---|---|---|
| Bounding box | Compare X/Y/Z dimensions before and after | Dimensions fall within the tolerance set for the job |
| Object count | Compare the Outliner with OBJ groups | Every expected object is present |
| Face and vertex count | Compare mesh statistics with the source | Counts match unless triangulation was requested |
| UV coordinates | Apply a checker texture | No missing or visibly stretched islands |
| Texture references | Inspect the MTL and texture folder | Every referenced image file exists |
| Normals | Enable backface culling in the viewer | No inverted faces or black patches |
Set tolerances before inspecting the result. Require exact object and mesh counts when the export settings should preserve them, and specify an acceptable dimension variance for the handoff. Keep a copy of the source, use deterministic output names, and package the OBJ, MTL and referenced images together with relative paths. A technically valid file can still fail acceptance if it misses the client's size, object or appearance requirements.
Common FBX to OBJ Problems and Fixes
The most frequent failure is a unit or axis disagreement, and it wastes the most time because the file itself is perfectly valid. Correct the unit scale at import and re-export rather than scaling the finished mesh, since a scaled mesh leaves the next person with no reference for the original size.
The higher-risk errors are semantic rather than geometric. Blender's FBX documentation notes unsupported or incomplete cases including material textures and vertex shape keys in relevant export workflows, and states that NURBS surfaces, text objects and metaballs are converted to meshes at export time. FBX can carry animation, skinning, shape keys, subdivision metadata, procedural materials and scene hierarchies. OBJ carries none of it, so rigged and animated assets need the pose baked before export.
| Symptom | Likely cause | Fix |
|---|---|---|
| Model is 100x too large or small | FBX unit convention mismatch (cm vs m) | Correct the unit scale on import and re-export |
| Textures missing on import | Broken MTL paths or textures not copied | Re-export with Path Mode Copy and ship one folder |
| Model renders black or inside-out | Normals flipped | Recalculate Outside before export |
| Animation and rig are gone | OBJ cannot store them | Keep the FBX master or bake the needed pose |
| Parts collapse to the origin | Unapplied transforms | Apply Transforms before export |
| Face count exploded | Modifiers frozen at high resolution | Freeze modifiers at the target resolution first |
| Holes or non-manifold edges | Zero-area faces and duplicate vertices | Merge by distance and delete interior faces |
Sort the fixes by where they belong. Units and transforms happen at import. Materials, path mode and normals happen at export. Merging doubles, deleting interior faces and freezing modifiers belong to mesh cleanup before you start. Reaching for the wrong stage is how a five-minute fix becomes a rebuild.
Three cases the table can't hold cleanly. When a part collapses to the origin, apply transforms before export instead of nudging objects by eye, because the eyeball fix hides the parent transform that breaks the next import. When the face count explodes, freeze modifiers at the resolution the target render or game needs rather than shipping the subdivision level you modelled at. When textures vanish, the cause is almost always path mode and folder structure, not the image files themselves.
Re-run the validation checks after every repair. Recalculating normals can flip a face you already corrected, merging by distance can collapse a UV seam, and a re-export with a new path mode can break references that worked in the previous build. One fix, one full check.
Handle Rigs Animation and the Delivery Choice
Most guides treat this conversion as an export task. That framing is exactly what produces a technically successful OBJ and a disappointed client. OBJ can't represent a skeleton, skin weights, animation curves, cameras or scene hierarchy, so a rigged character that leaves your machine as an OBJ arrives as a statue.
Blender's FBX and OBJ import/export documentation makes the split explicit: FBX is commonly used to exchange character animation, while the OBJ workflow is limited to writing static geometry or, for some simulations, a sequence of files. That leaves three honest options rather than one default.
Preflight the file before you choose
Open the FBX and answer four questions before touching the exporter.
- Armatures: anything in the Outliner bound to a skeleton is information OBJ will discard, so decide now whether the rig matters to the recipient.
- Shape keys: they don't travel as keys, so set the values you need and the mesh exports at that evaluated shape.
- Animation actions and frame range: if the timeline holds more than one frame of motion, pick the frame you're shipping and set it current.
- Live modifiers: a subdivision modifier still active at export multiplies the polycount you thought you were sending.
Three routes through the decision
Keep the FBX as the master. The default for anything playable, rigged or likely to be re-posed. Ship OBJ only when the request is explicitly a static mesh, and say so in the handoff note so nobody assumes a character that walks.
Bake one pose or frame. Set the frame, apply the armature modifier if the destination needs a plain mesh, then export with MTL and textures. This is right for a 3D print, a turntable render, a CAD comparison or a static game prop.
Ship a sequence or a vertex cache. For cloth, fluid, destruction or any geometry that deforms over time, a numbered OBJ sequence or a cache format carries motion that a single OBJ can't. It's heavier on disk, and it's the honest answer when motion is the deliverable.
An OBJ that opens correctly is still a failed handoff if the client expected something that moves.
The static case isn't a niche. A 2024 industry survey cited by Threedium's format overview reported that OBJ was used for 67% of static model deliveries in architectural visualization, which tells you the format is doing real delivery work rather than lingering as legacy.
The rule I'd apply
Ask what the recipient will do in the first ten minutes. A print shop, a CAD engineer, an archviz renderer and a fabrication vendor all want geometry and materials, and none of them can use a rig. A game studio, an animation house or an archivist wants curves, weights and hierarchy intact, and an OBJ there is a downgrade rather than a delivery. Static goes through Blender and arrives as one folder; animated stays FBX.
AI-generated sources need extra prep before any of this. Remesh or retopologize to a usable density, confirm the UVs exist and don't overlap, and bake procedural or PBR materials to images first, because a generated node tree won't survive the MTL step. If rigging is the part you're unsure about, this primer on 3D model rigging covers what a skeleton and skin weights do before you decide to strip them.
The sequence that holds up: decide static or animated, preflight the scene, freeze the frame, convert, run the validation checks, package OBJ with MTL and textures in one relative-path folder, and archive the source FBX with the delivery date in the filename. The OBJ is the deliverable. The FBX is the asset.
Sculpty generates 3D assets from text or images in the browser, applies PBR textures, and runs remesh and retopology before you download, with OBJ, FBX, GLB, STL, USDZ and 3MF among the export options. If you're producing static meshes rather than converting rigged ones, you can generate, texture and export OBJ in one place and skip the FBX leg entirely. Try it at Sculpty and see what the OBJ looks like in a viewer before it ever reaches your client.