
3D Model Rigging Guide: Bones, Skinning and Workflows
You generated a character, cleaned up the topology, and the turntable render looks sharp. Then you drop a skeleton inside, rotate the upper arm to ninety degrees, and the shoulder folds into the chest like wet paper. The elbow pinches to a crease. You undo, try a different auto-rigger, and the same collapse shows up two centimetres to the left.
Nothing is broken. The mesh and the rig were never matched to each other, or to the job the asset has to do. Rigging is a negotiation between three things: the geometry you have, the motion you expect, and the place the file has to run. Skip any one of those and the deformation fails, usually in a way that's easy to see and hard to diagnose.
This is the audit-and-workflow side of 3D model rigging: what a rig contains, how skinning math produces the bend you see, where generated meshes fail, and which checks catch the failure before an animator does.
Table of Contents
- Rig Requirements by Target Use
- The Four Parts Every Rig Needs
- Rig Readiness Audit for AI-Generated Meshes
- FK, IK and Other Control Methods
- Skinning, Weights and Fixing Deformation
- Choose Your Rig Workflow and Next Step
Rig Requirements by Target Use
A rig is finished when it works in its destination, not when it looks good in the viewport where you built it. Say the same character is headed for a third-person shooter, a browser AR try-on, and a resin print. Those three jobs want different skeletons, different weight budgets and different file formats, and only one of them needs a skeleton at all.
Here's how the requirements break down.
| Target use | Rig elements needed | Skinning and weights | Export formats |
|---|---|---|---|
| Game character (real-time) | Skeleton, LOD-ready mesh, control rig for export | Max 4 joint influences per vertex, weights sum to 1.0 | GLB or FBX |
| Animation or previs character | Full skeleton, FK and IK controls, face blend shapes | Fine weighting around shoulders, hips and face | FBX or USD |
| AR or web preview | Light skeleton with few joints | Simple weights, low joint count | GLB or USDZ |
| 3D print (static) | None needed | None | STL or 3MF |
| 3D print (articulated part) | Pivots and joint clearances only | None, rigid parts | STL or 3MF |
| Product mechanism | Rigid hierarchy with pivots | None, parent transforms only | FBX or OBJ |
Read a row in three steps. Find your target in column one, then check what column two demands (a skeleton, pivots, or nothing), then look at the export format because the format decides what survives the trip. A USDZ file will carry a light skeleton into an AR viewer and choke on a hundred-joint facial setup. An STL carries no rig data whatsoever, which is why a printed action figure with moving arms is modelled as separate parts with clearance, not skinned to a shoulder joint.
The most common mismatch is over-building. Someone spends two days on a facial blend-shape library for a mobile game where the character is nine hundred pixels tall and never speaks. The reverse happens too: a flat hierarchy of separate objects exported for a product animation when a simple pivot chain would have taken twenty minutes. If clean, engine-friendly geometry is the starting point you're missing, the fundamentals in modelling for games are worth reading before you ever open an armature.
The pass condition is blunt. The rig is correct when the asset deforms correctly inside the target engine or slicer, viewed through the target's own importer, not in your DCC.
The Four Parts Every Rig Needs
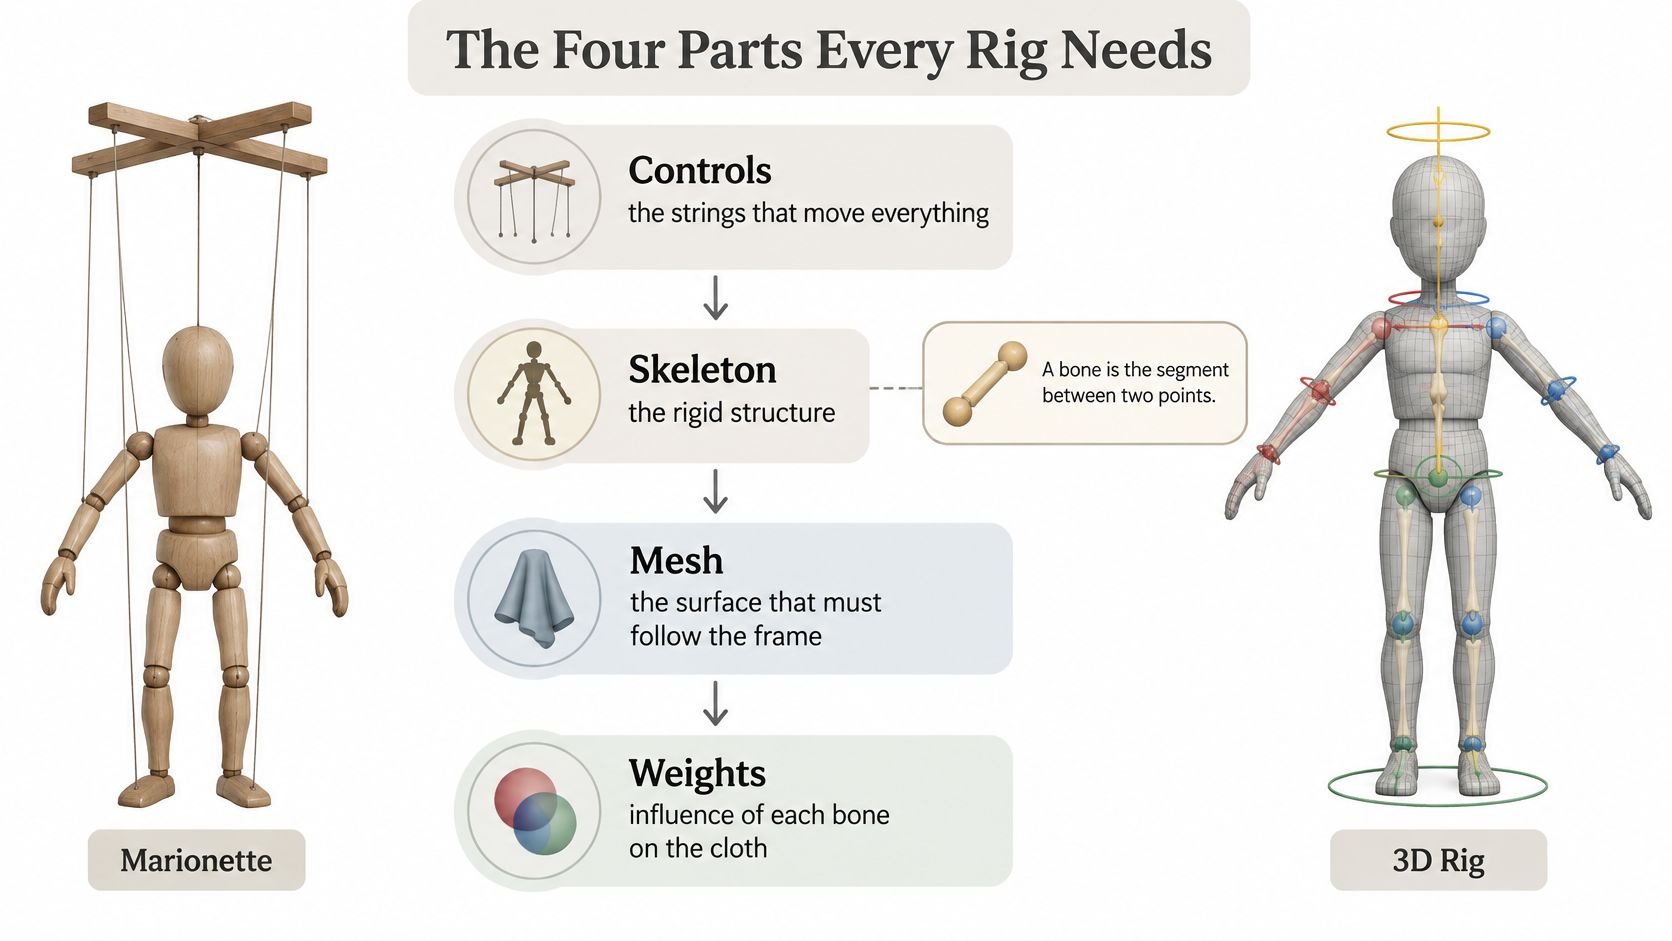
Think of a marionette. A wooden frame holds the shape, strings run from the frame to a crossbar in the puppeteer's hand, and cloth drapes over the frame and has to follow it without tearing. A rig has the same four pieces, and keeping them separate in your head prevents most confusion.
Bones, joints and the parent-child chain
A bone is the segment between two points. A joint is the pivot where a bone rotates. They're usually drawn as one object in Blender or Maya, which is why beginners use the words interchangeably, but the distinction matters the moment a bend goes wrong: a limb that folds inward almost always has its joint sitting away from the correct pivot, not a bad bone length.
The hierarchy is what makes a rig feel alive. Rotating the shoulder carries the elbow, the wrist and the fingers with it, because each is a child of the one above. Rotating the fingers leaves the shoulder alone, because children don't push their parents around.
Bones are the segments. Joints are the pivots. When a deformation looks wrong, ask which of the two you're actually looking at.
Skinning is the binding step that ties mesh vertices to joints. Weights are how much each joint pulls each vertex. A vertex sitting three centimetres above the elbow is split between the upper arm and the forearm, maybe 60/40, and that split is what lets the surface round over the bend instead of creasing. Set it 100/0 and you get a hard hinge.
The bind pose, sometimes called the rest pose, freezes the starting relationship between mesh and skeleton. Change the bind pose after weighting and every pose downstream inherits the error, which is why an offset at rest is the first thing to check when something feels shifted.
Deform bones versus controls
Deform bones drive the mesh and get exported. Control bones and helpers are what the animator grabs: IK targets, pole vectors, twist bones, custom shapes. They should never leave your DCC as deformers, or your engine will report joint counts you can't explain and weights that point at invisible bones. Count your deform joints before export. A real-time humanoid usually lands in the dozens, while a film rig for the same character can carry hundreds of controls, most of them helpers.
Rig Readiness Audit for AI-Generated Meshes
Generative tools made static 3D fast. They did not make it animatable. A 2025 CAD study recommends validating topology, UVs, geometry and joint-area edge-loop distribution specifically because AI-generated models can deform unnaturally under animation, and a separate 2025 research system, Puppeteer, identifies jitter and skinning quality as persistent problems, evaluating skeletal prediction and skinning weights rather than visual mesh quality alone (CAD Journal_2025_782-804.pdf)). Translation: a still render tells you almost nothing about whether the asset will bend.
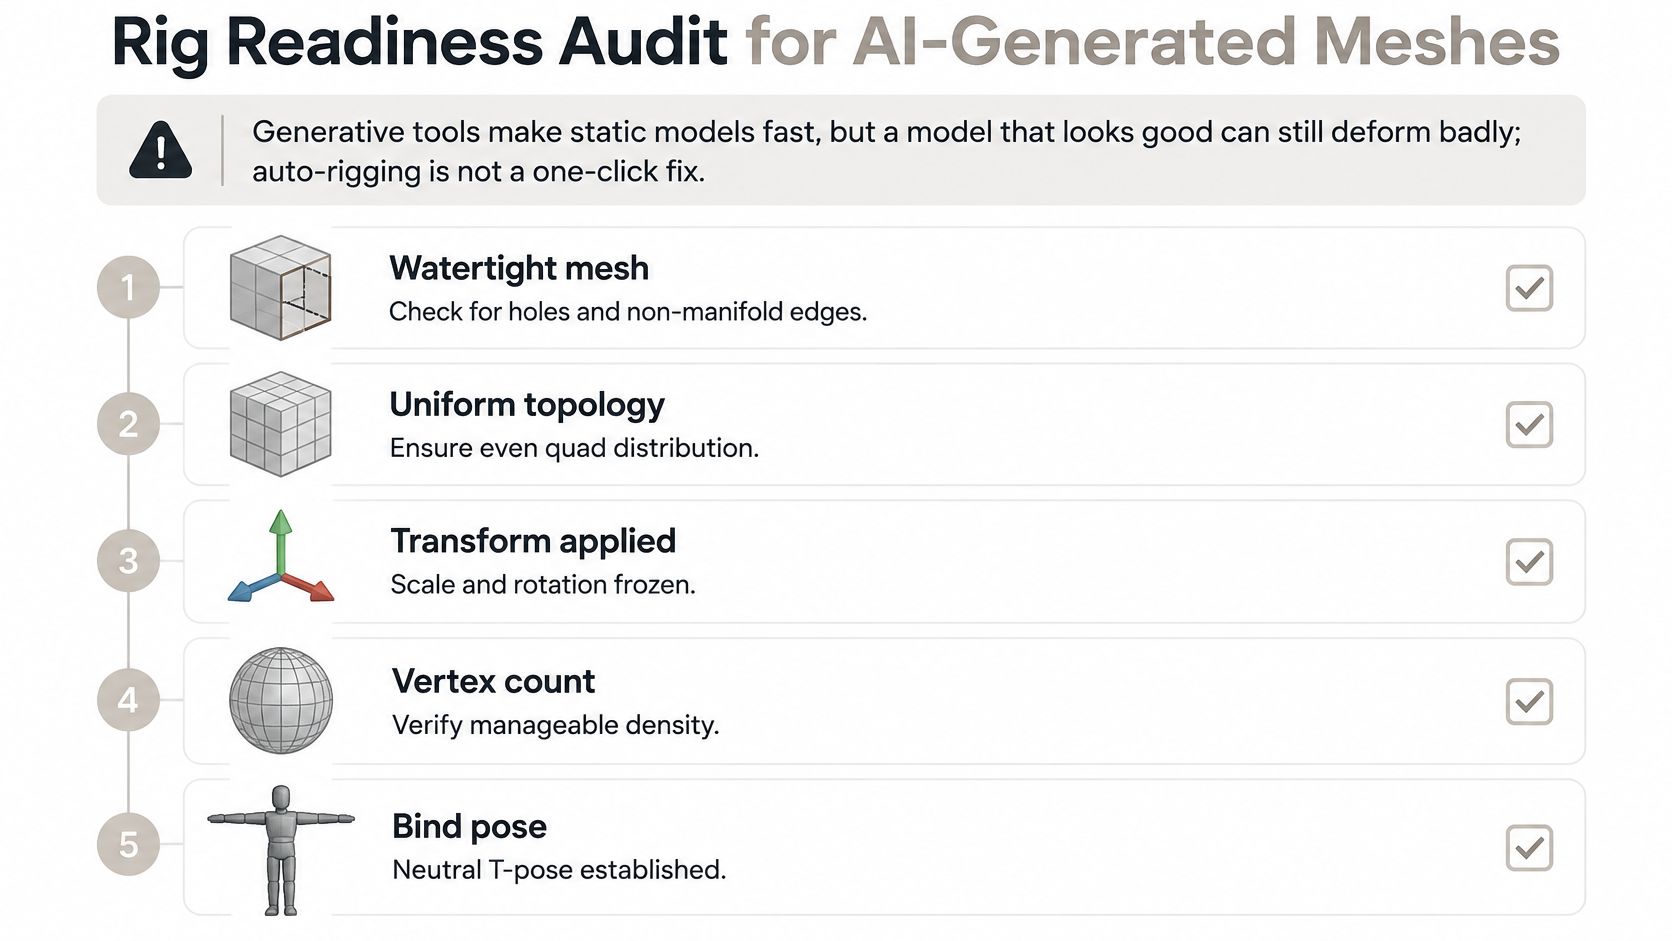
Run these six checks before a single joint is placed.
- Manifoldness. The mesh is watertight, with no holes, floating vertices or non-manifold edges. Select non-manifold in Blender's edit mode and fix what lights up. A hole near a shoulder becomes a visible tear the moment the arm raises.
- Edge loops at joints. Several loops should sit around each elbow, knee, wrist and shoulder, roughly perpendicular to the bend. Two loops bend like a drinking straw. Three to five, spaced tightly at the joint and looser on the shaft, bend cleanly.
- Symmetry. Left and right match in silhouette and loop structure, so a mirrored rig stays mirrored. Asymmetric detail is fine; asymmetric topology at the shoulder is not.
- Joint clearance. Rotate each part through its full intended range in a rough proxy pose. No geometry should pass through another part, especially on mechanical and armoured assets.
- Weight normalization. Every vertex sums to 1.0 with no stray influences from distant joints. Most DCCs have a normalize-all and a limit-total operator; run both.
- Test poses. T-pose, a 90-degree raised arm, a full elbow bend, a shoulder raise and a torso twist. Five poses, every time.
Here's the contrarian part. Remeshing and retopology don't make an asset animatable. They make it cleaner. A uniform quad field with no loops around the elbow deforms worse than a messy mesh with proper loops, because topology has to be shaped around the motion you expect, not merely tidied. Retopo is a mesh operation, not a rig-readiness operation.
Practical failure to watch for: a generated character reads perfectly at rest and fails at the bend. The elbow crease collapses into a spike because the loop density is uniform everywhere, so there's nothing for the bend to gather into.
Some assets never need any of this. If the deliverable is a turntable or a short product clip, you can create studio-quality videos in minutes from the same mesh and skip the skeleton entirely. If you want the source mesh side of this workflow, the guide to AI 3D modeling covers generation, remeshing and export in order.
FK, IK and Other Control Methods
The question that decides the method is not "which is better" but "what is the asset, and what motion does it have to make".
| Method | How it moves | Best for | Main trade-off |
|---|---|---|---|
| FK (forward kinematics) | Each joint rotated in order from the root | Tails, tentacles, spines, waving limbs | Slow to place feet exactly on the ground |
| IK (inverse kinematics) | A chain solved from a target point | Feet on floors, hands on props, legs | Can flip when the target is out of reach |
| Rigid constraints | Parts parented to pivots, no skin weights | Machinery, products, mechanical creature parts | Hard edges, no soft deformation |
| Blend shapes (morph targets) | Stored shapes interpolated between | Facial expressions, muscle bulges | Many shapes to store and edit |
| Hybrid rig | Skin weights on soft parts, rigid pivots on hard parts | Armoured or mechanical creatures | More setup and checks |
| Template-free auto-rig | Skeleton and weights predicted without a humanoid template | Quadrupeds, insects, unusual generated shapes | Output must be checked for editability |
FK wins on chains with no fixed endpoint. A tail, a tentacle, a whip, a waving arm. You rotate from the root outward and the arc is whatever you draw. It's also the most predictable thing in an engine, which is why export rigs often bake down to pure FK chains.
IK wins when a point must stay put. A foot planted on uneven ground, a hand locked to a doorknob, a leg pushing off. The catch is the solver: pull a target beyond the chain's reach and the knee or elbow pops to an unexpected orientation unless you constrain the pole.
Keep both on the same character. IK for the limbs an animator places, FK for the spine, tail and fingers, with a switch to bake one into the other for export.
Rigid hierarchies cover the assets that skinning ruins. A door hinge, a folding chair, a robot arm, a camera lens barrel: parent each part to a pivot and rotate it. Skinning a machined edge across two bones blurs it, and no weight painting recovers a crisp chamfer.
When the asset isn't a biped
Most beginner material assumes two arms and two legs. Research has moved past that assumption. RigAnything, published in 2025, predicts skeleton hierarchies and skinning weights without relying on a predefined humanoid template, reporting support across multiple categories and rigging in under a few seconds per shape (ACM Digital Library).
What that doesn't answer, and what you have to decide yourself: what skeleton a generated creature should have, where joints belong when its anatomy is ambiguous, and whether the result stays editable once it lands in Blender or Unity. Automatically rigged AI assets can arrive without a logical object hierarchy, which means the output is a rig you can animate today and can't repair tomorrow.
The honest answer for an ambiguous creature is often a hybrid. Soft body gets skin weights, hard shell and armour get pivots, and the two are parented under one root so the whole thing moves as a unit. That's more setup than a single skinned mesh, and it's the version that survives a director asking for a change.
Skinning, Weights and Fixing Deformation
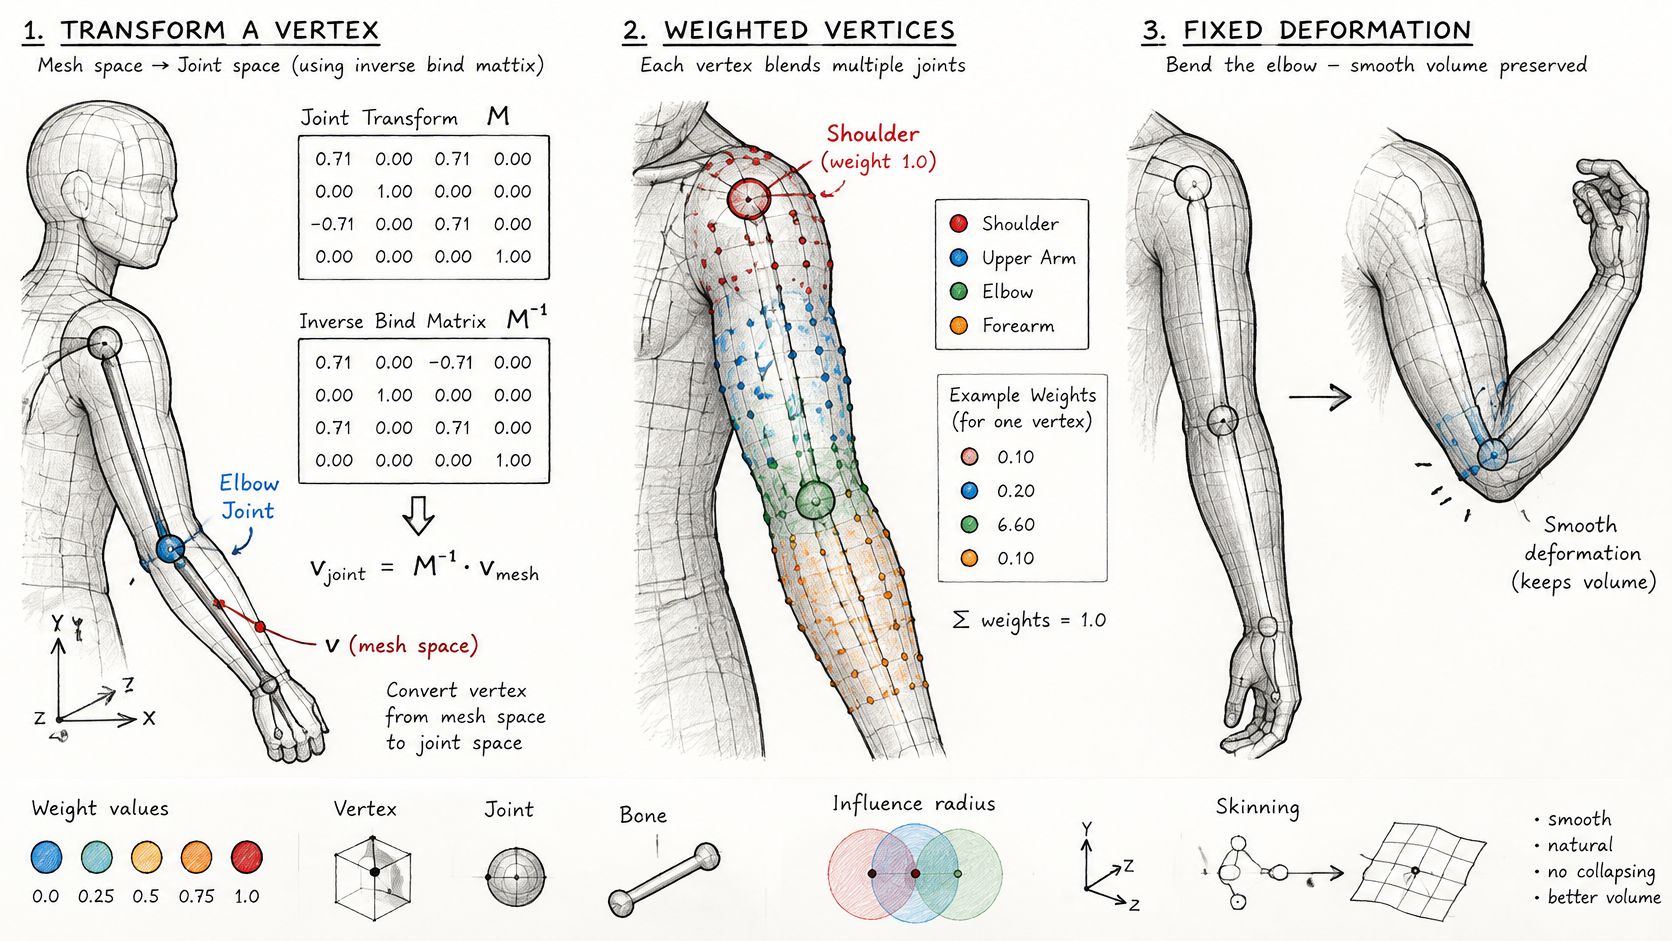
Every skinned vertex carries a short list of joints and a matching list of weights. At runtime the renderer takes each joint's animated transform, combines it with that joint's inverse bind matrix, and blends the results by weight to produce the final vertex position. The inverse bind matrix is the piece people skip: it converts a vertex from mesh space into the joint's bind-pose coordinate system, so the joint's animation is applied relative to where the vertex started.
The glTF skinning tutorial gives the storage convention for game-ready assets. glTF commonly limits each vertex to four joint influences, stored as JOINTS_0 and WEIGHTS_0, and the weights should sum to 1.0. That four-influence cap is both a format rule and a performance decision, since a fixed vertex layout keeps GPU buffer access predictable and vertex-shader work bounded.
Building it in Blender or Maya follows a fixed order. Parent the mesh to the armature with automatic weights, select a joint, paint its influence onto the shoulder, then rotate the arm and look. Automatic weights are a first pass, not a result.
The inverse bind matrix also explains the most confusing class of bug. When bind-pose transforms are wrong, or an asset exports with mismatched joint order, weights and inverse bind matrices, the symptoms are limbs that collapse, offsets at rest, and deformation that changes incorrectly as you rotate. The mesh isn't the problem in any of those cases.
The four checks that catch a bad export
- Every referenced joint exists. No weight points at a bone you deleted or renamed.
- Every vertex normalizes to 1.0. Run the normalize operator, then inspect a few vertex weight lists by hand.
- Joint indices match the exported skeleton order. Reordering bones in the outliner without re-exporting is a classic silent break.
- The bind pose reproduces the original mesh with no displacement. Load the file fresh and compare it to the pre-rig silhouette.
Here's the visual walkthrough of the deformation side, which is easier to absorb in motion than in a table.
Symptom, cause, fix
| Symptom | Likely cause | Fix | Effort |
|---|---|---|---|
| Collapsing shoulder | Missing or weak weights on upper arm and chest | Reweight the upper arm and chest and add a clavicle joint | Quick, about a day |
| Candy-wrapper twist at forearm | Too few edge loops or no twist joint | Add edge loops, place a twist joint, re-skin the forearm | Quick |
| Weight bleeding into distant bones | Weights spread across far joints | Smooth and limit weights to the nearest joints | Quick |
| Jitter during animation | Unnormalized weights or mismatched joint order | Normalize weights to 1.0 and check joint indices against the export | Quick |
| Offset at rest pose | Incorrect bind pose or inverse bind matrices | Re-export and confirm the bind pose matches the original mesh | Quick |
| Limb folds inward on bend | Joint placed away from the real pivot | Move the joint to the anatomical or mechanical pivot and retest | Quick to rework, longer for creatures |
The candy-wrapper name is literal. Twist a forearm with a single influence gradient and the surface pinches at the midpoint the way a sweet wrapper twists, because there's no intermediate joint holding volume. A twist bone partway down the forearm, carrying part of the rotation, fixes it in minutes.
Quick fixes and real rework
Separate the two before you start painting. Reweighting a shoulder is a fix. Rebuilding loop density around a knee, or re-looping a creature's entire torso, is rework, and it means going back to the mesh.
Rule that saves days: after every fix, re-run all five test poses. A weight change at the shoulder routinely breaks the wrist.
And if the asset gets remeshed or retopologised at any point after weighting, the vertex layout changes and the original weight data is meaningless. Weights must be transferred or regenerated, never reused. The guide to 3D model skinning goes deeper on the weighting side once the mesh stops moving under you.
Choose Your Rig Workflow and Next Step
Three decisions, in this order, and you're done planning.
Match the target first. Game, animation, AR, print or mechanism. That single choice sets your joint budget, your weighting density and your export format, and it eliminates most of the options on the table.
Then pick the control method. Biped and creature with soft tissue goes to skin weights. Machinery, products and armoured parts go to rigid pivots. Faces go to blend shapes. Anything with both soft and hard sections gets a hybrid, weighted where it bends and parented where it doesn't, with the whole thing under one root so the asset still moves as a single object.
Then audit before bones. Manifoldness, loops at joints, symmetry, joint clearance, normalization, test poses. Six checks, done on the mesh, which is the only stage where fixing them is cheap.
If your starting point is generated geometry, a text-to-3D or image-to-3D studio with remeshing and retopology can hand you a cleaner mesh to work from, exported as GLB, FBX or OBJ for Blender, Unity or Unreal. That gets you a better starting surface. It doesn't place a joint, normalize a weight or pass a test pose for you, and it isn't a substitute for the checks above.
When the rig leaves your hands and someone else animates it, understanding what that team needs from the skeleton, the naming and the file, is worth as much as the weighting itself. Studios that offer 3D animation services will tell you the same thing: a clean rig with a boring naming convention beats a clever rig nobody can retarget.
The next step is small on purpose. Export one test model, run the six audit checks on it, rig a single limb, and confirm the bind pose reproduces the mesh before you touch the rest of the character. One arm, tested properly, teaches more than a full skeleton built on a mesh you haven't audited.
Sculpty is a browser-based 3D AI studio that turns a prompt, a photo or a set of views into a mesh you can retopologise, texture and export as GLB, FBX or OBJ, which is exactly the state a rigger wants to receive before placing a skeleton. Generate one test character, run the six audit checks on it, and see how much of the deformation work the mesh can do for you. Start at Sculpty with a single character and a single limb.