
Modeling for Games How to Build Game Ready Assets
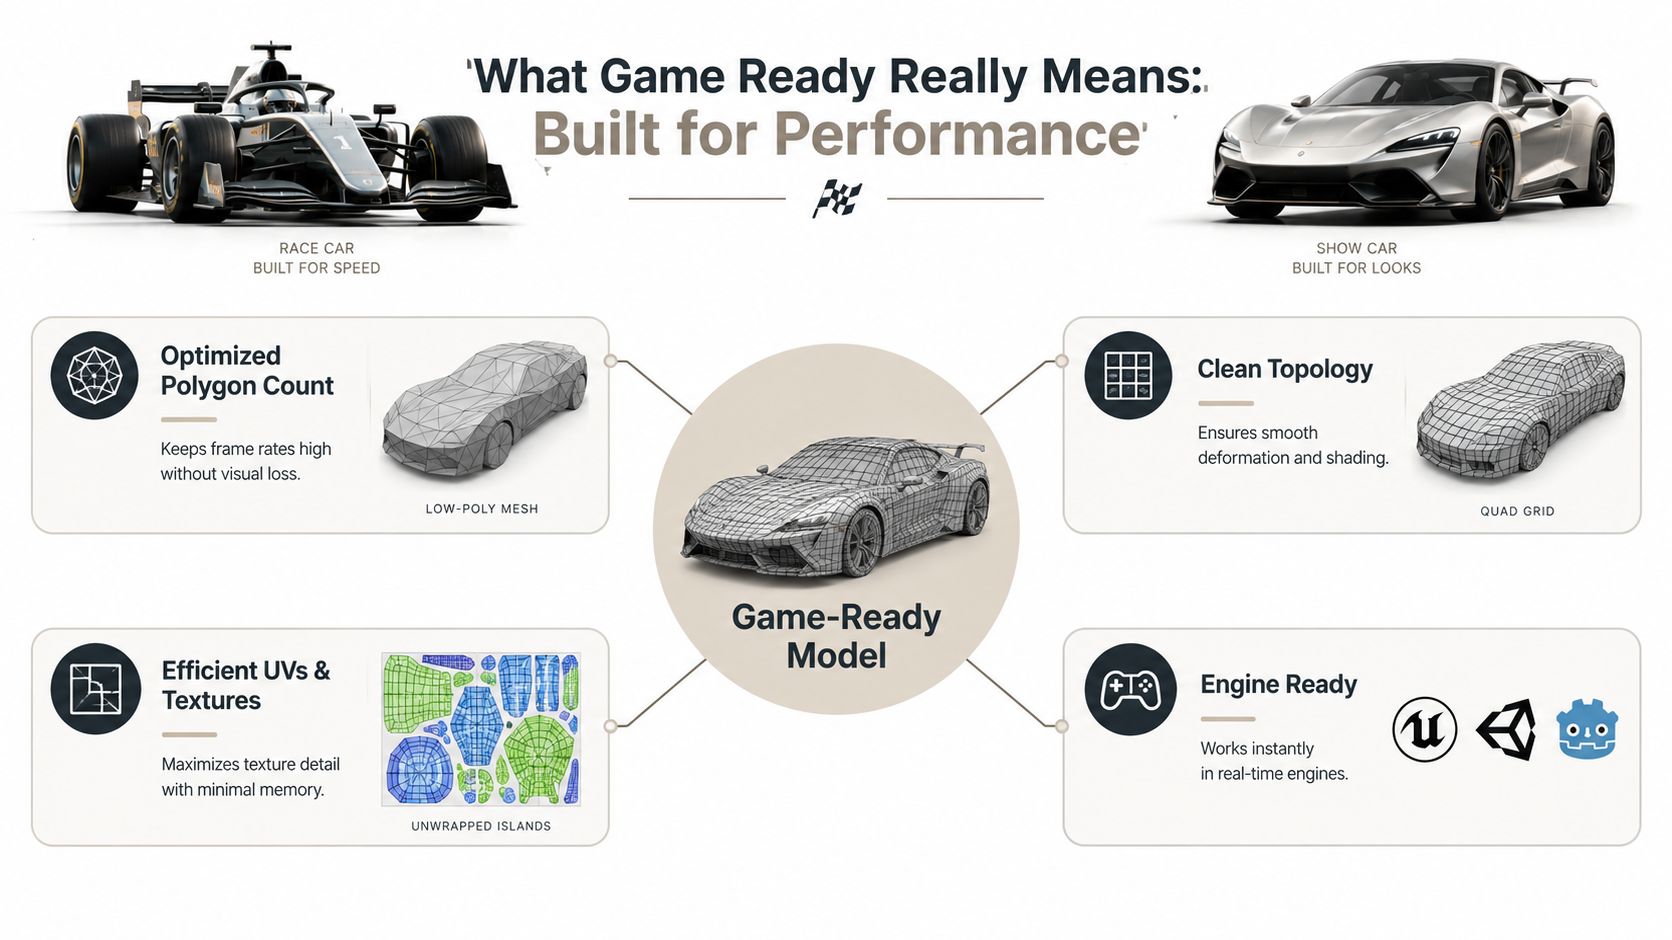
You've spent hours refining a character sculpt. The silhouette reads well, the materials look convincing, and the viewport screenshot could pass for a finished asset. Then you import it into Unity or Unreal and the problems appear: shading breaks across the face, the character bends like folded cardboard, textures stretch over the arms, and the collision volume doesn't match the body.
That experience is common in modeling for games because a beautiful mesh and a usable game asset serve different purposes. A sculpt proves that an idea works visually. A game-ready model proves that the idea can survive animation, memory limits, texture streaming, collision, export, and real-time rendering.
The important shift is simple: game-ready isn't a generation result. It's an integration test. You haven't finished when the model looks correct in Blender, an AI viewer, or a render. You've finished when the target engine imports it correctly, displays it consistently, deforms as expected, collides properly, and performs within the project's measured budget.
Table of Contents
- Introduction Why Beautiful Models Still Fail in Games
- What Game Ready Really Means
- Topology and Retopology That Deforms and Performs
- UVs Baking and PBR Texturing Without Waste
- LODs Collisions and Export Targets That Engines Expect
- Modern Pipeline From AI Generation to Game Ready Cleanup
- Conclusion Your Game Ready Checklist Before You Ship
Introduction Why Beautiful Models Still Fail in Games
A junior artist often receives the same confusing feedback: “The asset looks good, but it isn't game-ready.” That sentence can feel vague until you separate visual quality from runtime behavior. A high-poly sculpt may contain excellent anatomy, crisp folds, and tiny surface details, yet still be unsuitable as the mesh that the engine draws and deforms every frame.
The problem usually starts with treating the viewport as the final destination. A modeling application can display dense geometry, tolerate messy object structure, and hide problems through generous editor resources. A game engine has to manage the asset alongside characters, effects, lights, animation, physics, shaders, and the rest of the scene. Every choice becomes part of a shared runtime system.
Historical hardware makes that trade-off clear. A reported Nintendo 64 target was about 100,000 polygons per second, which works out to roughly 1,700 polygons per frame at 60 fps or 3,300 polygons per frame at 30 fps (historical polygon benchmarks). Later hardware handled dramatically larger scenes, but the underlying discipline didn't disappear. Artists still need to decide where geometry matters and where textures, normal maps, or LODs can create the same visual impression more efficiently.
The practical mindset: model for the player's view, the animation system, and the target hardware, not only for the beauty shot.
A model has several jobs
A game asset must communicate form, hold textures, deform under a rig, interact with physics, and load without damaging the rest of the scene. Those jobs can conflict. Dense geometry may preserve a sculpt's contours but make skinning and runtime rendering unnecessarily expensive. Aggressive reduction may improve performance but destroy the silhouette or create visible shading errors.
The workflow in this guide treats each asset as a chain of decisions:
- Establish the visual form with a high-poly model or generated base.
- Build a clean runtime mesh through retopology.
- Validate UVs and bake surface detail into texture maps.
- Create LODs and collision geometry.
- Export to the intended engine and test the asset there.
That last step changes how you evaluate progress. If the mesh only succeeds in the authoring tool, it's an intermediate asset. The engine is where “ready” gets earned.
What Game Ready Really Means
Think of a game-ready model as a race car rather than a show car. A show car can spend its entire life under controlled lighting, with its engine hidden and its tires never touching a track. A race car still needs an attractive shape, but every component must support movement, heat, weight, maintenance, and repeatable performance.
A game asset works the same way. It needs visual fidelity, but it also has to respect memory, rendering, animation, physics, and loading constraints. The exact budget depends on the project, platform, camera distance, and asset role. There isn't one universal polygon count that makes a model ready.
The five checks behind the label
Clean topology gives the model predictable surfaces and deformation. A static rock can tolerate topology that would be unacceptable on a face or elbow. A character needs edge flow that follows movement, while a prop needs geometry that shades cleanly and avoids needless density.
Efficient UVs turn a three-dimensional surface into a two-dimensional texture layout. The islands should use space deliberately, maintain useful texel density, and place seams where players are unlikely to notice them. Overlapping UVs can be valid for mirrored or repeated details, but accidental overlap makes unique baking unreliable.
Baked PBR textures transfer high-poly information to the lower-density runtime mesh. Normal maps can preserve the impression of small sculpted forms without forcing the engine to draw every ridge as geometry. Roughness, metallic, ambient occlusion, and related maps then describe how the material responds to light.
LODs, or Levels of Detail, provide simpler versions for views where the full mesh isn't needed. A character close to the camera may use the primary asset, while a distant character can use reduced geometry and smaller textures. The engine switches between versions according to distance or another project-specific rule.
Correct export preserves scale, orientation, pivots, material assignments, skeleton data, and triangulation. A model can pass every visual check and still arrive in Unity or Unreal with the wrong forward axis, an unexpected unit scale, or broken smoothing.
Test the asset as a system
Don't ask only, “Does this look good?” Ask whether the asset imports at the intended scale, whether its materials use the expected channels, and whether its animations remain stable. Check the mesh under the project's actual lighting, camera distance, and post-processing. A model that looks fine in isolation may reveal texture softness or silhouette loss when surrounded by the rest of the game.
A useful definition: game-ready means the asset satisfies the project's visual and technical requirements after import, not before export.
That definition also explains why a generated mesh can be useful without being finished. Generation can supply a strong starting point, but readiness depends on the cleanup, packaging, and validation that follow.
Topology and Retopology That Deforms and Performs
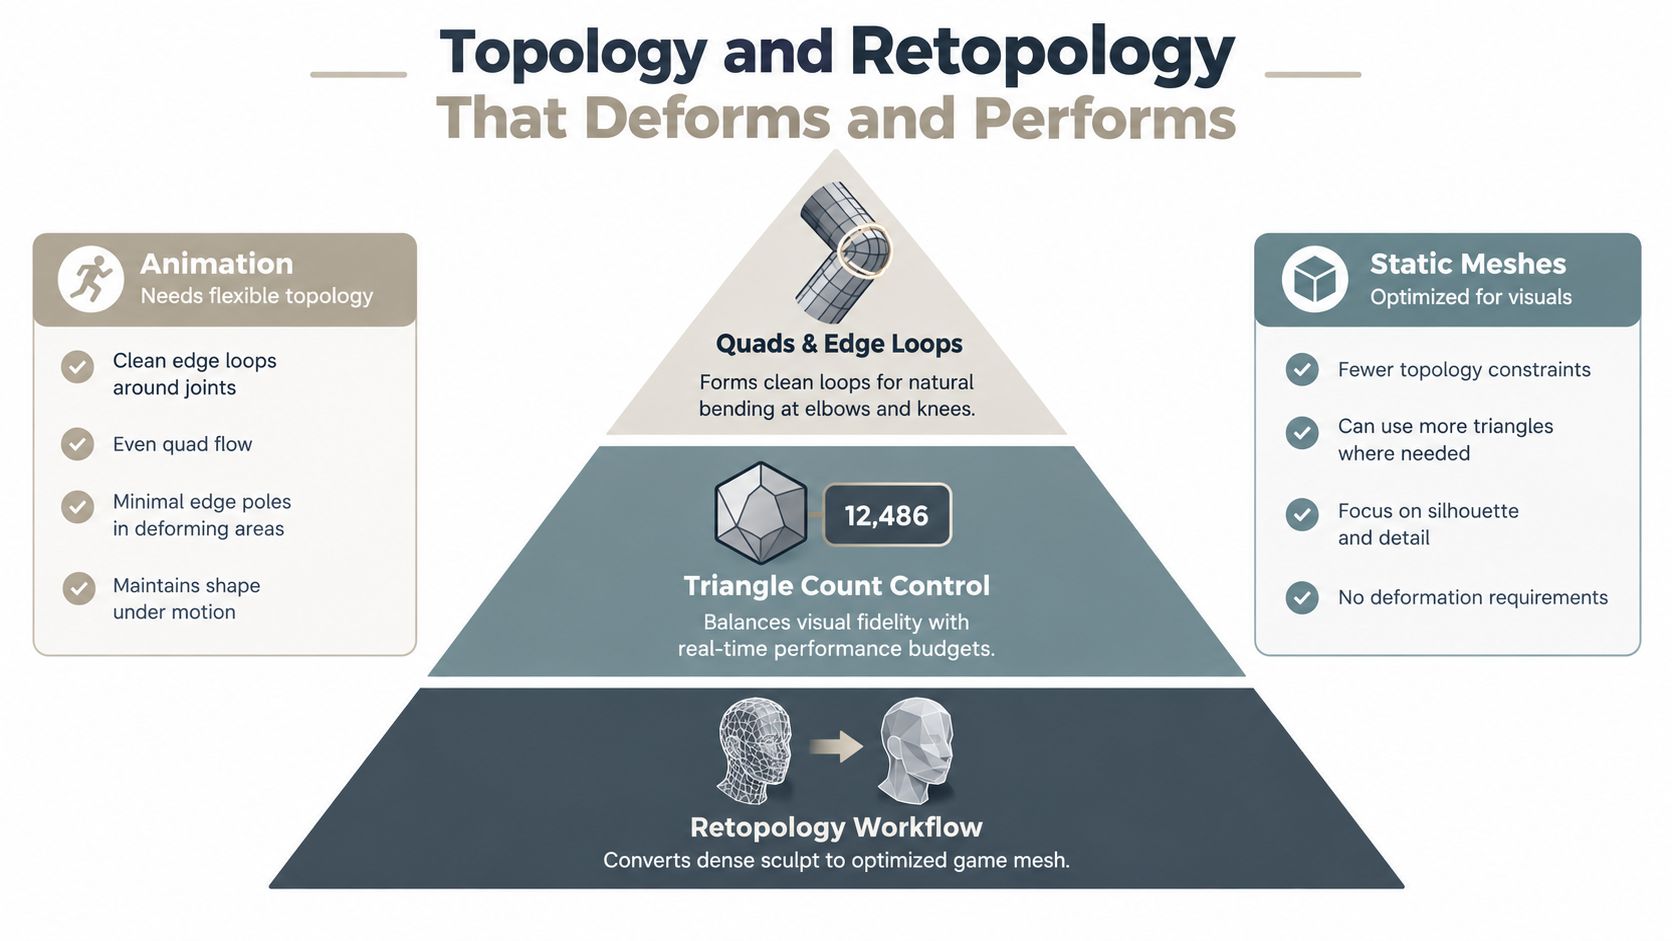
A character can look finished in a viewport, then fold like paper at the elbow once animation starts. A prop can carry beautiful sculpted detail, yet waste processing time because its mesh has no clear runtime structure. Topology is the arrangement of vertices, edges, and faces that determines how a model bends, shades, and runs in an engine.
Dense sculpts and scans commonly contain uneven spacing, stretched faces, awkward poles, and details that do not belong in the runtime asset. Retopology rebuilds that surface with deliberate geometry. Autodesk describes retopology as a method for improving mesh efficiency and suitability for animation and real-time rendering through cleaner topology (Autodesk retopology guidance).
Put edge flow where the model bends
An edge loop works like a seam in fabric. Around an elbow, it gives the surface enough structure to fold around the joint. The same density spread across a flat upper arm contributes little while increasing the cost of the mesh.
For deforming characters, concentrate loops around elbows, knees, eyes, and the mouth. These regions compress, twist, and change shape often, so they need supporting geometry to avoid collapsing or forming harsh creases. Broad, economical spacing usually works across quieter, flatter areas.
Rule for deformation: place polygons where joints bend or the silhouette changes, then simplify the quiet areas.
Quads make edge flow easier to read and edit during character production. Triangles become normal at export and can support predictable real-time rendering. The relevant test is not whether triangles exist, but whether the final triangulation keeps shading, deformation, and baking stable.
Use budgets as starting points, not laws
A practical real-time target range is about 5,000 to 50,000 triangles, though the correct count depends on the asset's role and visibility. A foreground character, small prop, and background building have different demands. Use the range as a starting point, then test the result in the project.
Ask three questions:
- Silhouette: Does reducing geometry alter the outline from likely player viewpoints?
- Deformation: Does the surface bend, twist, and compress without collapsing?
- Shading: Do normals and material transitions remain stable after triangulation?
A static prop can often accept more direct simplification because it has no joints to deform. A face may need careful loops even during a brief close-up, since small shading errors become visible during dialogue or animation.
For a practical explanation of the underlying concepts, use this guide to 3D modeling topology. Inspect AI-generated meshes with the same discipline: zoom out to judge the silhouette, then zoom in around joints and high-curvature areas. Retopology supplies the structure that lets UVs, skinning, baking, and engine import behave consistently. A generated mesh is therefore a starting point, not proof that the asset passed its integration test.
UVs Baking and PBR Texturing Without Waste
A character can look correct in the viewport yet show a stretched cheek, blurred logo, or broken material after engine import. UVs and textures are part of the integration test, not the final decoration. The layout must give the renderer predictable surfaces to sample.
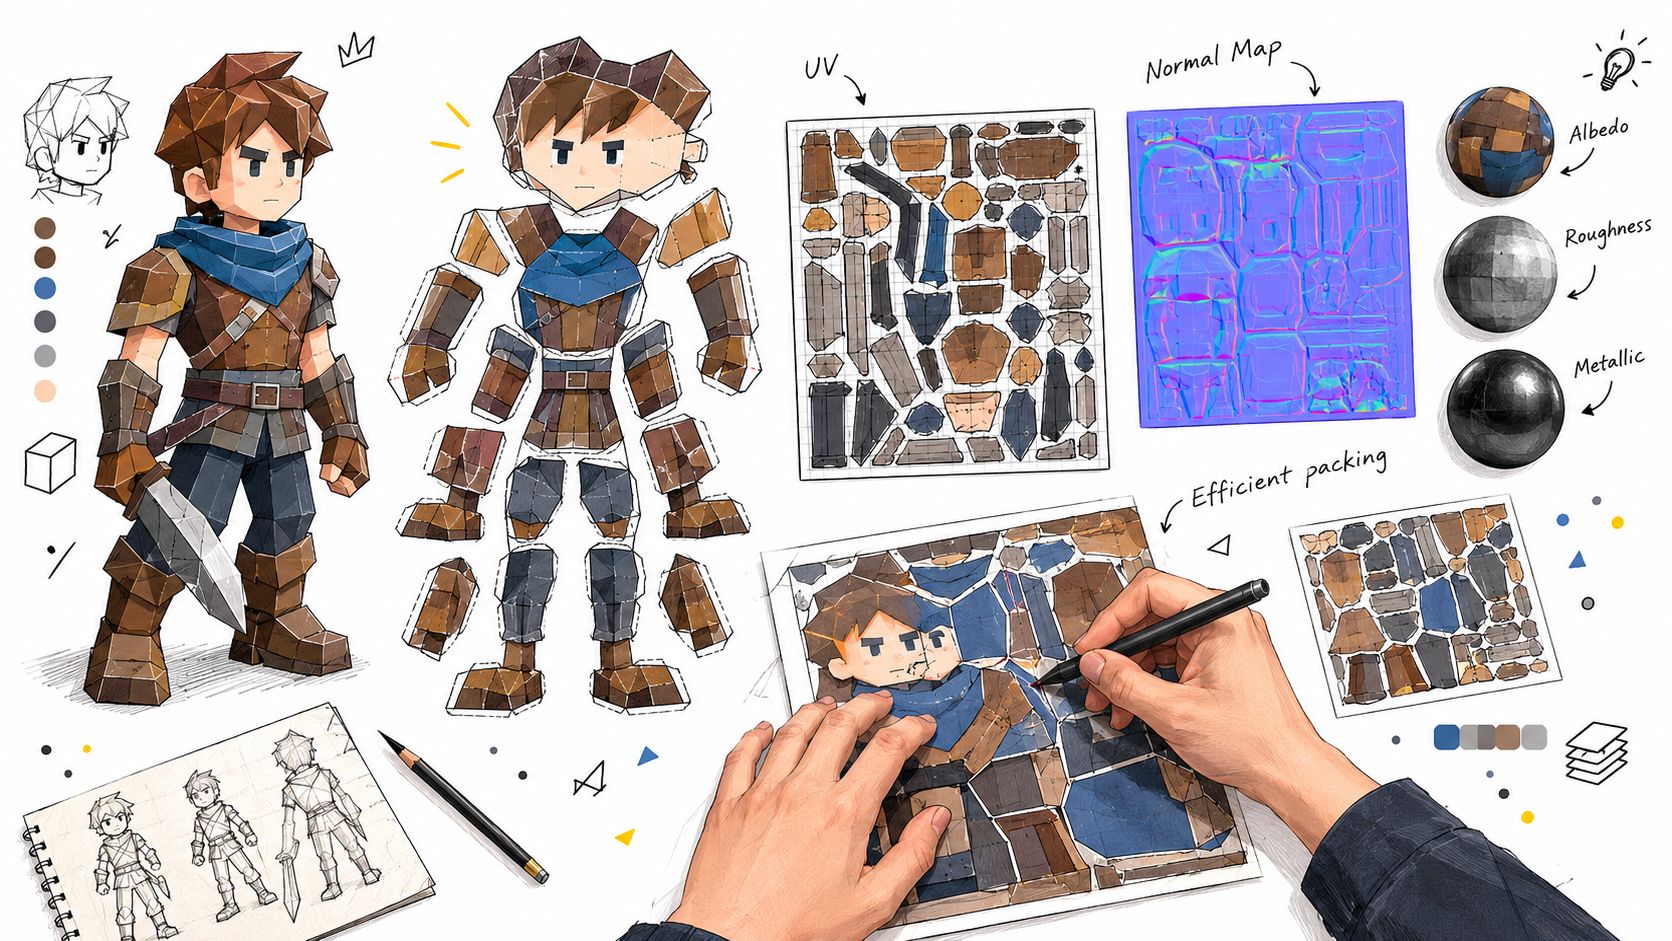
UV unwrapping works like opening a paper model and laying it flat. Seams are the cuts that make this possible. Place them in hidden areas where practical, because a seam across a cheek or a prop's hero logo can make texture errors visible immediately.
Decide which surfaces need unique texture space before unwrapping. A symmetrical object can mirror some UV islands, while a hero asset may need separate space for marks that appear on only one side. Avoid accidental overlaps when baking unique detail. Then inspect the islands for stretching, especially around curves, joints, and high-visibility areas.
Bake detail instead of carrying it
The high-poly model stores fine surface information. The low-poly model supplies the efficient shape that the engine renders. Baking transfers the high-poly form into maps, allowing the lower-density mesh to display detail without carrying every sculpted polygon.
A typical bake uses a normal map and may include ambient occlusion, curvature, position, or other supporting data for texturing. The cage controls how rays travel from the low-poly surface. If it does not surround that surface correctly, rays can miss the sculpt or capture detail from the wrong region. Always inspect the bake on the actual game mesh, not only on the high-poly source.
PBR materials divide surface behavior into channels with specific jobs. Base color describes visible color, roughness controls whether reflections look broad or sharp, and metallic indicates whether the surface behaves like metal. Match these meanings to the engine's shader setup. A polished texture can still render incorrectly if channel packing or color space settings disagree with the import configuration.
Treat texture memory as a measured budget
Keep full-quality masters, then create mip chains for runtime use. Reserve memory for render targets, geometry, shaders, and operating-system overhead before assigning space to asset textures. The GPU's advertised memory is therefore not the same as the amount available for texture streaming.
Use texel density to direct detail where players can see it. Faces, hands, branded surfaces, and other focal areas may need more space than unseen backs or tiny accessories. Equal resolution everywhere wastes memory on low-impact surfaces and can leave important details soft.
For a focused guide to the surface workflow, review 3D modeling texturing. Test the result in the engine at gameplay distance. Mips, anisotropic filtering, lighting, and compression can change its appearance, so the texture passes its integration test only after running through the same material and camera conditions used by the game.
LODs Collisions and Export Targets That Engines Expect
A model can have clean topology and excellent textures yet still fail its runtime responsibilities. The engine needs cheaper geometry for distance, simplified shapes for physics, and a file that preserves the information required by the target pipeline.
LODs are not merely smaller copies. Each version should preserve the features that matter at its intended distance. For a character, that may mean protecting the head and silhouette while reducing hidden body detail. For a prop, it might mean removing bevel segments, unseen backs, or small hardware that disappears at normal viewing distance.
Collision geometry should serve physics, not beauty. A custom collision mesh can approximate the playable shape more efficiently than using the render mesh. Name collision objects according to the engine's conventions, keep them simple, and test the asset against actual movement, interaction, and blocking behavior.
Choose the export around the destination
FBX remains common for engine and animation workflows, while GLB and glTF are useful for compact, self-contained real-time and web delivery. The correct choice depends on the target engine, the rig, material support, and the handoff requirements. Exporting both formats can help when the same asset serves an engine build and a browser-based review.
| Asset Type | Recommended LODs and Export |
|---|---|
| Hero character | A carefully tested LOD chain, with FBX when skeletal animation and rig transfer are central |
| Reusable gameplay prop | LODs based on camera distance, with GLB or FBX according to engine and material needs |
| Background object | Simplified geometry and reduced texture detail, with the format supported by the level pipeline |
| Web or viewer asset | A GLB package with embedded or correctly referenced materials |
| Physics-focused object | Separate collision geometry, plus the render asset in the project's accepted format |
Before importing, verify the pivot, scale, orientation, smoothing, material slots, and triangulation. Apply transforms where the pipeline requires it, freeze or preserve the correct rest pose for rigs, and make sure filenames and object names follow the project's conventions. Then import into a clean test scene before placing the asset into a production level.
The test scene should include the shader, representative lighting, a camera at gameplay distance, and the intended collision setup. If the asset behaves correctly there, you have evidence. If it only works in the modeling package, you have a promising source file, not a finished game asset.
Modern Pipeline From AI Generation to Game Ready Cleanup
AI tools are most useful when you give them the right job. Text-to-3D and image-to-3D systems can help you explore forms, block out a prop, or produce a background object without starting from an empty scene. They can also create a watertight base from a reference image, but the result still needs inspection before it enters a production pipeline.
A useful way to think about AI generation is as a fast first draft. It compresses the time needed to reach a visible idea, then moves more of the artist's attention toward topology, UVs, materials, rigging, and engine validation. Independent guidance on AI 3D generation makes the same distinction: generated and game-ready are different states, and production still requires retopology, baking, UV checks, rigging checks, and in-engine testing (AI 3D game development guidance).
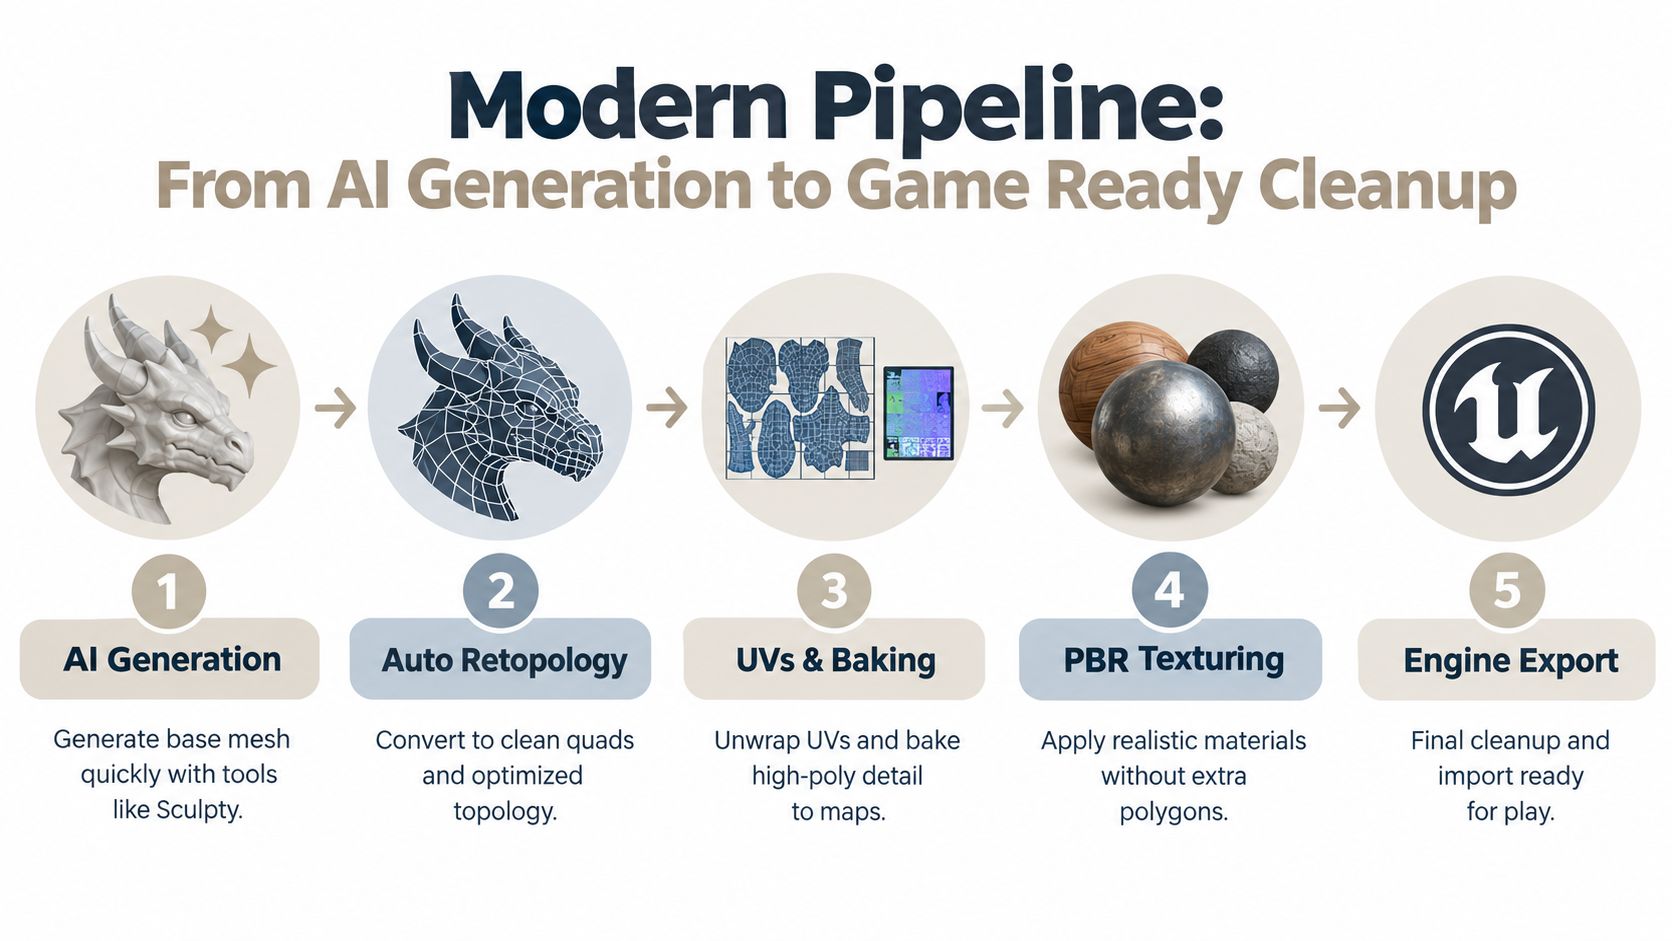
A practical hybrid workflow
- Generate the base. Use text-to-3D or image-to-3D to explore shape, proportion, and style. A resource on AI image to 3D conversion can help clarify how a reference image becomes a starting mesh.
- Inspect the form. Check whether the object is watertight, whether separate parts are intentionally separated, and whether the silhouette matches the design.
- Remesh and retopologize. Replace irregular density with topology that suits deformation, shading, or static placement. Don't assume an automatic result has the correct loops around joints.
- Build UVs and bake. Unwrap the runtime mesh, transfer high-poly information, and check the normal map for projection errors.
- Apply PBR materials and export. Confirm channel packing and color space, then export to GLB or FBX as required by the engine.
- Run the integration test. Import the asset, assign the production shader, test collisions and LODs, and inspect it under gameplay conditions.
Tools such as Sculpty combine text-to-3D and image-to-3D workflows with remeshing, retopology, PBR texturing, and exports including GLB and FBX. That makes the platform one possible starting point for an AI-assisted asset pipeline, but the same acceptance checks still apply after export.
Match AI to the asset's risk
AI is a strong fit for concept exploration, grayboxing, stylized props, and background objects where small topology imperfections may remain hidden. Hero characters, deforming clothing, facial rigs, and assets with strict collision requirements demand more deliberate human review. Their importance makes errors visible, and their interaction with animation or physics leaves less room for a rough first pass.
Production principle: use AI to shorten the distance to a useful draft, then spend human attention where the engine can expose failure.
This approach avoids two extremes. You don't need to reject generated meshes because they need cleanup, and you shouldn't ship them because they look convincing in a viewer. The value comes from assigning automation to exploration while retaining artist judgment for integration.
Conclusion Your Game Ready Checklist Before You Ship
The final question isn't whether your model has enough detail. It's whether the asset behaves correctly when the game asks it to do its job. A model can look outstanding and still fail because its topology collapses during animation, its UVs produce broken bakes, its textures consume more memory than the device budget allows, or its collision shape blocks the player incorrectly.
Use a repeatable acceptance pass before you call the asset finished.
Inspect the mesh
- Topology: Check edge flow around elbows, knees, eyes, and the mouth when the asset deforms.
- Density: Compare triangles with the asset's role, camera distance, and measured project budget.
- Shading: Inspect normals, hard edges, smoothing, triangulation, and silhouette changes.
- Structure: Remove hidden geometry, accidental duplicates, unused materials, and unnecessary objects.
Validate the surface
- UVs: Look for stretching, accidental overlaps, poor island packing, and seams in visible areas.
- Bakes: Review normal and supporting maps on the runtime mesh under actual lighting.
- PBR channels: Confirm that base color, roughness, metallic, and other maps use the engine's expected interpretation.
- Streaming: Make sure mip chains and texture sizes fit the measured device allocation after other memory needs are reserved.
Test the runtime package
- LODs: Switch through every level in the engine and watch for popping, broken silhouettes, or material changes.
- Collisions: Walk, shoot, pick up, or drive against the collision mesh using the gameplay interaction.
- Transforms: Confirm scale, pivot, orientation, rest pose, and animation behavior after import.
- Performance: Test the asset in a representative scene, not only in an empty preview level.
Keep a record of the failures you find. If an AI mesh needs repeated correction around the same feature, adjust the generation prompt, reference images, or cleanup procedure for the next asset. A clean checklist turns each failed import into pipeline knowledge instead of allowing the same problem to return.
Modeling for games is complete at the point of verification. Generation, sculpting, retopology, UV work, and texturing create the candidate. Engine testing decides whether that candidate is ready to ship.
Sculpty brings text-to-3D, image-to-3D, PBR texturing, remeshing, retopology, and GLB or FBX export into one browser-based workflow for building and preparing assets. Use Sculpty to create a starting mesh, clean its topology, and move it into your own engine testing process.