
GLB to FBX Conversion: Methods, Settings and Fixes
A converted FBX can open, display textures, and play animation while still being wrong for production. Its metal can lose its reflection, its idle clip can multiply, and its character can face sideways in the engine. That's why GLB to FBX isn't a filename change. It's a material and animation migration between two different scene models, and the export click is the easy part. The work that decides success happens after conversion, when you reopen the file in the destination application and audit what survived.
Table of Contents
- Choose the Right GLB to FBX Method
- Export GLB to FBX in Blender Step by Step
- Quick Conversions with Online Tools and Sculpty
- Keep Materials and Textures Intact
- Audit Animation and Fix Common Failures
- Pick Your Route and Test One File First
Choose the Right GLB to FBX Method
Pick the route by what you're converting, not by what's fastest to click.
| Method | Best for | Material fidelity | Animation handling | Effort |
|---|---|---|---|---|
| Blender manual export | Rigged characters and PBR scenes that need control | Good once channels are checked and reconnected | Kept when baked and tested in the target | Highest, but most control |
| Online converter | One static mesh or a quick preview | Often textures only; verify every channel | Frequently limited; verify clip count and duration | Lowest, minutes per file |
| Sculpty export | Assets created in Sculpty | Check every PBR channel in the target app | Confirm with a deforming pose in the target app | Low, from the gallery |
For most production work, Blender manual export is the only route that gives you control over scale, axes, bones, texture paths, and animation baking. Online tools are fine when a static prop only needs to open in a viewer. A Sculpty export suits assets made in Sculpty, but treat its output like any other conversion and verify it in the destination.
Why the Method Changes the Result
The Khronos glTF 2.0 specification identifies version 2.0.1 as dated October 11, 2021, and defines .glb as the file extension for Binary glTF. A GLB packages the scene description, geometry, materials, and referenced image data into one binary file. Standard glTF commonly distributes JSON, binary buffers, and textures separately.
That single-file packaging makes GLB strong for browsers, web viewers, and simple handoffs. FBX serves a different job. It's Autodesk's scene-exchange format for desktop and production pipelines that specifically ask for it.
Converting between them means mapping geometry, hierarchy, materials, textures, cameras, lights, rigs, and animation from one representation into another. Material nodes, texture paths, coordinate conventions, units, and animation tracks don't always reproduce identically. That's the reason the table matters. A route that hides those mappings may produce a file quickly, but it gives you no way to fix what changed.
If the asset has a rig, multiple clips, or PBR materials that must match in an engine, choose control over speed.
Your destination decides the route. A preview can tolerate a quick converter. A rigged character headed for Unity, Unreal, or Maya needs Blender and a proper audit.
Export GLB to FBX in Blender Step by Step
Use Blender when you need to inspect the scene before it becomes an FBX. These steps catch the problems that are cheap to fix before export and annoying afterward.
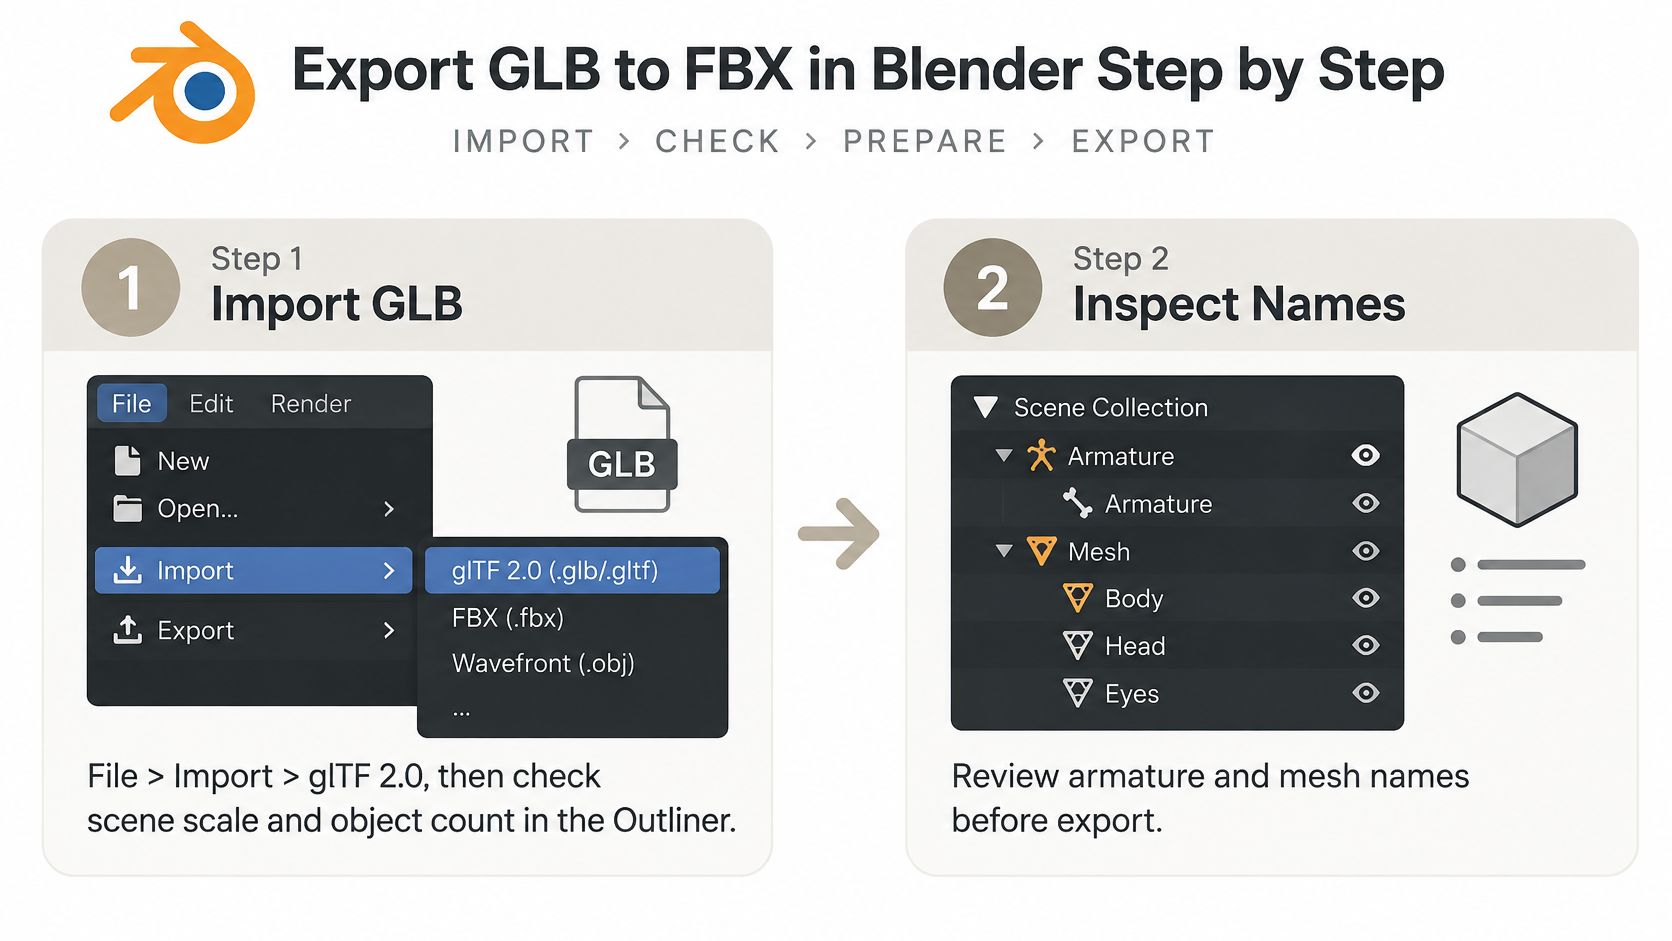
- Import the GLB. Use File, Import, glTF 2.0, then check scene scale and object count in the Outliner. If the model imports tiny, huge, or with unexpected empties, fix that now.
- Inspect armature and mesh names. Rename ambiguous bones, meshes, and actions before export. Clear names make retargeting and clip comparison far easier in the target.
- Apply transforms. Apply rotation and scale on objects and armatures so the export starts from rest. Skipping this step is a common cause of scale surprises and rotated characters.
- Open the FBX exporter. Use File, Export, FBX and set the options in the table below. Don't accept defaults blindly, especially for axes, scaling, and leaf bones.
- Bake animation for animated files. Bake the action so sampled keys carry over, then confirm the clip list. This helps when the target can't reproduce the source interpolation.
- Export into a dedicated folder. Use Copy path mode with a texture folder, or choose Embed Textures for a single portable file. Keep the original GLB beside it for comparison.
Settings That Prevent Rework
| Blender setting | Recommended value | Why it matters |
|---|---|---|
| Path Mode | Copy with texture folder, or Embed Textures | Keeps texture references working on another machine |
| Apply Scalings | FBX All | Prevents a model that imports tiny or huge in the target |
| Forward and Up | -Z Forward, Y Up for Unity-style imports | Stops axis flips that rotate characters on import |
| Apply Transform | On | Starts the target from a rest transform |
| Bake Animation | On, with sampled keys | Keeps motion when interpolation differs in the target |
| Add Leaf Bones | Off | Avoids extra bones that break retargeting |
Leaf bones deserve special attention. Blender can add end bones that the source rig never had. Those extra bones can confuse retargeting systems and change the hierarchy an animator expects.
Embedding textures also needs a clear decision. A single embedded file is easier to hand off. A copied texture folder is easier to inspect, reconnect, and replace. For production assets, I'd keep the folder during testing and embed only after the materials pass.
What a Clean Export Looks Like
Reopen the FBX before you call it done. You should see the same object count, the same bone hierarchy, and at least one readable material on every mesh. The character should stand at the expected size, face the expected direction, and deform without collapsing at the joints.
If any of those checks fail, return to the exporter setting that controls it. Don't patch a bad hierarchy by rotating objects inside the engine unless the whole team agrees to own that workaround.
Quick Conversions with Online Tools and Sculpty
Quick routes are useful only for a single static mesh, a preview, or a file that only needs to open in a viewer. Outside that zone they hide too much. A GLB carries more than geometry: a PBR material model, a node hierarchy, and possibly skins and clips, and a one-click converter has no obligation to tell you which of those it kept. Treat every quick result as a draft until it survives the same checks you'd run on a Blender export.
Where Online Converters Stop Being Safe
- No install and minutes per file. That's the whole appeal. You upload, convert, download, and inspect.
- Hidden settings. Axes, scale, leaf bones, action baking, and texture path mode get decided for you, usually invisibly.
- No loss report. Most tools won't say which material channels, bones, morph targets, or clips were dropped.
- Uploaded files. Check the size limit and file retention policy before sending client work or an unreleased character to a third-party server.
Materials fail first. A converter can write base colour correctly while flattening metallic, roughness, or normal data. Rigged assets lose more: bones arrive with altered hierarchies, or the clip doesn't come through at all. Because nothing reports the loss, the file opens, looks plausible in the viewer, and only breaks when a deformer runs or a metallic surface renders like plastic. Reopen every converted file in a clean project before you rely on it.
For assets created in Sculpty, check whether the gallery offers the FBX export you need, then run the same checks you'd apply to any converted file. Its converters cover GLB, glTF, STL, OBJ, and PLY variants rather than FBX for files from other tools, so that route doesn't meet an FBX requirement by itself; those files go through Blender. If you're comparing related interchange routes, the DAE to FBX conversion guide covers another format that often enters the same pipelines.
For Unity, Unreal, Maya, or any rigged character, neither quick route is enough on its own. Use the Blender workflow and audit the result.
Keep Materials and Textures Intact
A model can look textured and still have the wrong material. Start with the channel contract you expect the FBX to preserve.
| Channel | Colour space to set | Check in destination app |
|---|---|---|
| Base color | sRGB | Colours match the GLB preview in a clean project |
| Normal map | Non-color | Detail shows no inversion or flattening |
| Metallic | Non-color | Metal areas reflect the same as in the source |
| Roughness | Non-color | Gloss matches the source at key angles |
| Ambient occlusion | Non-color | Crevices stay darkened after export |
| Emissive | sRGB | Glowing areas keep their intended brightness |
| Alpha mode | Opaque, mask, or blend set per target material | Transparent edges render with the expected mode |
The Khronos glTF overview describes a core material model that is physically based, with structured scene elements including meshes, textures, skins, and animations. FBX behavior varies among consuming applications. An importer may rebuild the material as a node network, but that network isn't guaranteed to map one-to-one to the destination shader.
Set Colour Space by Data Type
Use sRGB for images that carry visible colour, mainly base colour and emissive. Use Non-color for data maps such as roughness, metallic, normal, and ambient occlusion. If you mark a roughness map as sRGB, the surface can become glossier or rougher than intended. If you mark base colour as Non-color, the model can look washed out or too dark.
Collect every referenced image from the GLB before export. Use relative, portable texture paths so the images travel with the FBX instead of pointing back to a folder on your machine.
For a deeper walkthrough of map roles and setup, use this PBR texture tutorial before you rebuild channels by guesswork.
Packaging Is Not Shading Fidelity
Embedding images improves portability. It doesn't prove that metallic, roughness, transparency, emissive, or occlusion reached the right shader inputs. You may still need to reconnect channels manually in Unity, Unreal, Maya, or 3ds Max.
Check tangent-space normals after triangulation. A changed vertex split or tangent basis can make shading look inverted or softened even when the normal map itself is correct. Rotate the model under a strong light and inspect seams, hard edges, and fine surface detail.
Practical rule: Judge materials in a clean destination project, never in the exporter's preview.
Compare the FBX beside the original GLB under similar lighting. Check colour, gloss, reflections, transparency, and emissive strength before you approve the conversion.
Audit Animation and Fix Common Failures
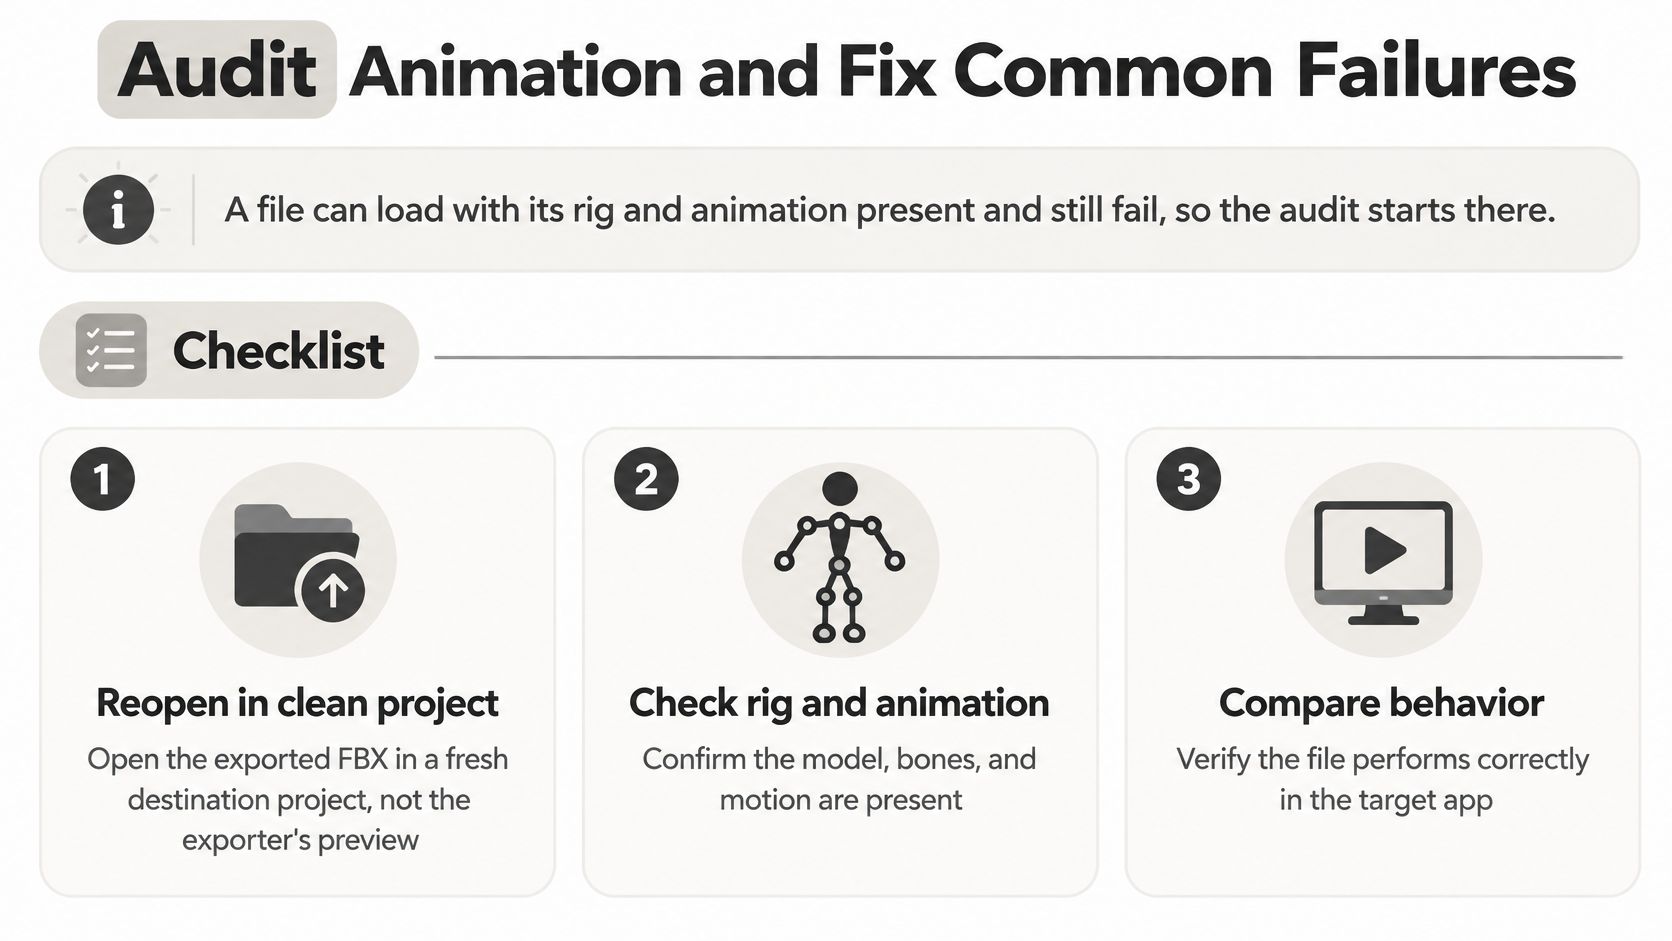
A file can load with its rig and animation present and still fail. That's the assumption most tutorials leave untested.
A GLB to FBX guide from Bake3D reports that a single idle animation became twelve animations during conversion. The file loaded, but the animation library was no longer usable as intended. Presence isn't preservation.
Run the Audit in a Clean Project
Reopen the exported FBX in a fresh project in the destination application. Don't judge it in Blender's preview or in a scene that already contains an older version of the same asset. Cached materials, existing skeletons, and previous import settings can hide failures.
Check these items in order:
- Scene scale. Measure the character or prop against a known reference in the target scene.
- Forward and up axes. Confirm the asset faces the direction the engine or DCC expects.
- Bind pose. Compare the rest pose against the GLB before playing any clip.
- Bone hierarchy and root bone. Look for added leaf bones, renamed bones, missing parents, or a different root.
- Animation count and names. The FBX should contain the clips you exported, not split fragments or duplicates.
- Duration, frame rate, and looping. Play each clip from start to finish and confirm it ends where the GLB ends.
- Constraints and root motion. Watch whether the root travels the same distance and whether feet slide, pop, or hover.
Test at least one deforming pose and one nondeforming frame. Scrub slowly through contact poses. A clip can look acceptable at full speed while shoulders collapse, elbows flip, or the root shifts on a single frame.
Audit by Asset Type
A static mesh needs scale, axis, material, UV, and normal checks. It doesn't need a long rig inspection.
A skinned character needs the full audit. Inspect skin weights around shoulders, hips, fingers, and facial bones if present. Put the character into an extreme pose from the source clip and compare silhouettes.
A multi-clip production needs a clip-by-clip comparison. Record the source count, names, durations, and looping behavior before export. Then compare the FBX list against that record. This catches split actions early.
Baking complicates the choice. Baked animation improves portability because sampled keys are easier for another application to reproduce. It can also destroy editable keyframe structure or create duplicate actions. Preserving motion and preserving an animator-friendly rig are different goals, so choose based on whether the next person needs playback or editing.
For the Blender side of building and refining character motion, this guide to animating a character in Blender is useful before you bake a final export.
Match the Symptom to the Fix
| Symptom | Likely cause | Fix |
|---|---|---|
| Grey or black model | Materials not reconnected in the target shader | Reconnect base colour and roughness, then recheck the channel list |
| Missing textures | External texture paths broken | Re-export with embedded textures or copy the texture folder |
| Model rotated or tiny | Axis or scale mismatch | Set Forward -Z, Up Y and apply scalings on export |
| Animation plays at the wrong speed | Frame rate assumed differently or keys not baked | Bake the action and check frame rate on import |
| One idle becomes several clips | Actions split during export | Merge, rename or delete duplicate actions |
| Character slides or pops | Rest pose or root motion changed | Compare rest pose and root bone against the GLB |
| Normals look inverted | Tangent basis changed after triangulation | Recalculate normals and recheck tangents |
Some fixes take minutes. Re-exporting with embedded textures, correct axes, or applied scaling is straightforward. Others take longer. Rebuilding shader nodes, cleaning duplicate actions, and repairing a changed rest pose can become real production work.
Don't batch convert a character library because the first file opened successfully. Opening only proves the importer didn't reject it.
Finish with one round-trip test. Convert a single representative character, import it into the destination, and compare it side by side with the GLB. Check one neutral frame, one extreme pose, root travel, and the end of every clip. Only then should you trust the settings on a batch.
Pick Your Route and Test One File First
Choose by situation, then prove the choice on one file.
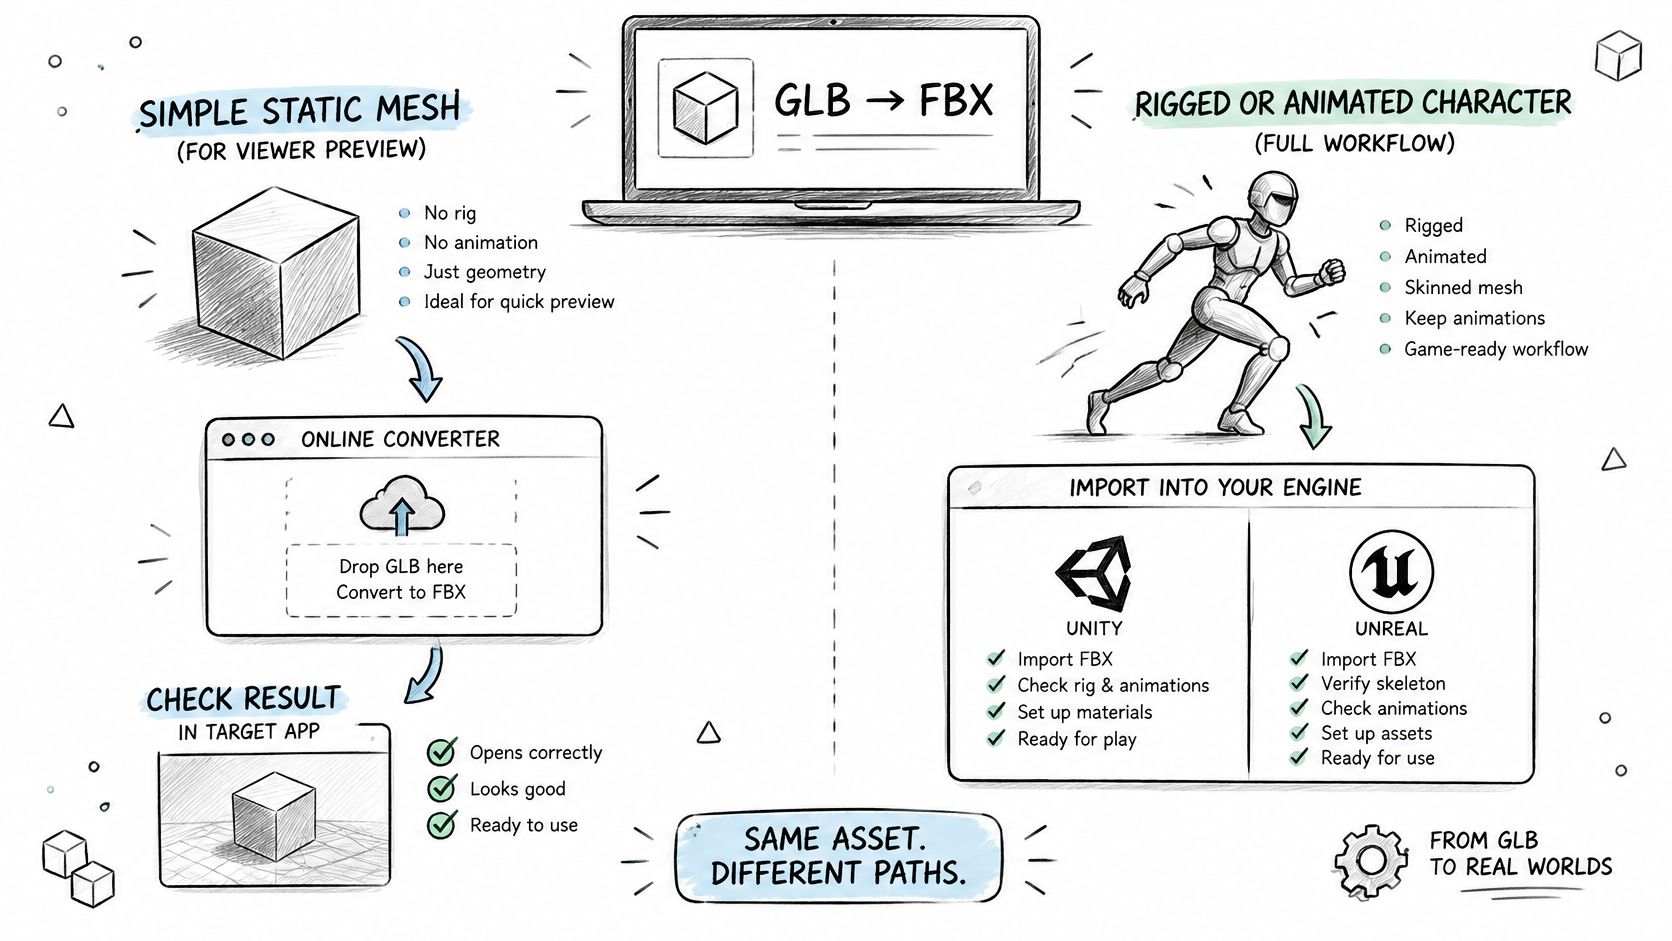
- Static mesh for a viewer or quick preview. An online converter is acceptable if the model opens at the right scale and the visible textures survive.
- Rigged or animated character for Unity, Unreal, or Maya. Use Blender, apply the settings table, run the material channel check, and complete the animation audit.
- Asset generated in Sculpty. Export it from the gallery if that option is available, then test it in the destination like any other FBX.
- Client handoff or game build. Don't ship it until one representative file passes in the actual destination application.
The Three-Step Test
- Convert one representative file. Pick an asset with the hardest combination of materials, bones, morph targets, and clips. A simple cube won't reveal pipeline problems.
- Run the material and animation checks. Confirm colour spaces, shader connections, bind pose, clip count, timing, looping, and root motion in a clean project.
- Compare it with the GLB side by side. Use the same viewer or matched lighting where possible. Look at the silhouette, surface response, deformation, and motion timing.
This short video shows the conversion flow in motion, which helps when you're deciding where to pause for inspection.
Write down the settings that passed. Record the exporter version, path mode, axis choices, scaling, bake settings, and target import options. That note becomes your batch preset and your first reference when a later file fails.
If the test fails on materials, return to the channel table and rebuild the destination shader inputs. If it fails on motion, return to the animation audit and inspect bind pose, actions, frame rate, and root movement. If it passes, batch the rest with the same settings and spot-check the first and last outputs.
I'd rather spend twenty minutes proving one conversion than discover a broken skeleton after a whole library has been processed. Test one file first. That's the difference between converting a format and delivering an asset.
Turn your next idea into a textured 3D asset in Sculpty, where you can generate from text or images, refine PBR materials, remesh the result, and export it for Blender, game engines, and other production tools. Start with one representative model, run the same material and animation checks from this guide, and build a repeatable conversion workflow from there.