
PBR Texture Tutorial: Make Physically Accurate Materials
You just signed off on a material that looks finished. The steel handrail catches a tight highlight, the painted wall stays matte, and the beauty render is the frame you sent in chat. Open the same GLB in Blender, or drop it on a Unity URP Lit material, and the handrail turns plastic-gray or mirror-bright. The wall picks up a greasy sheen that was never in the paint.
That break is almost never "the light." It is a metal mask that was never a real decision, a roughness map tagged as color, or a packed file whose channels do not match the shader that reads them. A PBR texture tutorial that stops at a pretty viewport shot will fail the handoff. The checks below are the ones that catch it before a client, a web viewer, or a game build does.
Table of Contents
- Channel Map Reference for Metallic-Roughness Textures
- Choosing Texture Size for Games and Print
- How to Generate a 4K PBR Texture in Sculpty
- Diagnosing AI Textures That Look Right but Render Wrong
- Pack, Export and Validate for Blender and Unity
Channel Map Reference for Metallic-Roughness Textures
Six maps carry a metallic-roughness material. Only two of them are color. The rest are control data, and treating them like pictures is how exports go wrong.
| Map | What It Controls | Color Space | Value Range | Packed Channel |
|---|---|---|---|---|
| Base color | Visible color with no lighting baked in | sRGB | 0.0-1.0 per channel | Not packed |
| Normal | Micro-surface direction for lighting detail | Linear | Encoded vector | Not packed |
| Metallic | Metal (1) or nonmetal (0) identity | Linear | 0.0-1.0 | Blue |
| Roughness | Sharpness of reflection, 0 mirror to 1 broad | Linear | 0.0-1.0 | Green |
| Ambient occlusion | Cavity shading in crevices | Linear | 0.0-1.0 | Red |
| Emissive | Light the surface gives off | sRGB | 0.0-1.0 per channel | Not packed |
Adobe's PBR guide treats base color, metallic, and roughness as the three primary maps. Roughness sits on a normalized scale from 0 to 1. A value of 0.0, solid black, is a smooth surface with strong reflection. Higher values scatter the highlight wider. Metallic uses the same 0 to 1 range: 0 is non-metal, 1 is metal, and real materials usually sit near one of those two extremes rather than in the middle.
Grayscale maps drive surface response. Base color stores the visible color and nothing else. Normal, emissive, and ambient occlusion sit beside those three in the glTF 2.0 core set. glTF 2.0 is what made this channel layout a portable contract, so the same numbers can leave one tool and still mean metal, roughness, and occlusion in another.
How to read the numbers
Calibrate roughness by highlight width, not by how dark the grayscale looks on its own. A brushed steel handrail is a fair starting point: metallic at 1, roughness in the lower-middle of the range so the highlight is a soft streak, not a mirror dot. A painted wall is the opposite: metallic at 0, roughness high, so the reflection is a broad, dull wash. Those roughness values are starting points. Wear, fingerprints, and orange peel move them. They do not change the metal decision.
Pack the scalar maps as ambient occlusion in red, roughness in green, metallic in blue. That is the glTF art-pipeline order. Base color, normal, and emissive stay in their own files. Emissive is color, so it stays sRGB. Everything in the packed file stays linear.
Classify every region as metal or dielectric before you paint detail. That one mask decides how base color, roughness, and the highlight are allowed to behave.
An intermediate metallic value should be a deliberate blend, such as a metal edge showing through thin paint, not a way to fake dirt. Dirt belongs in base color, roughness, and normal detail.
Choosing Texture Size for Games and Print
Resolution is a budget choice, not a quality badge. Match the map to the largest size the surface will occupy on screen, not to the biggest file the tool will write.
| Texture Size | Typical Use |
|---|---|
| 512 x 512 | Small props and distant objects |
| 2048 x 2048 | Mid-range props and characters in games |
Uncompressed RGBA is width times height times four bytes, and the mip chain adds about another third. Work that sum before you commit. A single 4096 map lands near 85 MiB before compression. A 2048 map lands near 21 MiB. That gap is why a hero prop seen at arm's length can justify 4K, and a background crate almost never can. The same arithmetic is why a 4K texture size decision should happen before you bake, not after the scene is already over budget.
Where the extra pixels stop paying off
A 4K set is not one file. Base color, normal, and the packed occlusion-roughness-metallic map each pay that cost. Ten hero props at 4K, three maps each, will blow a real-time memory budget even when every material looks correct. Background props, distant set dressing, and anything that never fills more than a small patch of the frame should stay at 512 or 1024. Mid-range characters and readable props usually live at 2048.
For a print or product-viz still, 4K can be worth it because the camera sits close and you are not paying a frame-time cost. For actual 3D printing, geometry and the slicer's color path matter more than these maps. Many print pipelines ignore PBR textures entirely. Check the slicer and the printer before you spend time on 4K color.
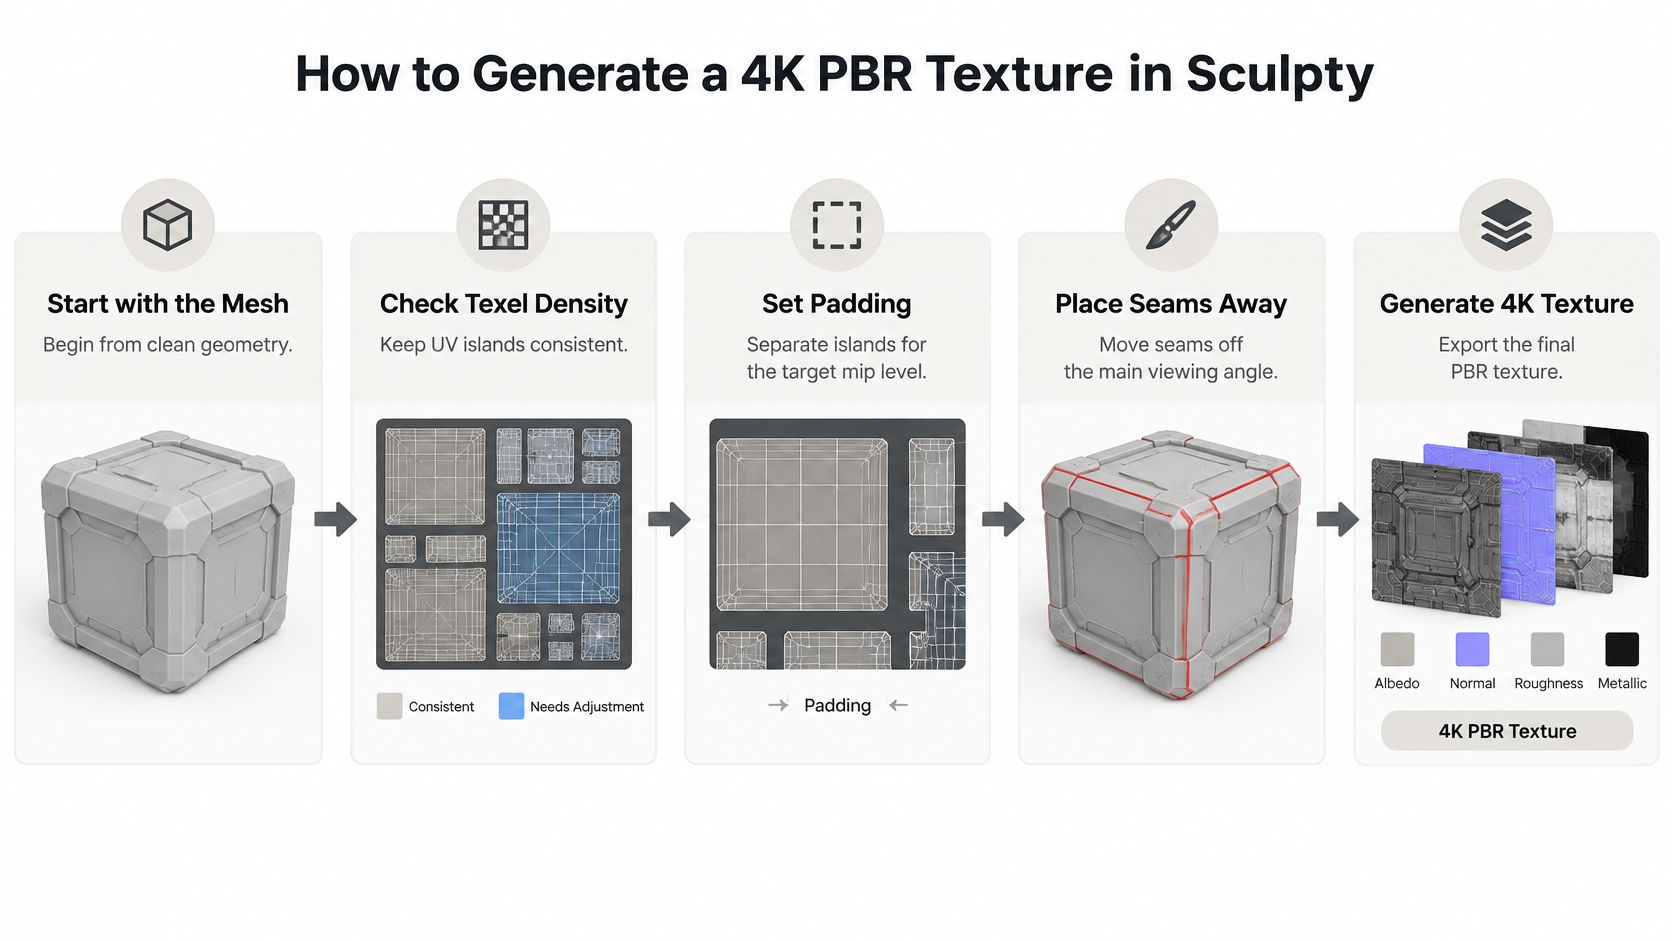
Set texel density first. Decide how many pixels cover a real-world centimeter on the hero surface, then size every island to that density. A huge map with stretched UVs still looks soft.
Bake at the target size. Downscaling a 4K bake to 1K blurs roughness edges and normal detail you already paid to author. Author at the size you will ship.
Pad islands for the largest mip you will sample. Tight UV packing looks efficient until the mip chain bleeds one island into the next and you get a dark seam in the distance.
Compress for the target. Desktop and console builds want block compression. A web viewer wants a format the browser can decode without a stall. Uncompressed size is the planning number. Shipped size is what the engine holds.
If you cannot name the largest on-screen size, you are not ready to pick a resolution.
How to Generate a 4K PBR Texture in Sculpty
Start with the mesh. A prompt cannot fix uneven texel density, islands with no padding, or a seam running down the face the camera sees. Check those three things, then generate.
The Khronos glTF art pipeline is the target this sequence is built for. Base color uses an sRGB transfer. Metallic and roughness stay linear, with metallic sampled from blue and roughness from green. Both factors live in 0.0 to 1.0. Occlusion shares that packed file in red, which cuts texture fetches. Normal stays linear and unpacks as its own map.
Sculpty is one place to run the generation step. It is a browser studio that can apply prompt-driven PBR materials at 4K and route a job to different text-to-3D engines when fidelity, speed, or topology matters more than the others. The checks below do not change if you paint the maps by hand instead.
Use a steel handrail with painted-over grime as the test. The steel is metal. The paint and the grime are not. If the grime changes the metal mask, the generation failed even when the preview looks dirty in a pleasing way.
Author, then inspect
- Name identity and wear apart. Write "brushed aluminum body, dark grime only in the seams," not "dirty metal." Grime described as a material change pushes metallic toward gray, and gray metal is the failure you will chase later.
- Set 4K and pick the engine for the job. Output resolution and the generator are separate choices. A fast mesh is the wrong pick when you need clean UVs for a close-up still.
- Look at base color under neutral light. No baked shading, no HDRI glow. If a cavity is dark in albedo, you have painted a shadow into color. Flat, even light makes that obvious.
- Read the metal mask as a binary. Every region should be near 0 or near 1. An ambiguous gray patch is not "a bit metallic." Regenerate or paint that region only, so the areas that already read correctly stay put.
- Build roughness in layers. Large-scale breakup first, then medium wear, then fine variation kept subtle. A single flat value looks synthetic. High-frequency speckle shimmers once the camera pulls back.
- Confirm the downloaded set. You want base color, normal, metallic, roughness, and ambient occlusion. Pack occlusion, roughness, and metallic only after each grayscale map is correct on its own.
The Khronos range makes the mask easy to test. Sample a few pixels. Steel should sit at 1. Paint and grime should sit at 0. Roughness should move across the bar, lower on brushed faces and higher where the paint is chalky.
A short look at the generation pass, before you trust the download:
Three mistakes show up constantly. People save roughness as an sRGB image, so mid-grays shift. They invert the normal's green channel for the wrong engine. They paint dirt by sliding metallic between 0 and 1. Dirt changes base color, roughness, and sometimes the normal. It does not change what the surface is made of.
A finished set is boring in the best way. Islands do not bleed, the main view has no obvious seam, base color has no baked spotlight, and roughness is not one flat number.
Diagnosing AI Textures That Look Right but Render Wrong
The preview lied. Under the generator's default light the metal looks convincing. Rotate the key, or load a neutral HDRI, and the highlight is the wrong width. The "steel" is just a dark dielectric. A second camera angle no longer matches the first.
A single beauty render cannot settle the material. Different metallic-roughness pairs can produce similarly plausible images, so recovery from one photo is an under-constrained problem. Inconsistent lighting and parameterization across generated maps can smooth out detail and make one view drift from the next. That drift often stays hidden until the mesh is written to glTF and opened in Blender or Unity.
A test that takes one sitting
Render the asset under at least three light directions plus one neutral HDRI. Compare at least two camera views. If a scratch exists in the front view and vanishes from the side, do not accept the map. If the highlight blows out only because exposure is high, fix exposure before you repaint roughness.
Export the same asset and open it beside the generator. Match the camera and a neutral light as closely as both apps allow. You are checking whether the material survived the file, not whether the preview was flattering.
Look at three things, in this order. Highlight width: if it stays stable across the three keys in the generator and then balloons or collapses after import, roughness did not travel cleanly. A mirrored look in Unity, or a suddenly flat look in Blender, is that failure. Metal versus dark paint: a region that reads as steel only under the generator's default light is usually a dielectric the beauty pass sold as metal. View agreement: geometry that is crisp from the hero camera and mush from the side was averaged across views. Reject that set before a client turntable goes out.
Pull lighting out of albedo by viewing base color with shading off, in the generator and again after import. A spotlight baked into the color will track the mesh when you rotate the key. It will not behave like a real light. Painted wood stays dielectric. Bare steel stays metal. Wear changes how rough a region is. It does not invent a new material between two cameras.
The same checks apply when you generate textures with AI and then have to defend the download in another renderer. A flattering default light is not a handoff.
| Symptom | Likely Cause | Fix |
|---|---|---|
| Highlight width matches the generator, then changes in Blender or Unity | Roughness that only looked right under the default light | Re-render three key directions on the imported file and correct roughness until the width agrees |
| "Steel" becomes dark plastic after import | Metallic left in a mid gray that the beauty pass hid | Push that region to metal or dielectric and compare both apps under the same HDRI |
| Scratch visible from the front, gone from the side | Generated detail smoothed toward an average across views | Do not accept the map; regenerate or paint only the view that dropped out |
| Surface stays lit from one side after you rotate the key | Shading baked into base color | View base color with shading off and paint the baked gradient out |
| Whole asset looks flatter in the DCC than in the preview | Exposure or light intensity differed between the two renders | Match exposure first, then judge roughness |
| One turntable shimmers, the other does not | High-frequency roughness or normal visible only at the generator's zoom | Inspect both apps at final screen size and soften only the noise that shimmers |
If the highlight changes shape across lights in a way the material should not, fix roughness before you touch color.
Work the table from the top when a region feels off and you cannot name why. Compare the generator and the imported glTF before you edit color. A wrong response to light will make a correct albedo look broken in the next tool anyway.
Pack, Export and Validate for Blender and Unity
A material can pass a beauty render and still fail the handoff. Blender, glTF, and Unity read packed channels differently, so validate the exported file in the target tools rather than trusting the source preview.
| Target | Channel Layout | Color Space | Common Mistake |
|---|---|---|---|
| glTF / GLB | Red occlusion, green roughness, blue metallic | Base color sRGB, packed map linear | Roughness read as a color image or channels reordered |
| Blender Principled BSDF | Separate roughness and metallic maps, or Separate Color node on a packed map | Data maps set to Non-Color | Leaving data maps tagged as sRGB |
| Unity URP Lit | Metallic in red, smoothness in alpha, the inverse of roughness | Linear for mask data | Plugging roughness straight in without inverting |
| Unity HDRP Mask Map | Red metallic, green occlusion, blue detail, alpha smoothness | Linear | Mixing up channel order with the glTF layout |
| Web 3D viewer | Same as glTF GLB | Check against the viewer's color settings | Judging the look without comparing it to the Blender render |
Khronos released glTF 2.0 on June 5, 2017, defining a compact PBR model intended to work across graphics APIs. glTF 1.0 relied on GLSL, which suited WebGL but limited portability to Direct3D and Metal. The glTF 2.0 material set includes base color, metallic, roughness, normal, emissive, ambient occlusion, and alpha coverage. Validate those values in the file, not just the appearance of a screenshot.
The same asset will not match pixel for pixel across Blender, a web viewer, and Unity. Color-space tags, channel order, tangent orientation, UV scale, exposure, tone mapping, and compression all affect the result. Physically based rendering does not promise identical pixels in every renderer. It gives you material values you can inspect and differences you can diagnose.
Validate before Unity ever sees the file
- Export the GLB. Treat it as the handoff contract. If its packed channels are wrong, every later import inherits the problem.
- Check each map's color-space tag. Base color is sRGB. The packed map and normal map are linear data. An sRGB tag on roughness alters its values, so a midrange value no longer behaves as expected.
- Open the GLB in Blender and a web viewer under the same environment. In Blender, use a Separate Color node to split the packed map, or use separate grayscale files. Set each data map to Non-Color. If a Blender metallic material still looks glossy, inspect the mask and channel connections before blaming the import.
- Match exposure and tone mapping before diagnosing a material. A brighter view transform can make a surface appear less rough even when its texture values are unchanged.
- Import to Unity after those checks agree. URP Lit expects metallic in red and smoothness in alpha, with smoothness inverted from roughness. HDRP uses a different mask layout: metallic, occlusion, detail, smoothness. Set up the channels for the selected pipeline rather than reusing the glTF map unchanged.
For example, roughness may look correct on a Principled BSDF while the URP material appears glassy. Check whether the green roughness channel was connected directly to smoothness. Invert it so a brushed bar keeps its streaked highlight instead of turning into a mirror line.
The packed GLB should hold up under different lights in both viewers, while staying within the file-size budget. A texture that works in only one renderer is not ready for handoff.
Use GLB for web delivery and Blender validation. Keep FBX or OBJ for cases where a downstream tool requires them. Compare the exported asset before sending it on: a client, a game build, or a print review should not be the first place the channels get read.
Generate a 4K PBR texture in Sculpty, export the GLB, and validate its packed channels in Blender and your target Unity pipeline before handoff.