
How to Convert STL to FBX Without Losing Scale

You drag an STL into Blender, export FBX, drop it into Unity, and the model either vanishes, fills the whole scene, or lands at a size that makes no sense. If you've ever lost an afternoon to that loop, the file conversion wasn't real problem. The unit assumption was.
That's the trap with STL to FBX. People treat it like a format swap. It isn't. It's a handoff between two very different kinds of 3D files, built for different jobs, with different expectations about scale, shading, and scene data.
I've seen this most often with printable meshes moving into game or viz workflows. The STL is fine in a slicer. Then it hits Blender, Unity, or Unreal and starts misbehaving because nobody stopped to decide what one unit is supposed to mean. Get that right first, and the rest becomes manageable. Skip it, and every fix after that is guesswork.
Table of Contents
- The STL to FBX Moment Most Artists Get Wrong
- Why STL and FBX Are Not the Same Kind of File
- Choosing the Right Tool for the Job
- A Clean Blender Workflow From STL to FBX
- Scale, Normals, UVs and the Other Silent Failures
- Game Engines and 3D Printers Two Different Endings
- When You Should Skip FBX Altogether
The STL to FBX Moment Most Artists Get Wrong
The mistake usually happens in the first minute.
You import the STL, see the mesh in the viewport, assume the software understands the file's real-world size, and keep going. Then the export lands in Unity or another DCC at the wrong scale because STL is unitless and FBX expects a defined unit system in the target app. Practical STL-to-FBX guidance consistently calls this out as a core pitfall, especially in Blender, Unity, and Unreal pipelines where bad unit mapping creates microscopic or massive imports (Tripo3D STL to FBX workflow).
Start with units, not cleanup
If the STL came from CAD, it may have been authored in millimeters. If it came from a hobby download, it might reflect inches, millimeters, or arbitrary values with no metadata at all. STL stores raw geometry, not the context that tells the next tool how large the part is supposed to be.
The fix is boring, but it works:
- Identify the source unit before import.
- Set Blender's scene unit to match your target workflow.
- Scale on import or immediately after import before you start editing.
- Apply scale before exporting FBX.
Practical rule: If you haven't confirmed source units, you are not ready to convert STL to FBX.
The contract for the rest of the pipeline
Every good STL to FBX workflow starts with a deliberate scale decision. Not a guess. Not “it looked right in the viewport.” A decision.
That matters because once you start decimating, UV unwrapping, fixing normals, or assigning materials, you're building on top of that scale. If it's wrong, every later step becomes cleanup on top of cleanup.
Why STL and FBX Are Not the Same Kind of File
The mistake here is treating STL to FBX like a format swap between equals. It is not. It is a handoff from a manufacturing mesh into a scene format, and that difference decides how much cleanup you inherit.
STL came out of the 3D printing and rapid prototyping world. The Library of Congress traces the documented format to 3D Systems' StereoLithography Interface Specification and notes how firmly it took hold in print-focused workflows (Library of Congress STL format description). That legacy still shows up today. CAD exports, scans, and printer-ready downloads often arrive as STL because the job is to describe shape accurately enough to fabricate it.
FBX came from content creation and interchange between DCC tools. Its history runs through Kaydara and later Autodesk, which is part of why it became common in animation, scene transfer, and engine pipelines (FBX format history on Wikipedia).
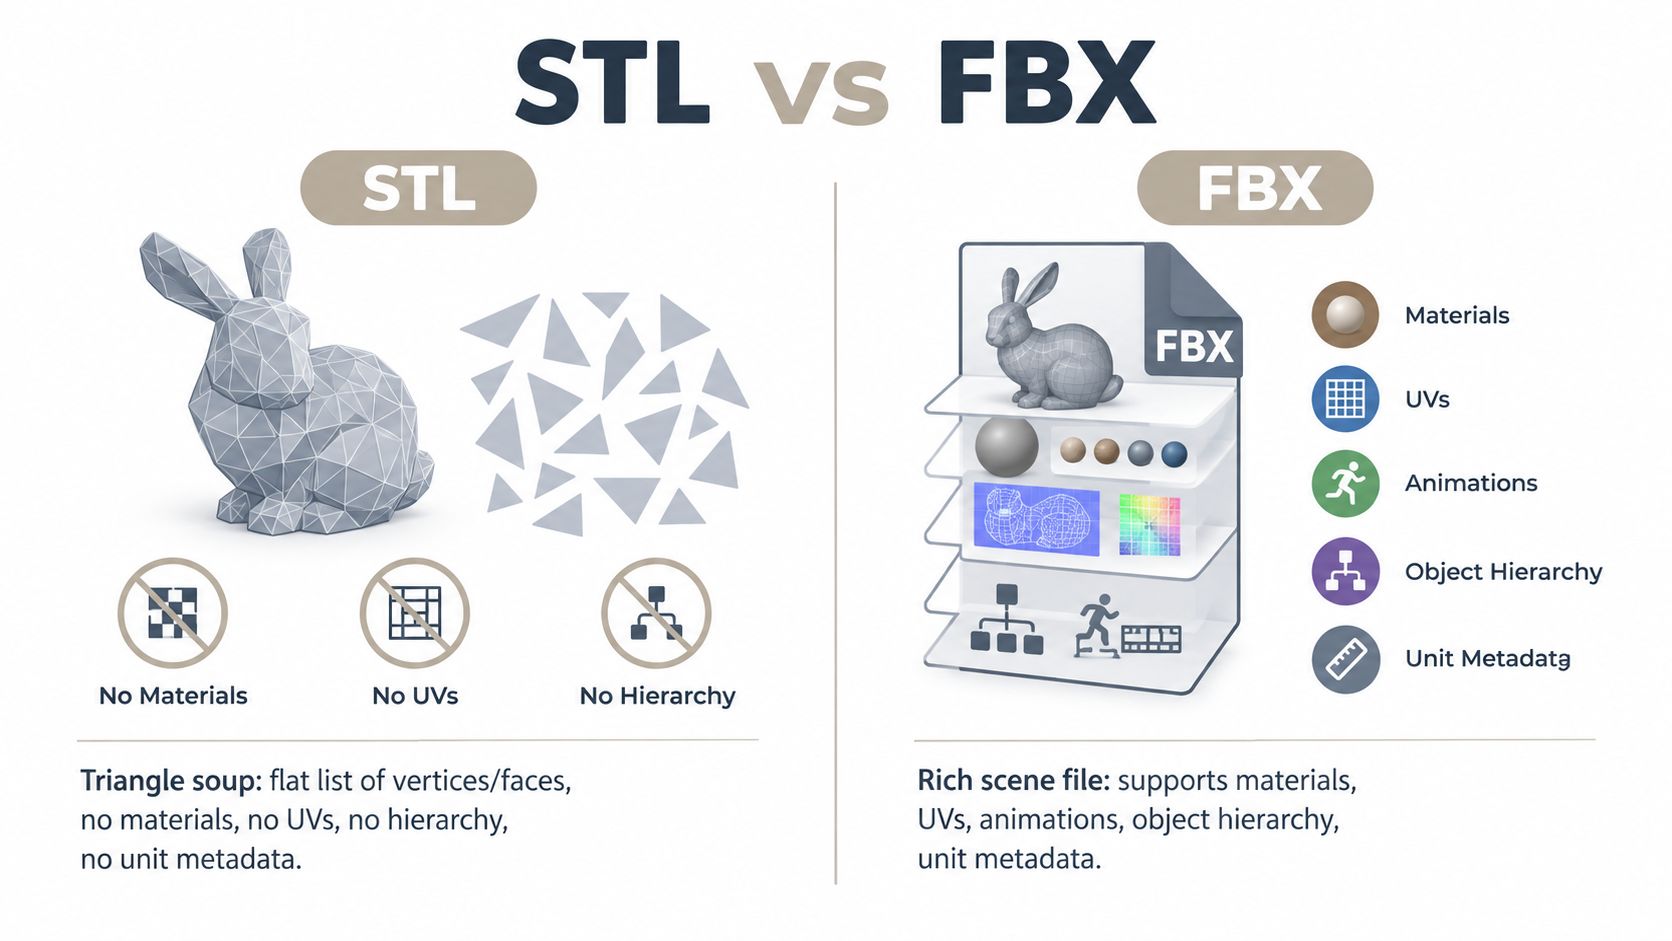
STL is geometry. FBX is asset structure.
That distinction matters more than the file extension.
An STL usually gives you a triangulated surface with no real production context attached. No UVs. No material assignments you can trust. No object hierarchy. No rig. No animation. In practice, it is often closer to a watertight shell for printing than a reusable game or visualization asset.
FBX can carry mesh data, transforms, object names, material slots, cameras, animation, and scene organization. So converting STL to FBX does not upgrade the asset by itself. It only places the same geometry into a container that can hold more information after you add it.
That is why conversion is sometimes the wrong move. If the target is a printer, keep the STL or switch to 3MF. If the target is a web viewer, GLB may save time because it packages mesh, materials, and textures cleanly once the asset is prepared for rendering. If the mesh is a rough scan or ugly CAD tessellation, remeshing before export usually matters more than the export format.
What actually survives the trip
The part that survives reliably is the surface mesh. What does not survive is the data STL never had in the first place. As noted earlier, STL-to-FBX conversion preserves geometry, but asset structure still has to be built after import.
That is the decision point many guides skip. If you only need the model to open in Unity, FBX is fine. If you need clean shading, usable UVs, sensible object naming, or animation later, plan for rebuild work. Conversion is packaging, not restoration.
For a broader comparison of where these formats fit, Sculpty's guide to 3D file formats is a useful reference. If your work overlaps with product visualization or niche manufacturing pipelines, this roundup of 3D graphics file formats for mattresses is a good example of how the destination often dictates the format more than the model does.
Choosing the Right Tool for the Job
You get an STL from a client, run it through the first web converter you find, drop the FBX into Unity, and lose the next hour to a part that imports at the wrong size, faces the wrong way, and shades like crumpled foil. That is the point where tool choice stops being a convenience issue.
Start with the destination and the unit system. If the end goal is a game asset, you need control over orientation, normals, and usually UV-ready topology. If the end goal is another print workflow, converting to FBX may add work without solving anything. In a lot of cases, the right move is remeshing first, or skipping FBX and exporting GLB once the asset is render-ready.
What each tool is actually good at
| Tool | Best For | Limitation |
|---|---|---|
| Blender | Editable STL to FBX conversion, transform fixes, normals repair, decimation | Manual workflow, easy to export bad axes or unapplied scale |
| Sculpty | Browser-based format conversion, remeshing, retopology, export into multiple downstream formats | You still need to choose the right target format and know the intended units |
| Autodesk scan tools | Cleanup and alignment for scan-heavy assets | Too much setup for a clean mechanical or printable mesh |
| Lightweight web converters | Fast one-off previews | Weak control over normals, scale, orientation, and heavy files |
Blender stays in the middle of this pipeline for a reason. It opens STL cleanly, exposes the ugly parts fast, and gives you enough control to fix the mesh before export instead of discovering problems later in engine. If I expect to touch transforms, split hard edges, clean normals, or reduce density, I go straight to Blender.
Sculpty makes more sense when the file problem is broader than format conversion. If the STL needs remeshing, retopology, or a quick branch into GLB, USDZ, or 3MF, a browser workflow can save time before you commit to manual cleanup. Its guide on how to convert 3D files across common formats is a useful reference if you are comparing that route against desktop tools.
When online converters are fine
Online converters are fine for one narrow job. Check whether a mesh opens, whether the geometry survives, and whether the file is worth bringing into a real tool.
They are a bad fit when you need:
- Predictable scale between Blender, Unity, and print dimensions
- Normals cleanup before export
- Mesh reduction on dense scans or CAD tessellation
- Repeatable axis settings for engine import
- Any inspection step before you hand the file to someone else
The common failure here is treating STL-to-FBX as a button instead of a decision. If the STL is dense, messy, or unit-ambiguous, a converter can produce an FBX that is technically valid and still useless in production.
Choose based on failure risk, not convenience
A lot of conversion trouble starts as a mesh problem or a units problem. Browser tools also tend to expose that quickly through upload limits and failed conversions, especially with scan-heavy files, as noted earlier in the Dorchester 3D converter discussion.
If the file is huge, reduce or rebuild the mesh before worrying about FBX. If the file is already clean and the target is Unity or another DCC handoff, Blender is usually the fastest reliable route. If the target is web presentation, GLB may be the better final format. If the target is a printer, keeping the STL or moving to 3MF often makes more sense than forcing FBX into the middle.
A Clean Blender Workflow From STL to FBX
You import an STL, it looks fine in the viewport, and an hour later Unity brings it in 100 times too small with broken shading. That usually starts in Blender, not in the export dialog.
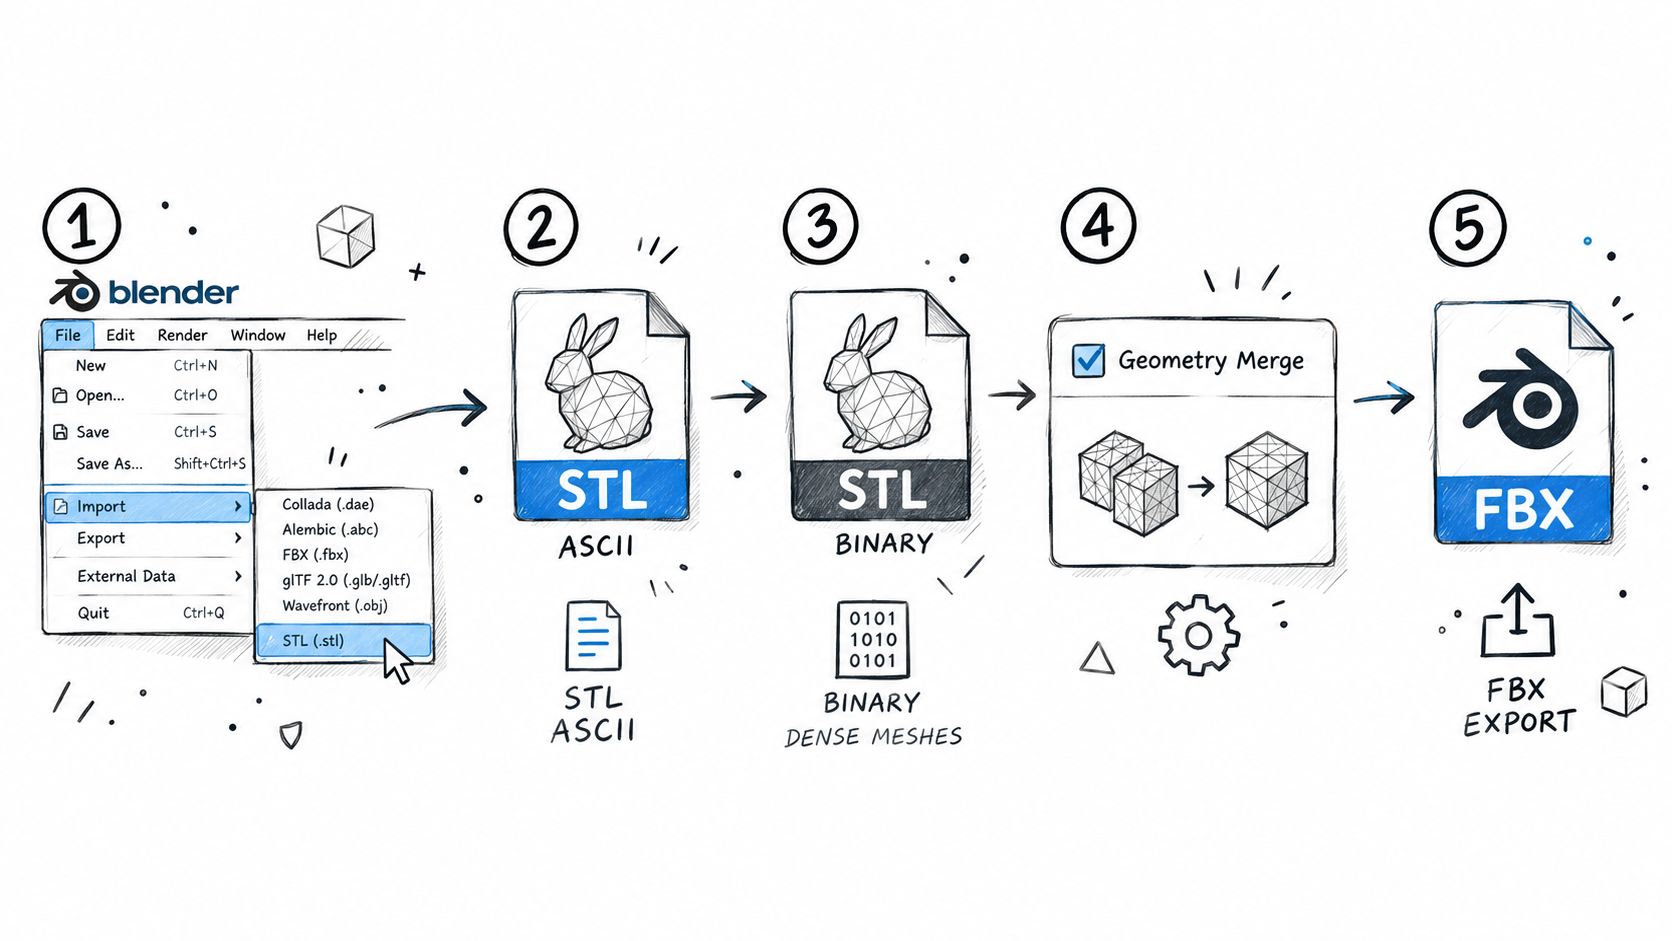
I treat STL to FBX as a checkpoint. Before touching cleanup tools, decide whether FBX is the destination you need. If the model is going to a game engine, animation tool, or another DCC, Blender is a solid middle step. If the goal is print, staying in STL or moving to 3MF usually saves time. If the goal is web, GLB may be the cleaner finish.
Step 1 import the STL and inspect it before editing
Use File > Import > STL. Then stop and inspect the mesh in Edit Mode.
Look for duplicate verts, non-manifold edges, loose islands, flipped faces, and obvious scan noise. Hard-surface print parts often survive this step well. Scans and CAD tessellation often do not. If the silhouette is lumpy or the edge flow is shredded, conversion is not the job yet. Mesh repair or remeshing is.
Step 2 set units first, then confirm object size
Open Scene Properties and set units to match the target workflow. This is the scale trap that burns time later.
If the source came from print, check real dimensions immediately. If a part should be 120 mm wide, verify that in Blender before you clean, unwrap, or export anything. Then apply object scale so the Transform panel reads clean values. In practice, I want scale at 1, 1, 1 before export because hidden scale is one of the easiest ways to get a bad FBX out of a good scene.
Step 3 clean only what the destination actually needs
STL imports usually arrive as triangulated meshes. That is not automatically a problem. Static props can ship that way just fine. The trouble starts when you need deformation, easier UV work, cleaner shading control, or lighter geometry for runtime.
If the mesh is too dense, simplify it before export. Decimate for straightforward reduction. Remesh if the topology is chaotic and you need a more usable surface. For a practical breakdown of those choices, this guide on simplifying a mesh in Blender is a useful reference.
If your downstream goal is stylized animation or blocky game assets, it also helps to study pipelines outside strict CAD-to-engine work. A good example is this revid.ai Minecraft animation guide, which shows how much asset readability depends on clean forms and intentional structure, not just file compatibility.
Step 4 export FBX with predictable settings
Use File > Export > FBX and keep the export boring on purpose:
- Export selected objects only
- Set scale to 1.0
- Apply scalings with intent, not by habit
- Set forward and up axes for the target app
- Save the .blend beside the FBX so you are not forced to restart from the STL later
A quick visual walkthrough helps if you want to compare Blender panels while doing it:
Step 5 reimport the FBX and verify the handoff
Open the FBX in a clean Blender scene or in the destination app before sending it on. Different FBX importers handle axes, smoothing, and transforms a little differently, so the check is worth the minute it takes.
This catches the expensive mistakes while they are still cheap. If the reimport is wrong, go back to units, transforms, or mesh cleanup first. Do not keep exporting the same broken scene and hope the next checkbox fixes it.
Scale, Normals, UVs and the Other Silent Failures
Most bad STL to FBX jobs don't fail loudly. They fail, then waste your time later.
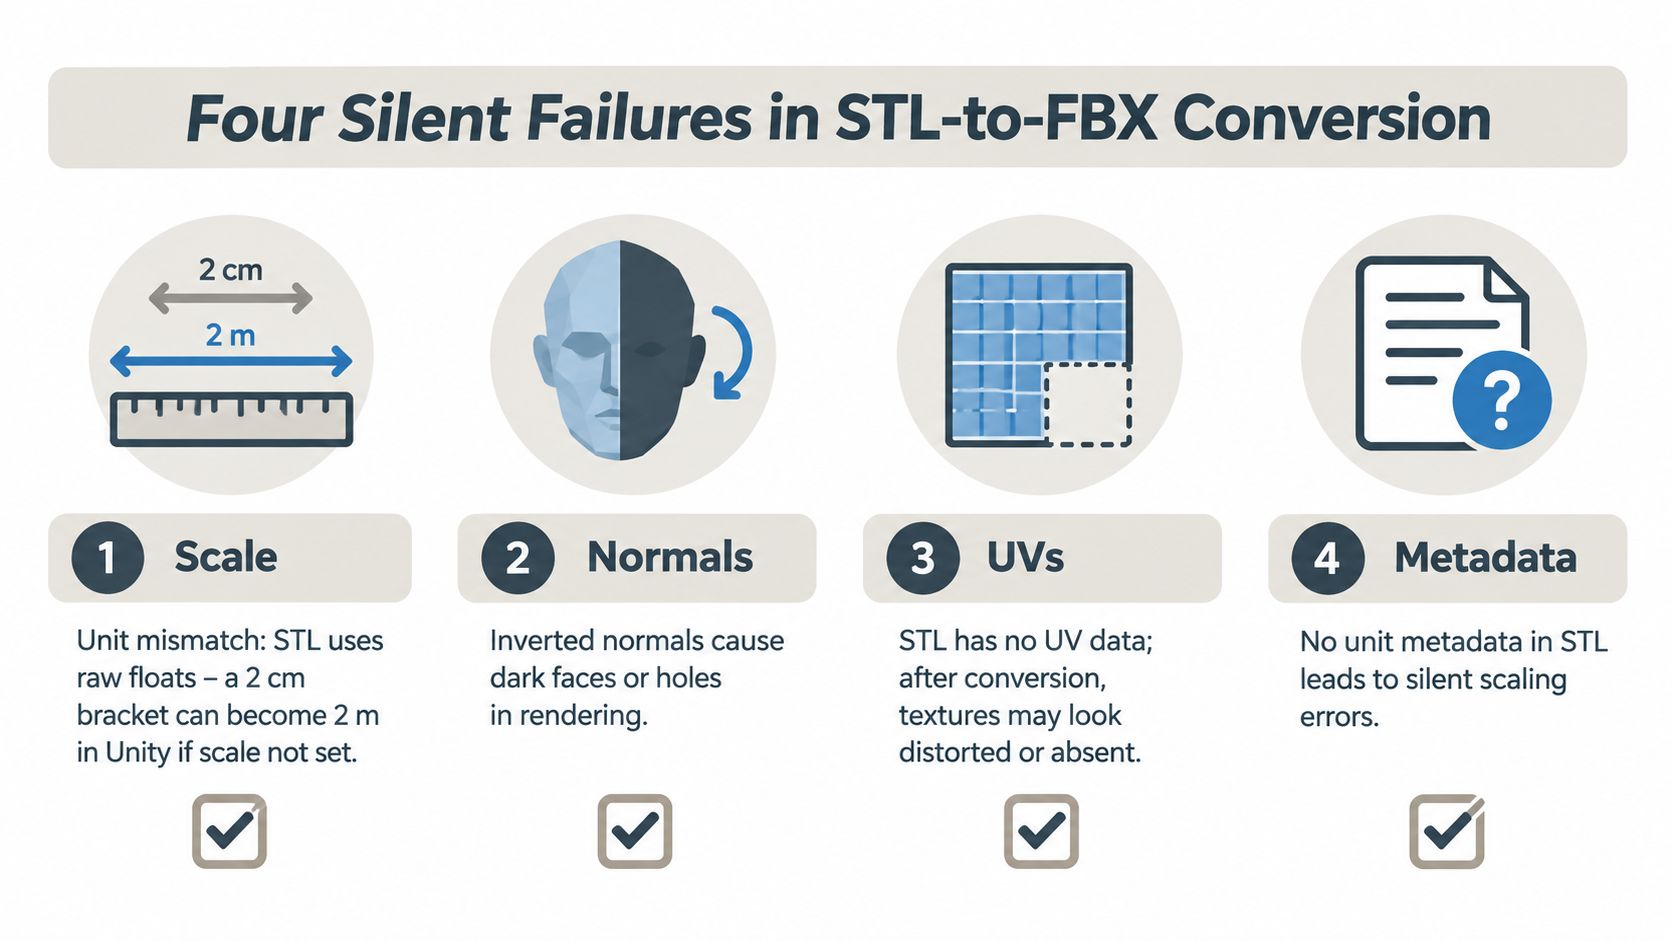
The four things to check every time
Scale
If the object looks right but imports wrong downstream, the transform probably wasn't resolved before export. Apply scale in Blender, then verify the exported object lands with neutral transforms in the target app.Normals
Faceted or inside-out shading is common because STL often lacks the smoothing data artists expect in DCC workflows. A recalculated normal pass and a shading check in Blender usually catch this before Unity or Unreal makes it obvious.UVs
STL has no UVs. If you export an FBX and expect textures to work, they won't until you unwrap the mesh. Even a basic Smart UV pass is better than pretending the format conversion handled it.File weight
Dense meshes produce heavy FBX exports because the destination format carries richer scene structures on top of the geometry. If a scan feels sluggish in Blender, it won't magically become engine-friendly after export.
The symptom-cause-fix rhythm
A good habit is to debug by symptom:
| Symptom | Likely Cause | Fix |
|---|---|---|
| Model imports tiny or huge | Unit mismatch or unapplied scale | Set scene units, scale deliberately, apply scale |
| Mesh looks faceted or dark | Broken or flat normals | Recalculate normals, test smooth shading |
| Textures render wrong or not at all | No UVs in source STL | Create UVs before FBX export |
| FBX is painful to open downstream | Scan density too high | Decimate or remesh before export |
A conversion that preserves bad topology is still a bad asset.
That's the part many guides skip. The file may convert correctly and still be wrong for the job.
Game Engines and 3D Printers Two Different Endings
The same source mesh can end in two completely different places, and the handoff standards are not the same.
A Unity-ready asset needs predictable transforms, sensible materials, and behavior that makes sense in a scene. A print-ready asset needs clean walls, expected dimensions, and slicer-friendly geometry.
Two finish lines for one mesh
| Step | Unity Game Asset | 3D Printer (Bambu / Prusa) |
|---|---|---|
| Import target | Bring FBX into Unity project | Bring STL or checked FBX into slicer |
| Scale check | Confirm scene size and import scale | Confirm bounding box reads expected print dimensions |
| Surface setup | Assign engine-ready material and inspect shading | Inspect shell quality and wall behavior |
| Orientation | Rotate for gameplay or prefab use | Auto-orient for support and bed contact |
| Validation | Test in scene and prefab workflow | Slice and inspect preview before printing |
What each path actually cares about
Unity doesn't care whether the mesh started life as a printable part. It cares whether the asset behaves like a sane scene object.
Bambu Studio and PrusaSlicer don't care about your material slots or hierarchy. They care whether the model is manifold, oriented well, and sized correctly for the printer bed.
Bench check: If your final destination is the printer, don't spend time polishing FBX metadata that the slicer will ignore.
If your project eventually moves beyond hobby output and into production manufacturing, it also helps to look at how service providers define a factory-ready 3D printing handoff. The useful lesson there is that clean geometry and correct dimensions beat fancy interchange every time.
When You Should Skip FBX Altogether
You import an STL, hit export to FBX, bring it into the next app, and lose an hour chasing problems that conversion never solved. The mesh is still triangulated. The scale is still off. The printer would have accepted the original STL, and the web viewer would have been happier with GLB.
That is the STL-to-FBX moment a lot of artists misread. FBX is useful when the next stop expects scene data, materials, or a standard DCC-to-engine handoff. It is a poor default when the problem is units, topology, or target format.
Before exporting anything, answer one question first: what is the actual destination?
Cases where FBX adds work instead of value
Print-only workflow
If the file is going straight into Bambu Studio, PrusaSlicer, or Cura, FBX usually buys you nothing. Slicers care about closed geometry, wall thickness, orientation, and physical size. They do not care about hierarchy, animation support, or scene metadata.
For color printing or richer manufacturing handoff, 3MF is often the better branch. It keeps the job closer to print reality instead of pushing the mesh through a scene format that the slicer barely uses.
Web, AR, or lightweight viewers
If the endpoint is a browser viewer, AR preview, or a small real-time app, GLB or USDZ is often the cleaner choice. Those formats are built for delivery. FBX often becomes an extra hop where you still have to fix normals, UVs, and materials afterward.
I use FBX for engine pipelines. I do not use it as a reflex.
Dirty scan or heavy STL
Dense scan data is where bad decisions get expensive. If the STL is full of tiny triangles, self-intersections, or ugly shading, converting it to FBX just preserves the mess in a different wrapper. The right move is usually to decimate, remesh, or retopo first.
Browser converters make this obvious fast. Big raw meshes hit file size ceilings, stall in the tab, or export something technically valid but miserable to edit later.
A faster decision filter
Use this in your project notes before you export:
- Check the target app first
- Confirm the unit system before touching scale
- Keep STL if the endpoint is print-only
- Use GLB or USDZ for web and AR delivery
- Remesh first if the STL is dense or scan-derived
- Export FBX only when the next tool wants FBX
- Keep the .blend so you can revise the cleaned mesh instead of repeating import work
That unit check belongs at the top for a reason. A lot of "FBX problems" are really millimeters versus meters, plus unapplied transforms. Fix that first and half the pipeline drama disappears.
What works better in practice
FBX still makes sense for Blender to Unity, Blender to Unreal, and mixed DCC handoff where scene structure matters. Use it there and use it on purpose.
Skip it when the STL still needs surgery, when the destination is a slicer, or when the final deliverable is better served by GLB, USDZ, or 3MF. Conversion is not progress by itself. If the mesh is bad, convert later.
If your STL to FBX job is really a topology or handoff problem, Sculpty gives you a browser-based way to convert formats, remesh dense meshes, and export into targets like FBX, GLB, USDZ, and 3MF without bouncing between a pile of separate tools. If that sounds closer to the problem you're solving, take a look at Sculpty.