
How to Convert 3D Files Without Losing Quality
You export a model from Blender, open it in a game engine, and discover that the textures are gone. Or you send an STL to the slicer and find a hollow section, flipped faces, or a scale that makes the part unusably small. The file opens, so the conversion looks successful, but the asset no longer behaves like the original.
To convert 3D files reliably, treat the job as a fidelity problem rather than an extension change. Geometry, UVs, materials, scale, orientation, animation, scene relationships, and watertightness all need separate checks. The workflow below focuses on what survives a conversion, what commonly disappears, and how to catch the damage before a client review, engine import, or print.
Table of Contents
- Why Converting 3D Files Goes Wrong More Often Than You Expect
- Understanding Common 3D Formats Before You Convert
- How to Convert 3D Files While Preserving Quality
- Converting 3D Files Quickly With Sculpty Tools
- Troubleshooting Common Conversion Issues and Fixes
- Your Next Conversion Done Right
Why Converting 3D Files Goes Wrong More Often Than You Expect
A conversion can appear successful because the destination file opens, even though information has already disappeared. An OBJ might retain the visible mesh while relying on a missing MTL file or external textures. An STL can preserve printable triangles while dropping the scene information needed for materials or editing. CAD exports may keep the outer shell but lose the parameters and constraints that made the model adjustable.
The format is only one source of risk. Software often implements part of a format's specification, so unsupported data may be ignored without an error message. With more than 140 3D file formats, many proprietary or complex, the same extension can behave differently across applications (National Archives format guidance).
A model can open and still fail its handoff
A textured GLB converted to OBJ may look acceptable at first glance, yet the receiving application can miss the MTL reference or fail to locate the image files. A game asset moved from FBX to a web-oriented format may display its mesh while losing animation clips or object relationships. These failures often surface only at the next stage, during engine import, review, or printing.
The practical test is whether the converted asset performs its intended job. Viewport approval is only an initial check. Compare the output against the source using the same sample assets, application versions, export settings, and inspection steps each time. A repeatable benchmark shows whether a format change is safe for a particular pipeline, rather than relying on a single successful preview.
Keep the destination tool in mind before choosing an extension. Mesh, scene, CAD, and print formats carry different kinds of information, and a format suited to browser delivery may be a poor choice for editable engineering data. A slicer-ready file also serves a different purpose from a material-rich game asset.
For confidential files or conversions that need controlled dependencies and export settings, use a local application. A browser converter suits routine interchange and quick checks when the result can be previewed before download. In either case, preserve the original, convert a test asset first, and record the settings that produced an acceptable handoff. That record turns a silent failure into a problem you can reproduce and correct.
Understanding Common 3D Formats Before You Convert
A model can look correct in a viewport and still fail at handoff. The receiving application may read the mesh but miss UVs, materials, animation, scale, or CAD structure. Choose the format based on what the next tool must preserve, not on the extension you recognize.
The web-native glTF format was publicly released as glTF 1.0 on 19 October 2015, after Khronos began work in 2012 and demonstrated an earlier version at SIGGRAPH 2012 (Khronos glTF overview). It targets efficient transmission of 3D scenes and models. GLB, its binary form, suits web viewers and compact asset delivery, provided the target viewer supports the materials, textures, and animation data you export.
OBJ, introduced by Wavefront Technologies around 1990, remains widely supported. STEP grew from work in the mid-1980s, received its ISO basis in 1988, and first came into use in 1994 (NIST 3D printing file-format study). Their age explains their compatibility, not their ability to carry every modern scene feature.
Match the format to the handoff
| Format | Best For | Preserves Materials and Textures | Preserves Animation |
|---|---|---|---|
| GLB/glTF | Web viewers, realtime delivery, compact scene exchange | Usually, when materials and maps are supported and packaged correctly | Yes, when the exporter and importer support the animation data |
| OBJ | Simple geometry editing and broad compatibility | Partially, through MTL files and external textures | No |
| STL | 3D printing and triangle-based geometry transfer | No, it is primarily geometry-only | No |
| FBX | Animation, rigged assets, and many game-engine workflows | Often, depending on exporter and texture handling | Yes, when supported by the conversion path |
| USDZ | AR delivery in supported Apple workflows | Can, but verify materials and maps in the target viewer | Depends on the asset and application |
STL still dominates many printing workflows. The cited study recorded 4,592,742 STL occurrences, compared with 44,920 for STEP and 14,823 for 3MF, showing how established formats influence practical choices. Use STL when the slicer needs a straightforward triangle mesh. Use 3MF when the receiving workflow supports richer print-project information.
For a wider comparison of capabilities and limitations, review this guide to 3D file formats. The working rule is direct: GLB for portable realtime scenes, OBJ for basic mesh interchange, FBX for animation-heavy pipelines, STEP for CAD structure, and STL or 3MF for printing. Confirm support for UVs, materials, scale, animation, and watertight geometry in the destination application before converting.
How to Convert 3D Files While Preserving Quality
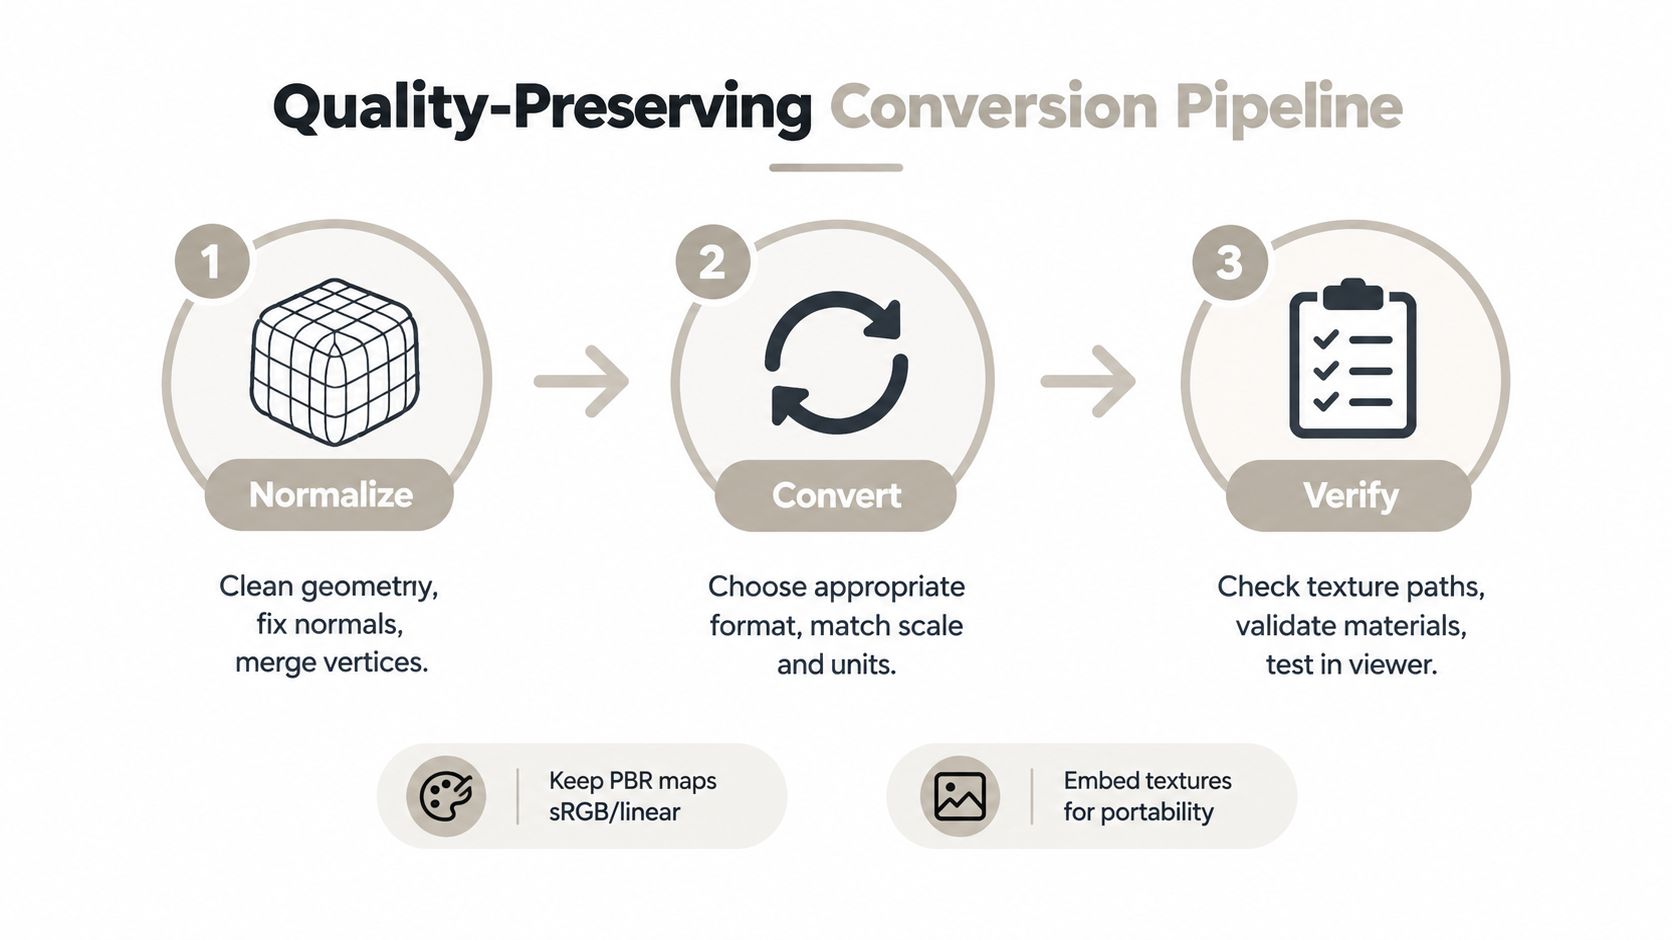
A conversion can finish without an error and still lose the details you need. Materials may detach from their maps, UVs may shift, scale may change, and a mesh that looked solid may contain holes. Treat the job as a quality-assurance pipeline, not a single export click. The 3D format benchmarking project compares conversion time, memory use, polygon and vertex counts, UV sizes, compression ratios, and data loss after round-tripping. Use those checks in Blender, MeshLab, a CAD package, or a browser tool.
Normalize the source before export
Work from a duplicate of the original asset. Apply or document transforms, remove hidden objects that should not be exported, merge accidental duplicates, and decide which modifiers belong in the final mesh. Recalculate face normals, locate non-manifold regions, and verify that the visible geometry is the geometry you intend to deliver.
Give materials a separate inspection. Confirm the active UV set and every connected map. Check whether image paths are relative, absolute, or embedded. Formats that use companion files need a complete package. For an OBJ, place the mesh, MTL, and image maps together in a ZIP instead of sending the OBJ by itself.
Record the source state before conversion: object count, approximate polygon and vertex counts, dimensions, units, active UV sets, material names, and animation clips. These values provide a practical baseline for the exported file.
Convert for a defined destination
Set export options for the receiving application, not for the source application's defaults. With GLB, decide whether textures are embedded and verify that the target viewer supports the material features in use. With OBJ, keep the MTL and texture paths together. With STL, judge the result as triangle geometry. Materials are not part of the format, so focus on a clean mesh with correct scale.
A GLB-to-OBJ handoff can suit direct mesh editing, although the material setup may need rebuilding. FBX-to-GLB can create a compact web asset, while animation, rigs, and unsupported scene features require a test in the target viewer. STL-to-3MF may suit a printing workflow, but the slicer still needs checks for units, orientation, and object separation.
Key takeaway: Convert toward the next task. The shortest format name and the easiest export button do not determine fidelity.
Verify the round trip
Open the result in an independent viewer or the actual destination application. Compare the silhouette from several angles, inspect the UV layout, and check each material slot. Look for invisible meshes, dark faces, missing maps, changed transparency, and objects that shifted relative to one another.
Compare measurable properties as well. Polygon and vertex counts can change for valid reasons, but every unexpected change needs an explanation. Check dimensions and scale, confirm the up axis, inspect the object hierarchy, and scrub animation where it matters.
For print assets, run watertightness and non-manifold checks before slicing. Research on watertight conversion identifies watertight conversion as a persistent failure point, with reported improvements from 60% to 80% success in one pipeline and a 20 percentage-point absolute improvement on the Objaverse dataset. Repair topology before export, then validate the exported mesh. A source that appears solid in the viewport does not prove that the converted file remains printable.
Converting 3D Files Quickly With Sculpty Tools
A conversion can finish while the asset loses its UVs, material assignments, scale, or printable geometry. Browser tools reduce installation and version-management work, but the destination still decides which data survives. Sculpty provides browser converters for GLB, glTF, STL, OBJ, and PLY variants, plus viewers for STL, OBJ, GLB, FBX, STEP, 3DM, and PLY. Its export options include GLB, STL, OBJ, FBX, USDZ, and 3MF for workflows involving Blender, Unity, web viewers, or slicers.
Start by uploading the source, selecting the destination, and previewing the result before delivery. GLB to OBJ can provide a broadly readable editable mesh, while OBJ to GLB packages a scene for web or realtime viewing. STL to GLB helps inspect a print mesh visually, but cannot restore materials or UVs that STL did not contain.
Prepare companion files before upload. For OBJ, keep the MTL file and image textures together in the accepted archive. After conversion, compare the silhouette from several angles, then inspect visibility, material slots, texture paths, dimensions, orientation, and object scale. A model can technically export while appearing untextured, microscopic, rotated, or empty.
Use a repeatable benchmark for production assets. Keep one known source file, record its dimensions, object count, material count, UV presence, and polygon count, then compare those properties in the converted file. For prints, check watertightness and non-manifold edges before slicing. For realtime assets, open the result in the target viewer and test normal maps, transparency, and draw-ready materials. AI Image Detector's conversion tips provide another reference for checking files during format changes.
Sculpty uses a unified credit system across its browser-based generation and 3D workflow, with a private gallery for managing outputs. That setup can help after AI texturing, remeshing, or retopology, because you can export the processed asset instead of converting an intermediate file with damaged topology or incomplete materials.
Browser conversion suits quick interchange and inspection. Use local software when confidentiality, custom export scripts, unsupported features, or detailed topology control matter more than convenience. A local workflow also keeps sensitive files away from remote processing when the tool supports conversion on the device. Whichever route you choose, validate the output in the application that will consume it. The 3D model converter workflow works best as a fast interchange step inside a measured verification process, not as a substitute for QA.
Troubleshooting Common Conversion Issues and Fixes
A conversion can finish without an error and still lose information. Diagnose the visible symptom first, then compare the result with the source in the application that will use it. The goal is to find whether the loss affects materials, UVs, scale, topology, or editable structure.
Missing materials and textures
A mesh that appears gray usually has missing image paths, an unsupported source shader, or geometry exported without its material package. Reconnect the maps in the destination application, use portable relative paths, and package external textures with the source. Check color-space settings for base-color and data maps. A normal or roughness map may be present yet render incorrectly if the destination interprets it in the wrong space.
Record the source material assignments before export. After conversion, verify that each object still points to the intended textures and that UV islands occupy the same regions. This catches silent material loss that a quick viewport check can miss.
Invisible or dark geometry
Flipped normals, hidden objects, failed triangulation, and unsupported transparency can make valid geometry appear broken. Recalculate normals, reveal hidden objects, inspect face orientation, and test the asset with a neutral material. If only certain parts disappear, compare their transforms, face winding, and material assignments with the source.
Wrong scale and orientation
Incorrect size usually comes from mismatched units or application-specific scene settings. Confirm the source dimensions, choose an explicit unit convention, and verify the up axis before export. Avoid correcting scale by eye after conversion when the asset will join a larger scene. A visual fix can still break rigging, collision, or assembly relationships.
Non-manifold or non-watertight meshes
A printable model needs a valid solid, not merely a surface that looks closed. Internal faces, holes, self-intersections, zero-area triangles, and disconnected shells can confuse a slicer or create missing regions. Run mesh analysis, repair the defects, and validate the repaired export in the slicer. Treat watertightness as a separate check after conversion, not as a side effect of successfully opening the file.
Lost CAD structure and constraints
CAD-to-mesh conversion can preserve the visible shape while discarding parameters, materials, and kinematic constraints. Common exchange formats do not fully represent every constraint, so keep the native CAD file as the master. Export a mesh for visualization or realtime use, and document which editable features will not survive. Check the converted dimensions and part relationships against the original before assembly.
For print handoffs, compare the source and destination in the slicer. Use this focused guide to convert 3MF to STL when the receiving machine requires STL, then recheck scale, shell integrity, and layer preview after the final export.
Your Next Conversion Done Right
A conversion passes only after the destination asset matches the source where it matters. Use a repeatable checklist:
- Choose by destination: Identify whether the target needs animation, CAD structure, realtime materials, or printable geometry.
- Normalize first: Clean transforms, normals, UVs, materials, linked textures, and topology before export.
- Convert deliberately: Set units, axis conventions, texture packaging, and export options for the receiving application.
- Verify visibly: Open the result in the viewer, engine, CAD package, or slicer.
- Verify structurally: Compare geometry, UVs, hierarchy, dimensions, materials, animation, and watertightness as applicable.
- Keep the master: Preserve the source until the converted asset passes every check.
Preview exports before sending them to a client, engine, collaborator, or printer. A missing UV, changed scale, broken material, or open shell is a failed test, not a minor detail.
Sculpty offers browser-based converters and viewers for common formats, with export paths for game assets and 3D printing. Visit Sculpty to inspect, convert, and verify your model before handoff.