
3D Model Portfolio: How to Build One That Gets Hired

Nearly three-fourths of junior 3D artists hired in a widely cited 2024 industry report had only three to five finished portfolio pieces, not a sprawling gallery (MAGES). That benchmark changes the question. A professional 3D model portfolio isn't a storage folder for everything you've made. It's a carefully edited argument that shows what you can build, how you think, and where you can contribute.
Modern reviewers also encounter portfolios in crowded, platform-based environments. Carbonmade's 3D Art category displays 4,547 works, while an industry summary reports that 45% of 3D artists use ArtStation as their primary portfolio platform (3D Reach). Your advantage rarely comes from adding another average render. It comes from making your strongest work understandable within a quick mobile visit, then proving that the polished image rests on a reliable process.
Table of Contents
- Why Curation Beats Volume in a 3D Model Portfolio
- Choosing the Right Number of Pieces and Projects
- Showing Process Evidence Without Losing Engagement
- Building a Fast, Mobile-Friendly 3D Portfolio Site
- Choosing Export Formats for Games, 3D Printing, and Clients
- Tailoring Your Portfolio for Different Career Paths
- FAQs About Building a Professional 3D Model Portfolio
Why Curation Beats Volume in a 3D Model Portfolio
A junior portfolio with four finished models can compete more effectively than a gallery of dozens of inconsistent experiments. The 2024 portfolio guidance for beginners places three to five pieces in the ideal junior range, while six to eight only works when every project reaches a comparable standard. 10 or more pieces may suggest weak editing rather than wider capability.
On a phone, a reviewer may see only a few thumbnails before deciding whether to continue. Those first images should establish specialization, completion polish, and role fit. A character artist should lead with character work. An environment artist should show a convincing scene before product renders or unrelated exercises.
Edit like a hiring manager
Put every project in a spreadsheet. Record its target role, modeling strengths, texturing and lighting quality, available technical breakdowns, and completion status. Score each piece against the position you want, rather than the attachment you feel toward it.
Remove work that creates doubt about your current level. A weak render can make a strong asset look accidental. A polished image without process evidence can also leave questions about topology, materials, or revision decisions. Process matters even more when AI-assisted tools enter the workflow. Show what you directed, changed, checked, and finished so the reviewer can distinguish judgment from an unedited tool output.
The same editing discipline applies in visual careers outside 3D, including a career in motorsport photography, where a tight selection of ten race weekends reads stronger than an unfiltered archive of every frame you shot.
Practical rule: Your portfolio should answer “What would I hire this person to do?” before it answers “What software does this person know?”
Arrange the remaining pieces around one clear promise. A compact group of related models can demonstrate control of proportion, materials, camera choice, and presentation as one working system. That evidence is easier to scan on a small screen and more persuasive than technically unrelated exercises. Keep only projects that strengthen the role you want next.
Choosing the Right Number of Pieces and Projects
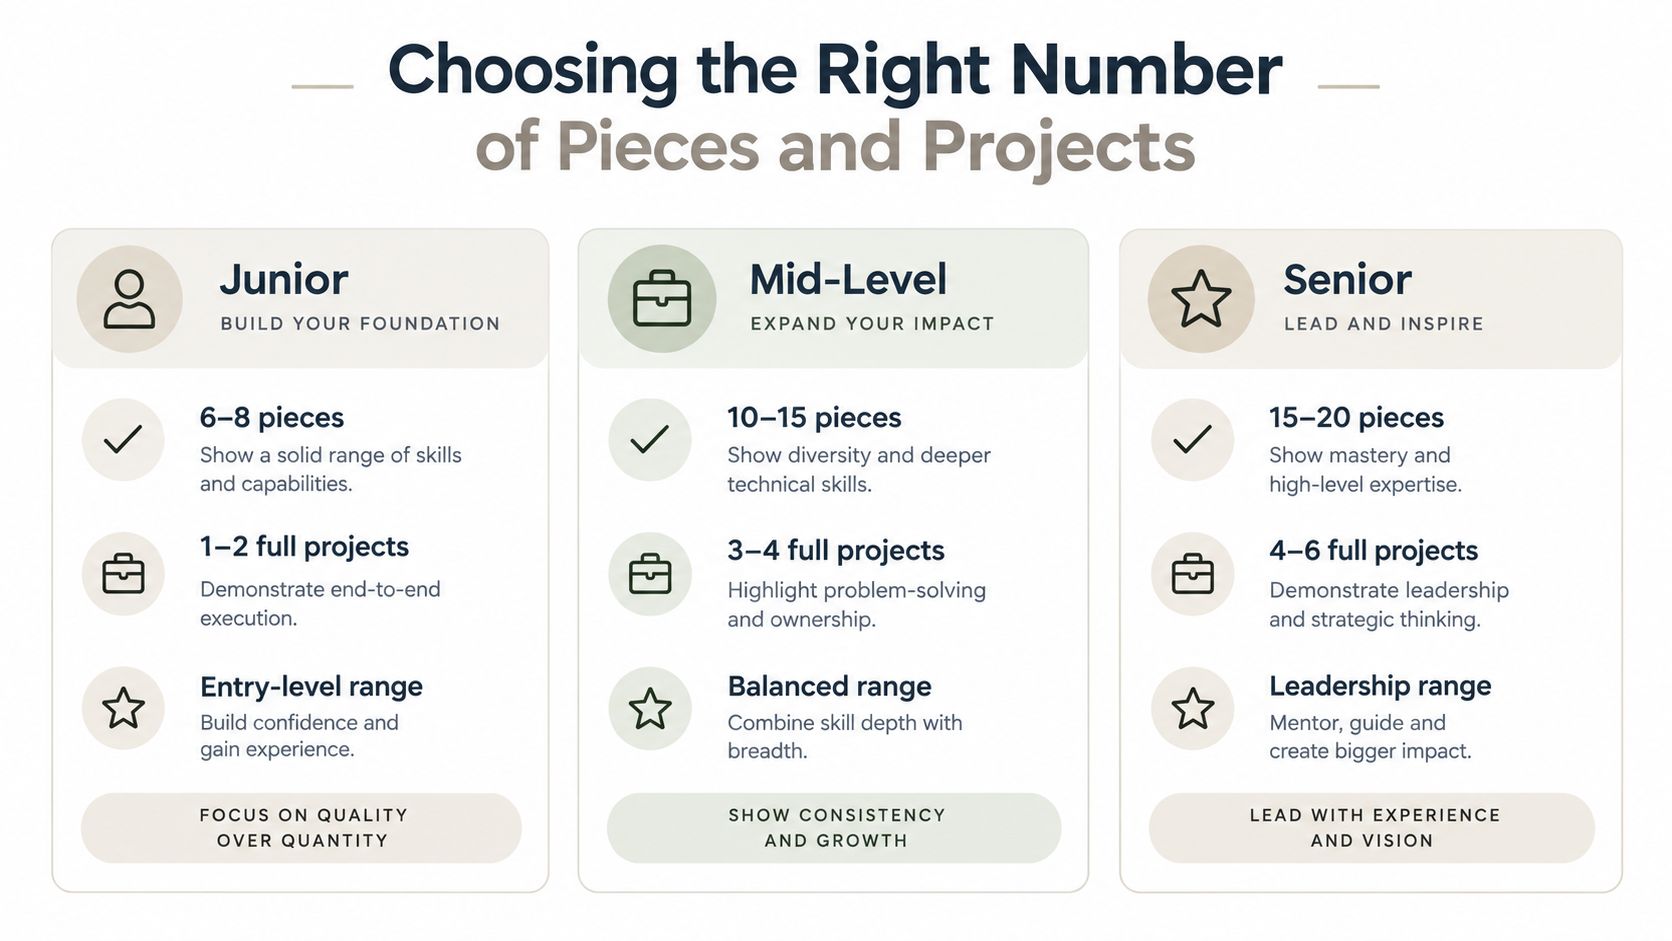
Your target role should determine the portfolio count. A junior application may need three to five finished projects that establish reliable fundamentals. A mid-level portfolio may support eight to 15 projects when those projects represent client work, varied briefs, and repeatable delivery. These figures describe different career stages, not competing rules. Use the smaller range for a focused portfolio built from scratch, and the larger range when you have enough professional work to show consistency without padding the site.
The first screen still has to work quickly on a phone. Put your strongest project first, make the role you played visible, and remove thumbnails that require a reviewer to guess what they are seeing. The visual guide below offers a planning framework by career level, but project quality and completeness should decide the final count.
Build around the role, not the software
For an entry-level application, choose a compact group with a clear direction. A character portfolio might include a stylized character, a realistic study, and a prop or creature that demonstrates clean construction. An environment portfolio could pair a composed scene with a modular asset set and a close-up showing material control.
Mid-level artists need evidence that they can deliver across different briefs. A product visualization artist might show furniture, packaging, and a consumer object, provided each project explains the brief, modeling decisions, materials, and final presentation. The projects can vary while the professional identity remains clear.
Senior portfolios should show judgment alongside execution. Include work that demonstrates art direction, pipeline awareness, collaboration, or ownership of a substantial visual problem. AI-assisted work can appear here when the case study makes your decisions visible: what you generated, directed, corrected, and delivered. Seniority comes from selecting meaningful problems and finishing them, not from listing every asset you have touched.
Use a shortlist test
Ask four questions about each candidate:
- Role fit: Does it support the job title or service you want?
- Visual strength: Does the opening image read clearly on a small screen?
- Technical proof: Can you provide relevant evidence such as topology, UVs, materials, or optimization?
- Narrative value: Does it add a capability missing from the other projects?
Archive a piece that fails two tests. If your portfolio is short, do not fill it with unfinished exercises. Expand the strongest project into a complete case study, or create a brief that addresses a specific skill gap. A small number of finished, relevant projects can carry more weight than disconnected studies.
Showing Process Evidence Without Losing Engagement
A polished hero render earns attention; process evidence earns trust. Present both in that order so a reviewer understands the finished asset before seeing the technical decisions behind it.
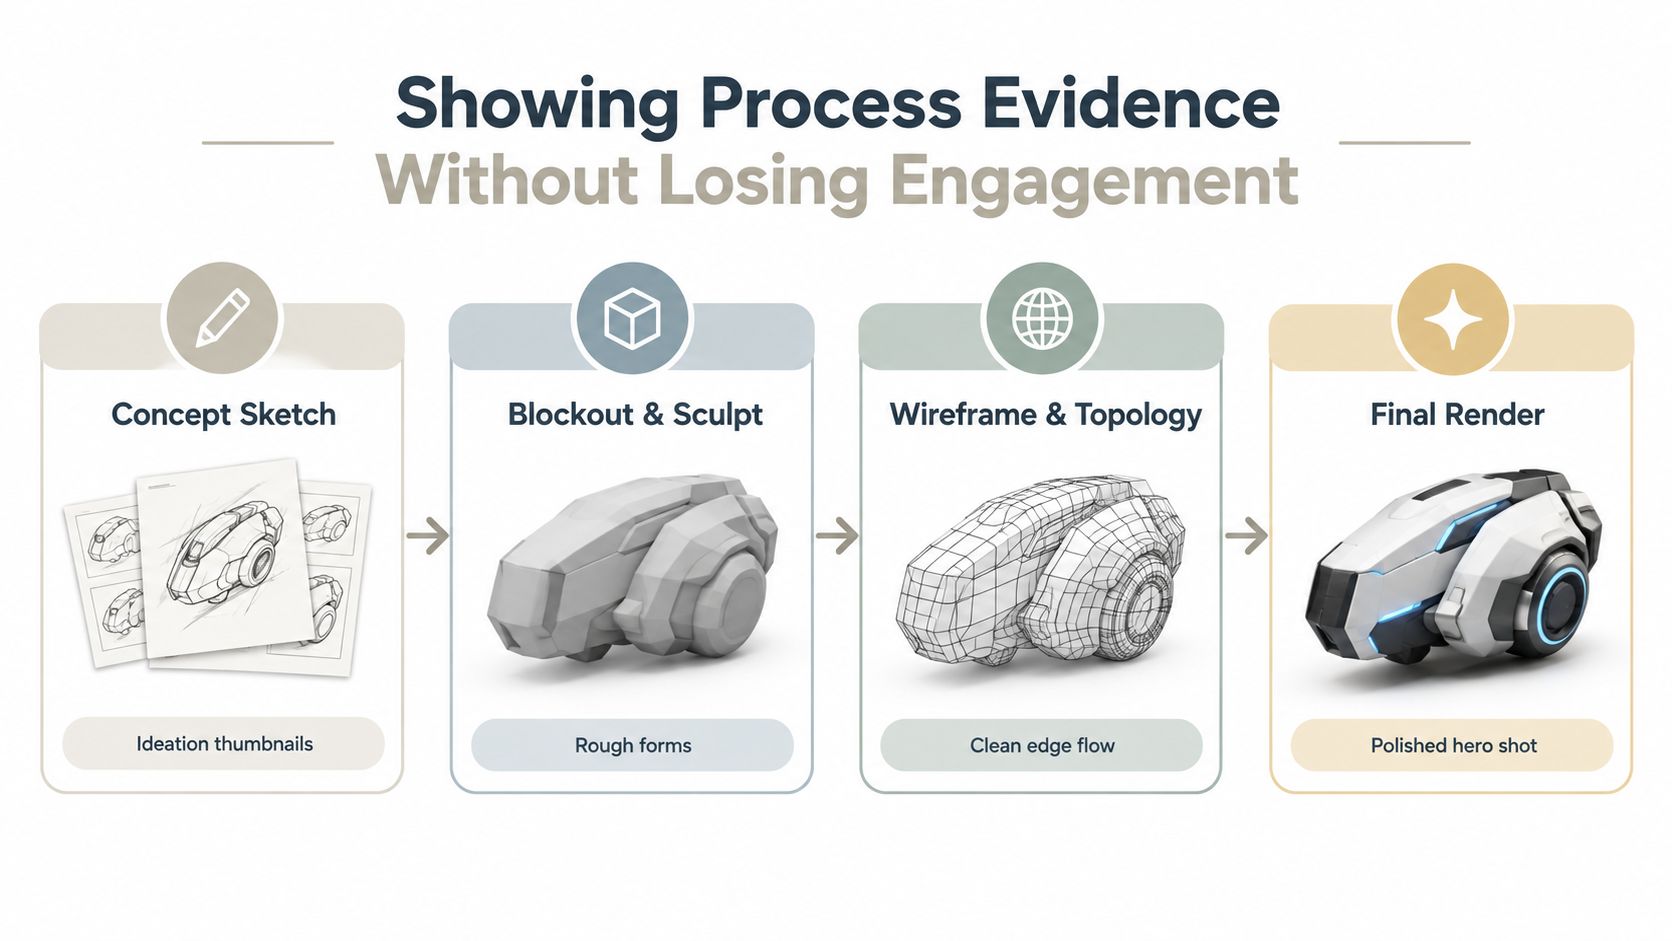
Lead with the strongest final image, then show only the evidence that supports the project's purpose. For a game asset, follow the beauty render with the low-poly or game-ready mesh, wireframe, UV layout, texture maps, and an engine screenshot when relevant. For product visualization, show form accuracy, material response, lighting studies, and your interpretation of the brief. For 3D printing, include watertight geometry, wall or structural considerations, and the physical result when available.
AI-assisted workflows need the same accountability. Identify what you generated, directed, corrected, and delivered. A reviewer should be able to separate tool output from your modeling judgment, cleanup, art direction, and final quality control.
Match proof to the audience
A technical breakdown should answer a hiring or client question. Wireframes show clean edge flow and controlled density. Texture sheets explain material separation and resolution choices. Lighting studies support roles involving look development or visualization. Select evidence that proves the skill the project claims to represent.
A “black box” beauty render cannot show how you solved the model. Recruiter guidance warns that portfolios without breakdowns can reduce trust. The same guidance also favors tightly edited portfolios over padded collections. Keep proof selective: one clear topology view is more useful than several nearly identical viewport captures.
On mobile, use stacked panels instead of tiny side-by-side diagrams. Label each image with a short phrase such as “retopology pass,” “packed UV layout,” or “roughness variation.” A reviewer should understand each image's purpose without zooming or decoding your file structure.
A breakdown isn't a confession of every mistake. It's a controlled demonstration of the decisions you want to be hired to make.
For turntables, test the interaction on a phone before publishing it. A short preview can attract attention, while a static fallback image keeps the project understandable if motion fails or loads slowly. A 360-degree turntable workflow can help you plan rotational presentation alongside still renders. Movement should support the hero image and project summary, not replace them.
Use the following video as a reference for presenting motion and inspection without making the viewer guess what to examine.
Building a Fast, Mobile-Friendly 3D Portfolio Site
A portfolio that takes too long to load loses attention before the work gets judged. Mobile-first browsing, scroll-driven case studies, and accessibility now shape how reviewers inspect 3D work, often on small screens rather than controlled studio monitors (2026 portfolio trends review). Build for that reality: make the project understandable quickly, then offer deeper inspection for people who want it.
Keep the site architecture simple:
- Home: State your role, specialization, location or availability, and one direct contact path.
- Selected work: Lead with your strongest projects, not a chronological archive.
- Project pages: Show the final result, brief, contribution, process evidence, and deliverables.
- About: Explain your working strengths and tools in plain language.
- Contact: Make the next step obvious and keep the form short.
Design for the first screen
The first screen should identify your discipline without requiring interaction. Use a compressed still as the initial visual, then load turntables or embedded viewers after the visitor understands the project. Avoid autoplay audio, oversized background videos, decorative transitions, and navigation that disappears while scrolling.
Give every project a clear title and one-sentence role statement. “Environment artist, responsible for modular modeling, trim-sheet texturing, lighting, and final presentation” tells a reviewer more than a software list. Keep captions readable, use strong contrast, add alt text, and make controls large enough to tap accurately.
AI-assisted workflows make process evidence even more important. If you used generative references, automated retopology, material tools, or scripting, identify where they helped and show the decisions you made afterward. Reviewers still need to see authorship, judgment, and the changes required to make an output production-ready.
A personal site controls the narrative, search visibility, contact capture, and analytics. ArtStation and similar platforms provide discovery and familiar browsing, so many artists use both. Let the personal site carry detailed case studies while the platform profile works as a public showroom. Advice on how to land a design job with a portfolio reinforces the connection between presentation and findability.
Keep the technical layer lightweight
Export web previews at a sensible size and lazy-load images below the fold. Test each page on a phone over cellular data, not only on a fast desktop connection. Browser viewers should be optional. A 3D model viewer online can support inspection, but a static image and concise summary must still explain the project if the viewer loads slowly or fails. A fast, readable fallback protects the review experience.
Choosing Export Formats for Games, 3D Printing, and Clients
Choose the destination before choosing the format. A file that opens in Blender can still fail in an engine, lose textures during a client handoff, or confuse slicing software. Ask whether the recipient needs to edit, render, animate, manufacture, or review the asset. That answer should drive the export.
For interactive assets, GLB or glTF suits browser previews and compact delivery because geometry, materials, and textures can travel together. FBX remains useful for production handoffs involving rigs, animation, cameras, or scene relationships. Test it in the target application, since materials and transforms may be interpreted differently. OBJ works for straightforward geometry exchange and is widely readable, but its material and texture files travel separately.
For physical production, STL supplies the surface geometry that slicers commonly require. 3MF can retain more manufacturing information than a basic STL workflow, provided the recipient's software supports it. USDZ supports Apple-oriented augmented-reality previews, while a production scene usually needs a different source format. A concise comparison of common extensions appears in this guide to 3D file formats.
Prepare the asset before export
Check normals, confirm scale, name objects clearly, and remove hidden construction geometry unless someone needs to inspect it. For game assets, inspect triangulation, material slots, pivots, texture paths, and collision requirements. For printing, confirm that the mesh is closed, surface direction is consistent, and small details will survive slicing.
AI-assisted tools can change this preparation stage. If automated retopology, material generation, reference creation, or scripting contributed to the asset, record the tool's role and show the manual decisions that followed. The exported file still needs a clear owner, predictable structure, and production-ready cleanup.
A client handoff often needs several deliverables: the requested production file, a review-friendly preview, and a short readme covering units, texture locations, software assumptions, and known limitations. Open the files in a clean scene or the destination tool before sending them. “Export completed” only confirms that a file was written, not that the handoff works.
Tailoring Your Portfolio for Different Career Paths
A portfolio gets stronger when each project answers the hiring audience's practical question. A game studio needs evidence that an asset works in a real-time pipeline. A product visualization client evaluates proportion, materials, camera control, and whether the image supports a commercial message. A 3D printing customer wants confidence that the model can become a physical part. Build the case study around that decision, not around the software used.
Game development
Open with the engine-ready asset, then show the production path. Include the high-poly source when it clarifies the work, followed by the optimized mesh, UVs, texture sets, material setup, and in-engine result. State exactly what you handled. If modeling, texturing, lighting, and technical art were divided among several artists, identify your contribution instead of presenting the whole asset as your own.
Product visualization
Use fewer, more resolved images. Close-ups should reveal surface behavior, while alternate views and controlled lighting variations should demonstrate deliberate choices. Random styling adds little evidence. If the product began with references or CAD, explain how you preserved proportions and converted the source into a presentation-ready scene.
3D printing
Show the physical constraints directly. Include intended scale, assembly logic, supports or separated parts where relevant, and the sliced or printed result. Explain decisions that affect fabrication, such as wall thickness, fit, orientation, and detail retention. A dramatic render earns attention, while a manufacturing explanation supports trust.
Freelance and hybrid work
Clients usually need to understand the outcome before they assess your exact technique. Structure each project around the brief, the problem solved, the deliverables, and how revisions were handled. Keep confidential work anonymous, or create a personal project that proves the same capability without exposing client information.
AI-assisted work belongs in a portfolio when your role is clear. Specify whether AI supported ideation, base geometry, texture generation, remeshing, or iteration. Then show the manual decisions that shaped the final asset, including cleanup, topology choices, art direction, and verification. Current portfolio guidance covers AI-assisted building and hybrid portfolios, while established advice still values wireframes and technical breakdowns in Envato Elements. Clear evidence lets reviewers judge authorship without implying that the workflow was entirely manual.
Artists who need a browser-based workspace can use Sculpty to generate, texture, remesh, retopologize, render, and export assets. It supports GLB, STL, OBJ, FBX, USDZ, and 3MF. Treat generated output as production material: inspect it, clean it, document the workflow, and label AI involvement accurately. A mobile reviewer should be able to find that evidence quickly, even on a narrow screen.
FAQs About Building a Professional 3D Model Portfolio
Should unfinished work appear in the portfolio?
Usually, no. Include an unfinished project when its process proves a relevant skill, such as a strong blockout, sculpting decision, or technical experiment. Label it clearly as work in progress and place it after completed pieces, so the opening projects establish your standard.
How often should a portfolio be updated?
Update the portfolio when a new project is materially stronger or more relevant than an existing one. A regular review helps, but a calendar should not push weaker work onto the site. Remove work that no longer reflects your current ability, then check every project page on mobile for readable images, process evidence, and usable navigation.
How should AI-assisted assets be presented?
Name the tools and stages that involved AI. Separate generated output from your modeling, cleanup, retopology, texturing, lighting, and art direction. Show enough process evidence for a reviewer to judge your decisions. A raw generated mesh does not demonstrate finished production skill until you verify its topology, scale, materials, and compatibility with the intended workflow.
What should you do with vague feedback?
Ask for feedback tied to a specific decision. Replace “Do you like it?” with questions such as whether the hero render communicates the target role, whether the breakdown proves the intended skill, or which project should be removed first. Apply one change at a time, compare the result, and record recurring criticism. That process improves the portfolio instead of keeping you focused on one image.
A strong 3D model portfolio is selective, quick to review on a phone, and honest about how each asset was made. It should show your specialty quickly, provide process evidence on request, and confirm that files suit the intended workflow.
Sculpty supports text-to-3D and image-to-3D generation, PBR texturing, remeshing, retopology, rendering, turntable export, and browser-based viewing. Use it to prepare a focused case study, verify the files, and present the finished work through its private gallery at Sculpty.