
USDZ to STL Conversion Guide for 3D Printing
You've received a USDZ model that looks perfect in Apple AR Quick Look, but the printer software won't accept it. Renaming .usdz to .stl doesn't solve the problem, and a quick online conversion may leave you with a model that is microscopic, hollow, inverted, or impossible to slice.
A reliable USDZ to STL workflow is a mesh-preparation process, not a file-extension change. You're moving from a rich AR container into a geometry-only format, so the job involves deciding what to discard, repairing the surface, checking scale, and validating the resulting mesh before it reaches your slicer.
Table of Contents
- The Reality of Moving from AR to 3D Printing
- Choosing the Right Conversion Environment
- Executing the Geometry Pipeline
- Fixing Geometry Before the Export
- Streamlining the Workflow with Sculpty
- Your Pre-Slicing Verification Checklist
The Reality of Moving from AR to 3D Printing
USDZ and STL serve different jobs. A USDZ asset may contain a complete AR-ready scene with geometry, materials, textures, object relationships, visual appearance, and animation. Apple devices use USD-based workflows for experiences such as AR Quick Look, where the model needs to look correct in a real-world camera view.
STL has a much narrower purpose. It stores a surface as a list of triangles and deliberately excludes colors, materials, units, object names, textures, and animation. The format originated with 3D Systems in 1987, and its minimal structure helped it become one of the oldest and most widely supported 3D printing formats. You can review this format history and the broader distinction between AR and manufacturing formats in this overview of 3D file formats.
Practical rule: Keep the USDZ if you still need the AR presentation. Create an STL when you need geometry for slicing, printing, or basic mesh exchange.
What survives the conversion
The converter extracts the printable surface from the USDZ package, triangulates it where necessary, and writes those triangles into an STL file. The physical shape can survive well if the source mesh is clean, but the visual information around that shape does not.
The following data generally gets lost:
- Materials and textures: Surface color, roughness, metallic response, image textures, and other appearance settings don't belong in a standard STL.
- Animation: Any movement or animation data in the USDZ has no equivalent in the exported file.
- Scene composition: Cameras, lights, object relationships, and presentation-specific placement aren't preserved as an AR scene.
- Units and context: STL does not carry reliable unit metadata, so the receiving slicer must interpret the exported dimensions correctly.
This trade-off isn't a defect in the converter. It's a consequence of the destination format. STL became universal because slicers and mesh tools can read its simple triangle structure, but that same simplicity prevents it from carrying the information that makes USDZ useful for AR.
When STL is the right destination
Export to STL when the model is going to a slicer, a basic mesh editor, or a workflow that only needs a printable shell. If you're trying to preserve a product's branded materials, animated presentation, or Apple AR behavior, STL is the wrong master file.
A good working habit is to archive the original USDZ and treat the STL as a production derivative. That gives you a geometry-focused file for printing without sacrificing the richer source asset for future AR revisions.
Choosing the Right Conversion Environment
The right converter depends on more than whether it can open a USDZ file. Consider where processing happens, how large the asset is, and how much control you need over the mesh. A quick browser tool can be convenient for a clean, modest model, while a desktop or command-line workflow is more appropriate when you need inspection and repair.
| Environment | Privacy & Processing | File Size Limits | Mesh Control |
|---|---|---|---|
| Browser-based converter | May process locally in the browser, or may require an upload. Check the tool's processing method before using confidential assets. | Limits vary by service. | Usually limited to import, conversion, and basic options. |
| Desktop application | Local processing keeps the source on your machine. | Usually constrained by local hardware and application performance rather than an upload cap. | Strong control over scale, orientation, repair, decimation, and export settings. |
| Command-line utility | Local and suitable for scripted or repeatable pipelines. | Constrained by local storage and available memory. | High control, but inspection and repair often require additional tools or scripts. |
A browser-based option is practical when the USDZ is already a clean, single mesh and you want a fast handoff to a slicer. Browser tools are also useful when you don't want to install a full 3D application. However, don't assume every service handles the file locally. Some upload the package to a remote server, which can be unsuitable for unreleased product designs or client-owned scans.
Published browser converters demonstrate how widely limits can differ. One service supports files up to 50 MB locally in the browser, another accepts up to 500 MB, and another processes files up to 200 MB in a browser worker, as described in this USDZ to STL converter workflow. These limits can change, so check the current tool before preparing a large scene.
Desktop and command-line control
Blender or another desktop 3D application gives you a viewport before export. That matters because you can hide presentation objects, remove duplicate shells, inspect normals, apply transforms, and repair the mesh before generating STL. The extra control takes longer, but it prevents the common mistake of discovering a bad surface only after the slicer produces errors.
A command-line workflow is useful for teams processing repeated asset batches. Utilities built around USD parsing and STL export can make the operation reproducible, but automation shouldn't replace visual inspection for scan-derived or AI-generated geometry. A script can apply the same transformation every time, but it can't automatically understand whether a hole is intentional or whether a thin decorative feature should be printed.
For a broader comparison of common 3D formats before choosing your handoff path, see this guide to 3D file formats.
Executing the Geometry Pipeline
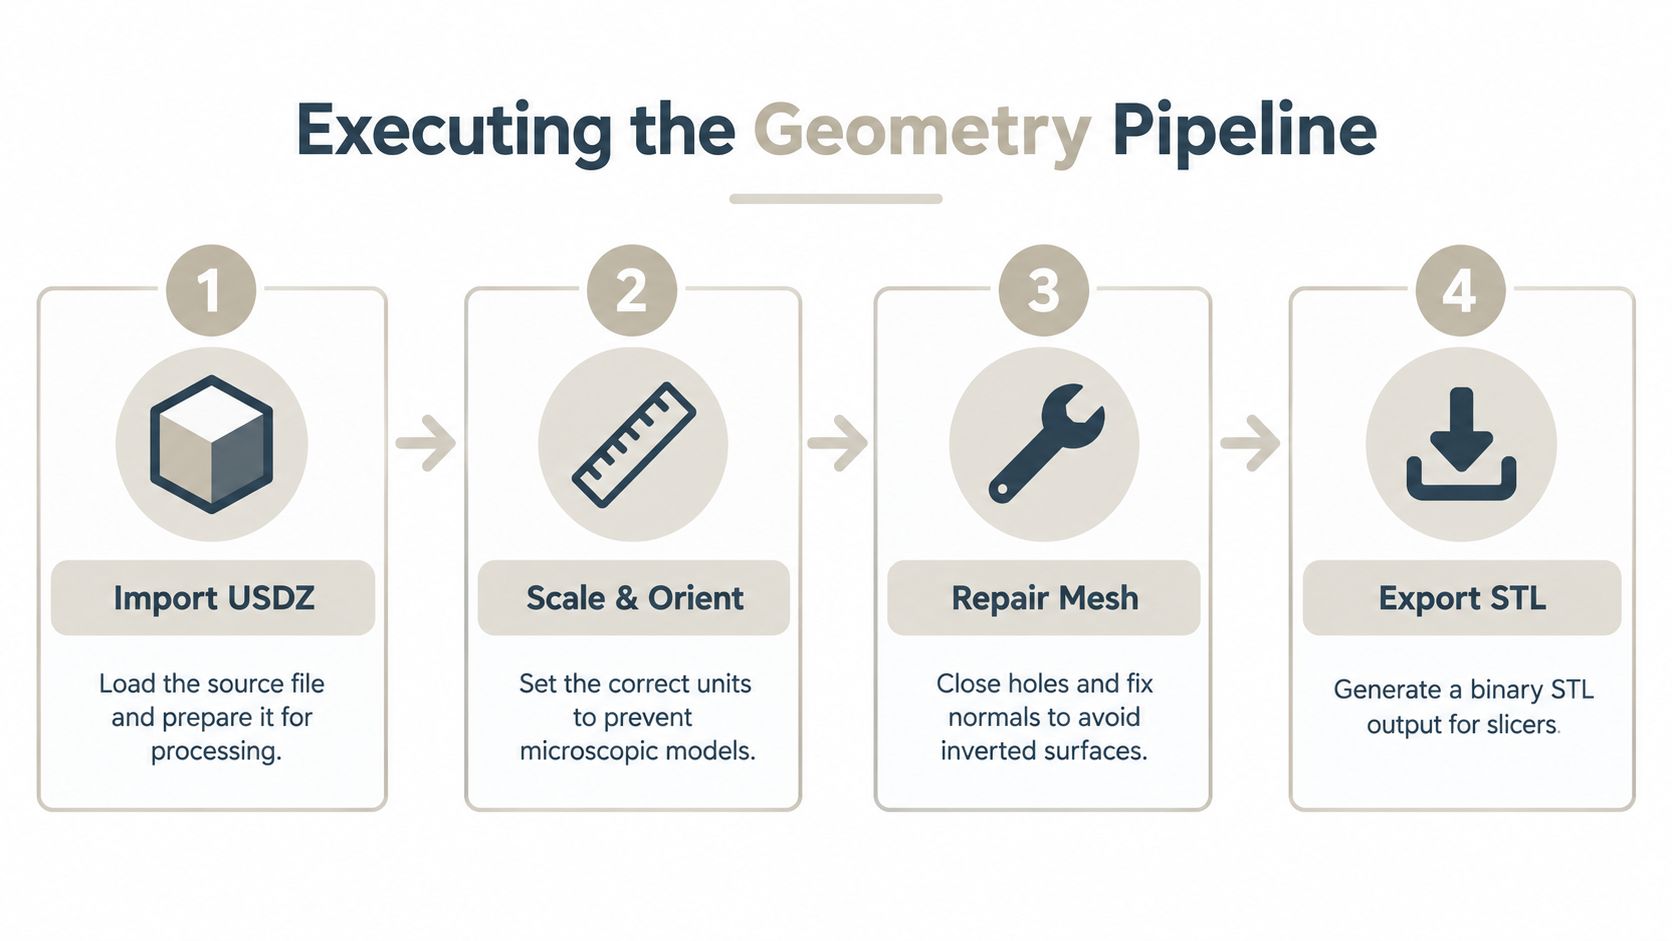
A dependable USDZ to STL conversion follows a clear sequence. The names of the controls vary between applications, but the underlying operations remain similar: open the package, reduce the scene to printable geometry, establish orientation and scale, repair the surface, and export the triangles.
1. Parse the USDZ container
USDZ is a packaged container, so the converter first has to read the USD scene and locate its mesh data. A practical implementation may open the package with a USD reader, identify the relevant geometry, and build an internal representation that the export tool can manipulate.
Start by checking whether the file contains one intended object or a complete scene. An AR asset may include several meshes, hidden parts, presentation elements, or duplicates. Exporting everything without inspection can produce an STL containing geometry that you never intended to print.
2. Triangulate and normalize the mesh
STL expects triangles. If the source contains polygon faces, the conversion process must triangulate them. Good triangulation follows the surface cleanly, while careless triangulation can create long, awkward triangles across thin or irregular areas.
Normalization also includes aligning the coordinate system. A model can import lying on its side, facing the wrong direction, or positioned far from the scene origin. Correct that before export so the slicer receives a sensible build orientation instead of forcing you to rotate and rescale blindly.
3. Map units and establish real size
Scale is one of the most common USDZ-to-STL problems. USD-based assets often use meters or another scene unit, while STL itself doesn't reliably store unit information. If the converter interprets the source incorrectly, a part intended to be life-size may arrive in the slicer as a tiny object or an oversized one.
A published conversion pipeline describes the critical operations as parsing the USDZ, normalizing geometry, preserving the information STL can represent, and writing the final file with an STL exporter. Its guidance also emphasizes mapping source units to meters during normalization. An App Store converter separately advertises automatic scale calculation so imported parts arrive at 1:1 real-world dimensions in slicers, as noted in this technical USDZ to STL conversion guide.
Don't trust the viewport alone. Measure the model's bounding box after import, compare it with the intended physical dimensions, and confirm the same dimensions after opening the STL in your slicer. For a more general conversion workflow, use this guide to converting 3D files.
4. Export the printable surface
Once the mesh is oriented, scaled, and repaired, export the geometry as STL. Binary STL is usually the practical choice for slicers, but the format choice won't rescue an open or self-intersecting surface. The quality of the export depends on the state of the mesh immediately before writing the file.
Fixing Geometry Before the Export
A converter can read a valid USDZ package and still produce an unusable STL. The main failure mode is usually geometry integrity, not file syntax. A model can open normally in an AR viewer while containing holes, disconnected fragments, non-manifold edges, flipped normals, or overlapping surfaces that confuse a slicer.
This happens often with photogrammetry, object captures, and AI-generated meshes. Those workflows may reconstruct a visually convincing surface without guaranteeing that the object has a clean, watertight shell. The AR viewer can hide the problem with materials and lighting. The slicer has to make manufacturing decisions from the triangles alone.

Repair the source, not just the export
Inspect the USDZ before conversion whenever possible. If the application exposes the scene hierarchy, isolate the actual object and remove cameras, lights, ground planes, duplicate meshes, and decorative elements that shouldn't become part of the print.
Then run a mesh inspection. Look for:
- Open boundaries: Holes in the surface can cause the slicer to infer an incorrect volume.
- Non-manifold edges: An edge shared by an invalid number of faces can prevent the software from deciding which side is inside.
- Inconsistent normals: Flipped faces may appear invisible, shaded incorrectly, or create inverted regions in the slice.
- Self-intersections: Overlapping shells can produce ambiguous internal geometry.
- Detached fragments: Small floating components may be accidental scan artifacts rather than intentional print details.
- Extremely thin features: A visual element can look substantial in AR but fail to create a printable wall.
Use a repair tool to close small holes, recalculate normals, merge appropriate vertices, and remove isolated components. Don't blindly apply automatic repair to a complex mechanical part. A repair operation may fill a purposeful opening or bridge a gap that should remain accessible.
Validate watertightness
A watertight mesh has a continuous closed boundary, with each surface edge connected in a way the slicer can interpret. This doesn't guarantee a successful print, but it removes one of the most common causes of missing layers and unexpected fills.
A clean STL begins with a clean surface. Exporting earlier only moves the inspection problem into a less convenient file format.
After repair, inspect the model again in a solid shading mode and use a section or clipping view if available. Confirm that the exterior is continuous, the normals face outward, and no internal scan debris remains. Only then should you triangulate the final surface and write the STL.
Streamlining the Workflow with Sculpty
Manual conversion becomes repetitive when the source assets need the same treatment repeatedly. A browser-based 3D studio can combine generation, remeshing, retopology, preview, and export so you're not moving the asset through a separate converter, repair application, and presentation tool for every revision.
The useful distinction is between format conversion and mesh preparation. Direct conversion is enough when the USDZ already contains a single, clean, printable surface. Remeshing or retopology is more appropriate when the source topology is uneven, overly dense, full of scan noise, or difficult to repair manually.
A unified workflow can help you:
- Generate or import assets: Bring in an AI-created or scanned model before deciding whether it needs cleanup.
- Remesh the surface: Create a more consistent mesh when the original triangles are unsuitable for editing or printing.
- Retopologize deliberately: Reduce irregular topology and produce a surface that is easier to inspect and modify.
- Export both use cases: Keep the AR-oriented USDZ and create an STL derivative for physical production.
- Review privately: Use a gallery and web viewer to compare source and repaired versions before downloading the print file.
The important caveat is that automation doesn't remove responsibility. A remeshed asset still needs dimensional verification, visual inspection, and slicer validation. Automated repair may improve the surface while also softening small details or changing the shape around damaged areas. Compare the repaired result with the original USDZ before treating it as production-ready.
Use the viewer to check the asset from multiple angles, then inspect the STL in the target slicer. A conversion pipeline is working when the model arrives with the intended orientation, the expected physical size, and a surface the slicer can interpret without unexplained gaps or fills.
For a junior modeler, the practical advantage is consistency. Instead of treating every USDZ file as a mysterious export problem, classify it first. Clean single mesh means convert and verify. Damaged scan means repair or remesh, then verify. Mixed AR scene means isolate the intended object before either operation.
Your Pre-Slicing Verification Checklist
A successful export isn't the same as a successful print. Before importing the STL into Cura, PrusaSlicer, or another slicer, run a short pre-flight check. The point is to catch errors while the model is still easy to correct, rather than after supports, toolpaths, or material have already been prepared.
Check the mesh and dimensions
Open the STL in a mesh inspector or your slicer and confirm that the object is a single intentional part. A visible model can still contain stray triangles or detached shells, so rotate it, zoom into detailed areas, and use the slicer's repair warnings as signals rather than nuisances.
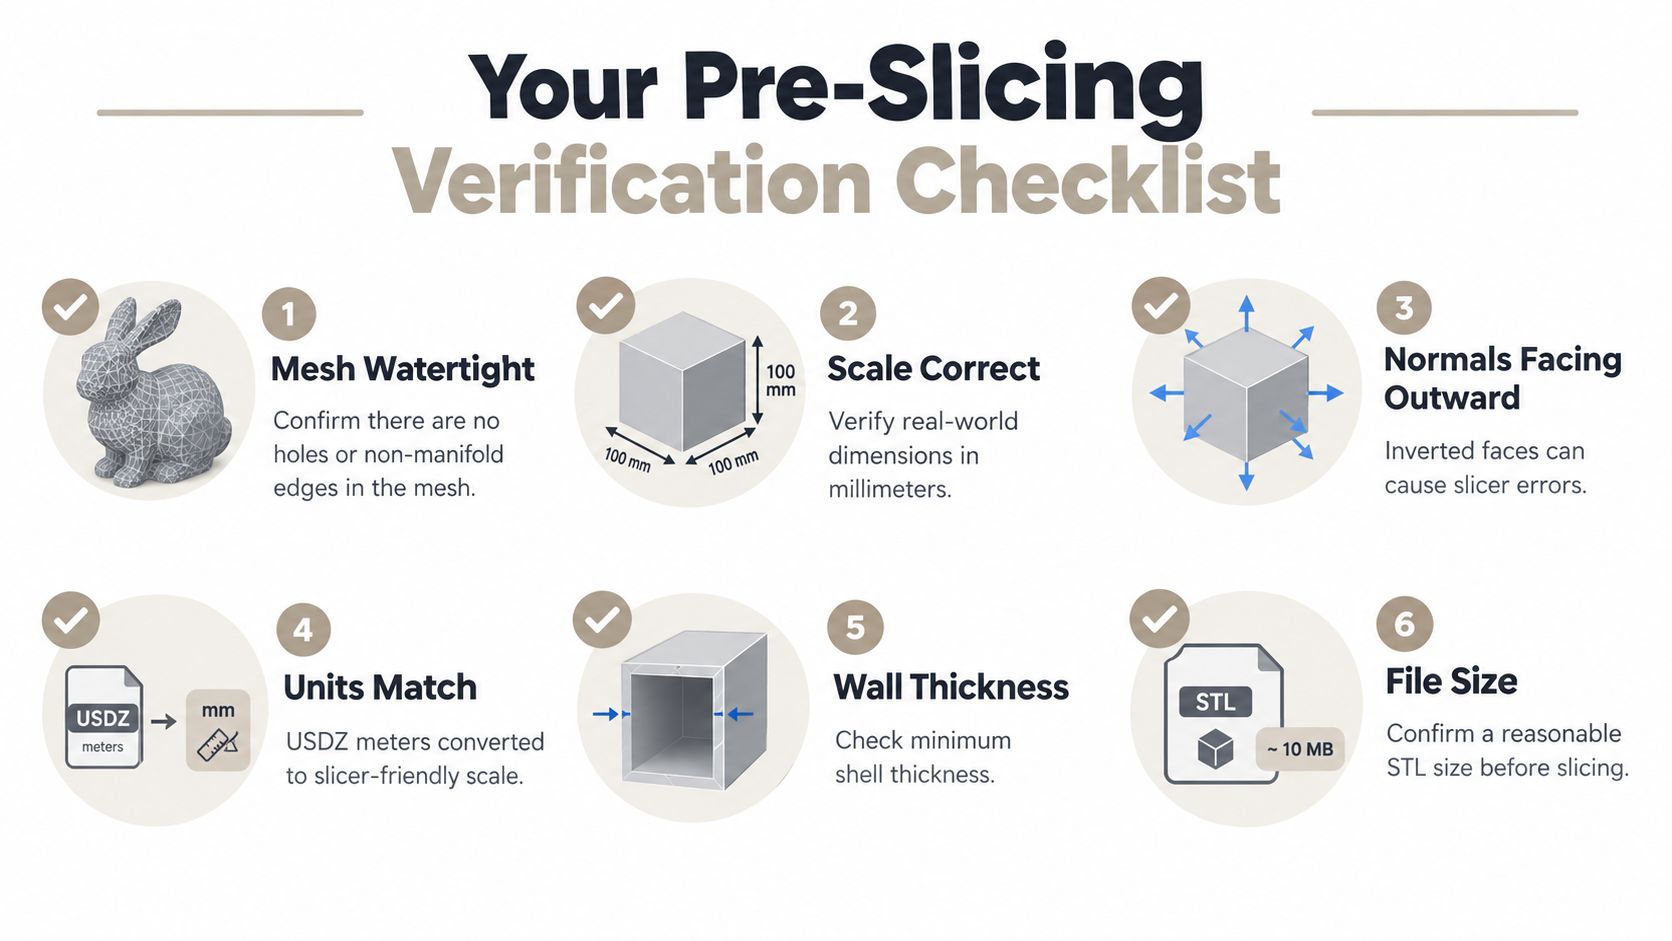
Work through this sequence:
- Confirm watertightness. Look for holes, open boundaries, and non-manifold edges.
- Measure the bounding box. Compare the displayed width, depth, and height with the intended real-world dimensions.
- Check orientation. Place the model on the correct build face and confirm that the vertical axis makes sense.
- Verify normals. Inverted faces can create missing surfaces or unexpected solid regions.
- Inspect wall thickness. Thin visual details may need thickening before they can survive printing.
- Review the file size and density. An unnecessarily dense mesh can slow inspection and slicing, while aggressive simplification can erase important detail.
The slicer preview is the final authority for the chosen printer and process. Scrub through the layers and look for sudden holes, isolated islands, filled cavities, or missing features. If the preview disagrees with the shaded model, stop and repair the mesh instead of compensating with slicer settings.
A clean result should retain the intended shape, arrive at a believable scale, and produce continuous layers in the preview. Keep the original USDZ alongside the STL so you can return to the AR asset if the print requires a new wall, a different orientation, or a detail-preserving remesh. This STL printing guide can help you evaluate the exported file in the context of the wider 3D printing workflow.
Sculpty provides browser-based tools for remeshing, retopology, viewing, and exporting 3D assets in formats including USDZ and STL, which can help when a direct conversion leaves geometry that still needs preparation. Visit Sculpty to prepare an AR asset for a cleaner, scale-checked handoff to your slicer.