
Skin Texture Types for Realistic 3D Skin
Most advice tells you to find a better skin photo and slap it on the model. That's exactly how you get plastic skin. In a 3D pipeline, skin texture types aren't a single color image, and they aren't oily, dry, or combination skin either. They're a stack of aligned PBR maps, and each map answers one shading question. Change the wrong map and you'll chase the problem for hours. Change the right one and the fix takes minutes.
Table of Contents
- PBR Skin Texture Types at a Glance
- How the Maps Stack on One Face
- Ranges That Keep Skin From Looking Plastic
- Visible Skin Texture Features and Their Maps
- Game Film and Print Map Setups
- Mistakes That Flatten or Plasticize Skin
- Choose Your Map Set Before You Texture
PBR Skin Texture Types at a Glance
A skin texture type in 3D is a map type, not a skin condition. Albedo says what color the surface is. Normal says which way tiny relief faces. Roughness says how widely light scatters off the surface. If you treat those as interchangeable, you'll bake one job into another map and break the shader.
Here's the full stack first, with the ranges a lead would expect to see in review.
Skin Texture Map Types and When to Use Them
| Map | Controls on skin | Typical range | Use or skip |
|---|---|---|---|
| Albedo or base color | Pigment, lips, freckles, scars with no lighting | sRGB color only, no baked AO or highlights | Always include |
| Normal | Pore and wrinkle direction | Tangent space, blue dominant, strength near 0.7 | Skip detail on distant LODs |
| Roughness | Oil versus dry microfacet scatter | 0.25 to 0.45 T-zone, 0.55 to 0.8 cheeks | Always in metal-rough workflows |
| Metallic | Metalness response | 0 for living skin | Skip any painted metal on skin |
| Subsurface or thickness | Light through ears, nose, and lips | Warm reddish scatter, masked thinner at ears and nostrils | Skip on mobile and hard surfaces |
| Cavity or height | Pore darkening or real displacement | Cavity as a multiply; height only for close-ups | Skip height when normal already carries pores |
| Specular | Reflectance in spec-gloss shaders | F0 near 0.028 to 0.04 | Skip in metallic-roughness pipelines |
Albedo holds pigment only. That's melanin variation, freckles, lip color, a faded scar, stubble shadow. It doesn't hold the shine on a nose or the shadow inside a pore. Save it as sRGB, because it's the one map in the stack that's meant to be looked at as color.
Normal holds direction, not color, even though it looks blue and purple in your editor. It's tangent space for a deforming face, and it has to match your engine's green channel convention. OpenGL and DirectX flip that green channel, so a normal map authored for one will invert relief in the other. Keep strength moderate. You're faking pores, not carving them.
The Maps That Decide Material
Roughness is where skin stops looking like a photograph and starts behaving like a material. A value of 0 is a mirror, 1 is fully diffuse, and skin lives in between. The forehead, nose, and lips sit lower because oil and moisture tighten the highlight. Cheeks and dry patches sit higher because the microfacets scatter light more broadly.
Metallic is the simplest call you'll make. Living skin is a dielectric, so the value is 0, black, everywhere. Sweat and sebum don't make skin metallic. They lower roughness. If you paint metallic to fake wetness, you'll get colored, tinted reflections that no face produces.
Subsurface or thickness handles light that enters skin, bounces inside, and exits somewhere else. It reads warm and reddish because blood tints the transmitted light. Mask it strongest where tissue is thin, at the ears, nostrils, and lips, and weaker across the cheek where there's more volume underneath.
One map, one job. If you can't name the shading question a map answers, you don't know which map to fix when the render looks wrong.
Cavity darkens the inside of pores and creases as a multiply, so detail survives soft fill light. Height moves vertices when paired with displacement or tessellation, which is why it's expensive and reserved for close work. Specular only exists if your shader uses a spec-gloss workflow, where you set the base reflectance directly instead of deriving it from metallic.
The classic plastic failure combines three mistakes at once. Highlights get baked into albedo, roughness gets left as one flat value, and subsurface stays switched off. The face then has color but no material behavior, so it reads as molded vinyl under every light. You don't always need the whole stack, though. A mobile character, a film hero, and a printed bust should ship different subsets, which is why understanding how PBR texture maps divide the shading work matters before you author anything.
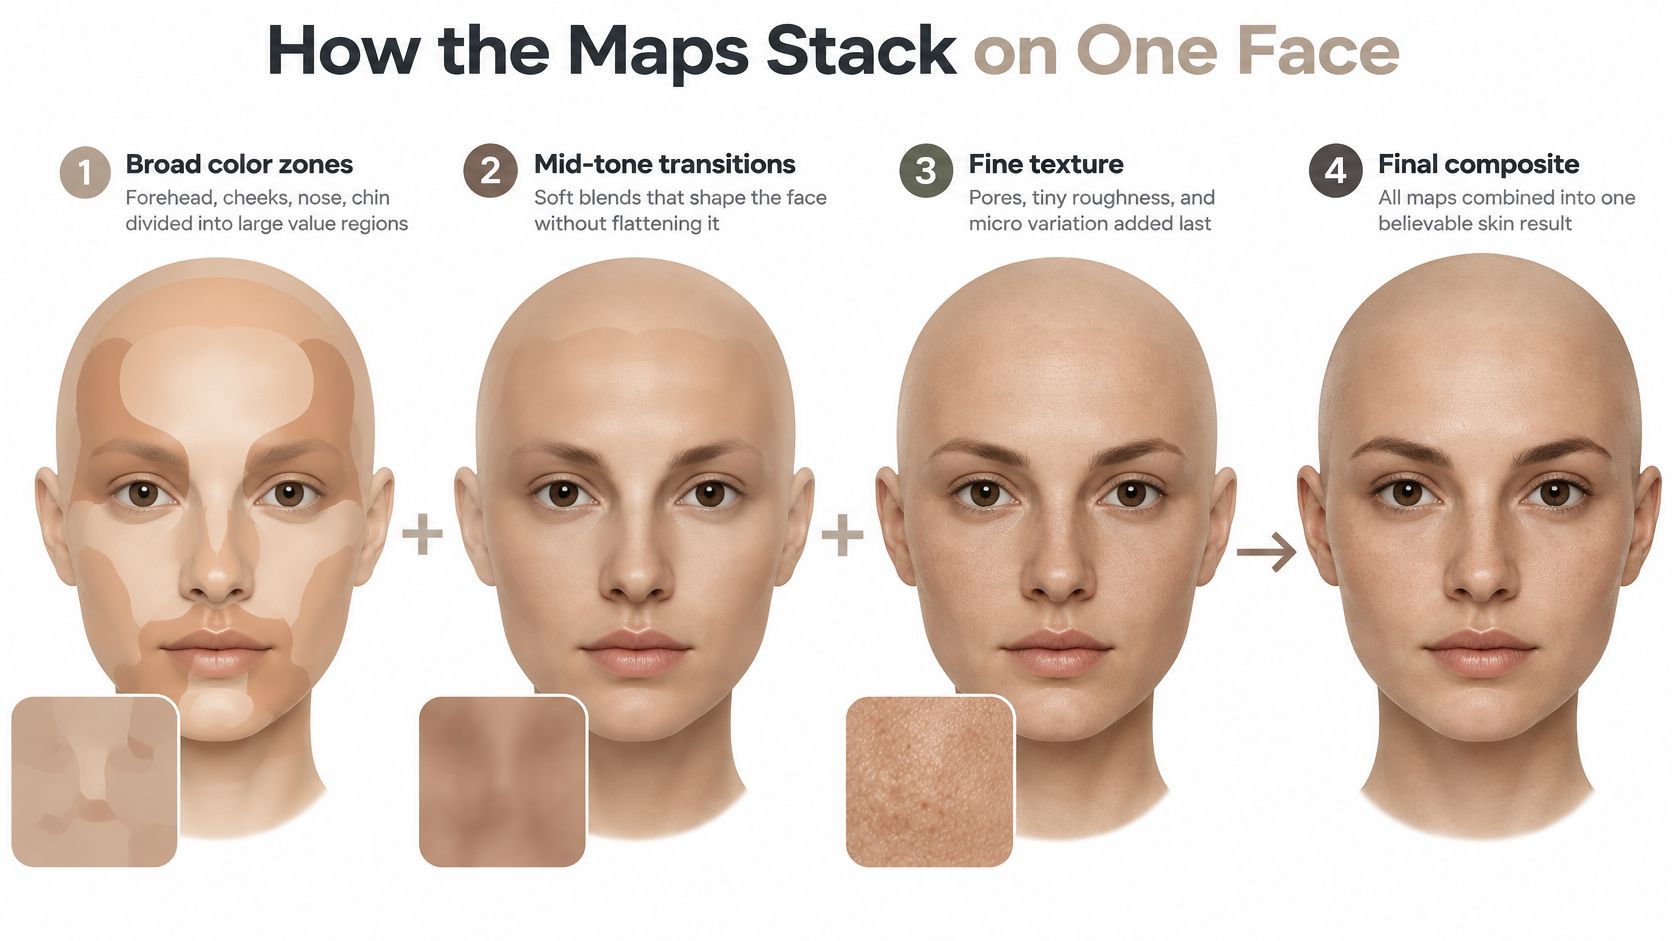
How the Maps Stack on One Face
Think of the stack as sheets of tracing paper laid over the same face. Each sheet carries one kind of information, they all share one registration, and the shader composites them per pixel. Pull one sheet out and the others still line up. Misalign one and every feature it carries drifts off the anatomy.
Start broad, not fine. A tiled pore detail can add micro variation as a blend, but it isn't the identity of the face. Identity comes from the large zones you block in first.
Color First, Then Direction
In albedo, lay down the broad color regions. The forehead tends warmer and slightly more saturated. Cheeks carry more red from blood near the surface. Eyelids run thinner and cooler, lips carry their own pigment, and the area around the mouth often shifts toward a muted tone. None of this is lighting. You're painting what the tissue is, not what a lamp does to it.
Normal goes over that and gives the surface direction. Now a key light rakes across pores instead of sliding over a smooth gradient. This is also where the green channel mistake shows up fastest. With the wrong convention, pores bulge outward and wrinkle grooves become ridges, and the face looks embossed rather than textured. Check it under a grazing light, where inverted relief is obvious.
Roughness Decides How Relief Reads
The same normal map can look wet or chalky depending entirely on roughness. Lower the roughness across the nose and forehead and those pores catch a tight, oily highlight. Raise it on the cheeks and the identical relief goes matte and powdery. That's why you don't fix a greasy looking face by repainting color. You fix it in roughness.
Subsurface sits underneath all of that conceptually, because it describes what's below the surface rather than on it. An ear against a rim light should transmit a warm glow. A nostril wing does the same at a smaller scale. The cheek scatters too, but over a thicker volume, so the effect softens edges instead of glowing. Keep it off teeth and eyes if they share the head material, since they don't transmit light the way skin does.
Cavity then multiplies into the result, either into albedo at bake time or into a dedicated shader slot. It keeps pore interiors and the fold beside the nose dark when fill light would otherwise wash them flat. The advantage over painting darkness into albedo is control. You can dial cavity down without repainting pigment.
Height comes last and only where it earns its cost. Displacement pays off when the camera is close enough to see a silhouette change, like the raised lip of a scar or a deep nasolabial fold. On a cheek full of pores it changes nothing the viewer can see, so the normal map should carry that detail alone.
Two rules govern the whole stack. Every map shares one UV layout, so a pore in the normal map lands on the same texel as its cavity darkening. And anything applied to skin, whether makeup, stubble, or a tattoo, belongs in albedo and roughness together. Foundation changes color and finish at once. Paint only the color and the shine will contradict it.
Ranges That Keep Skin From Looking Plastic
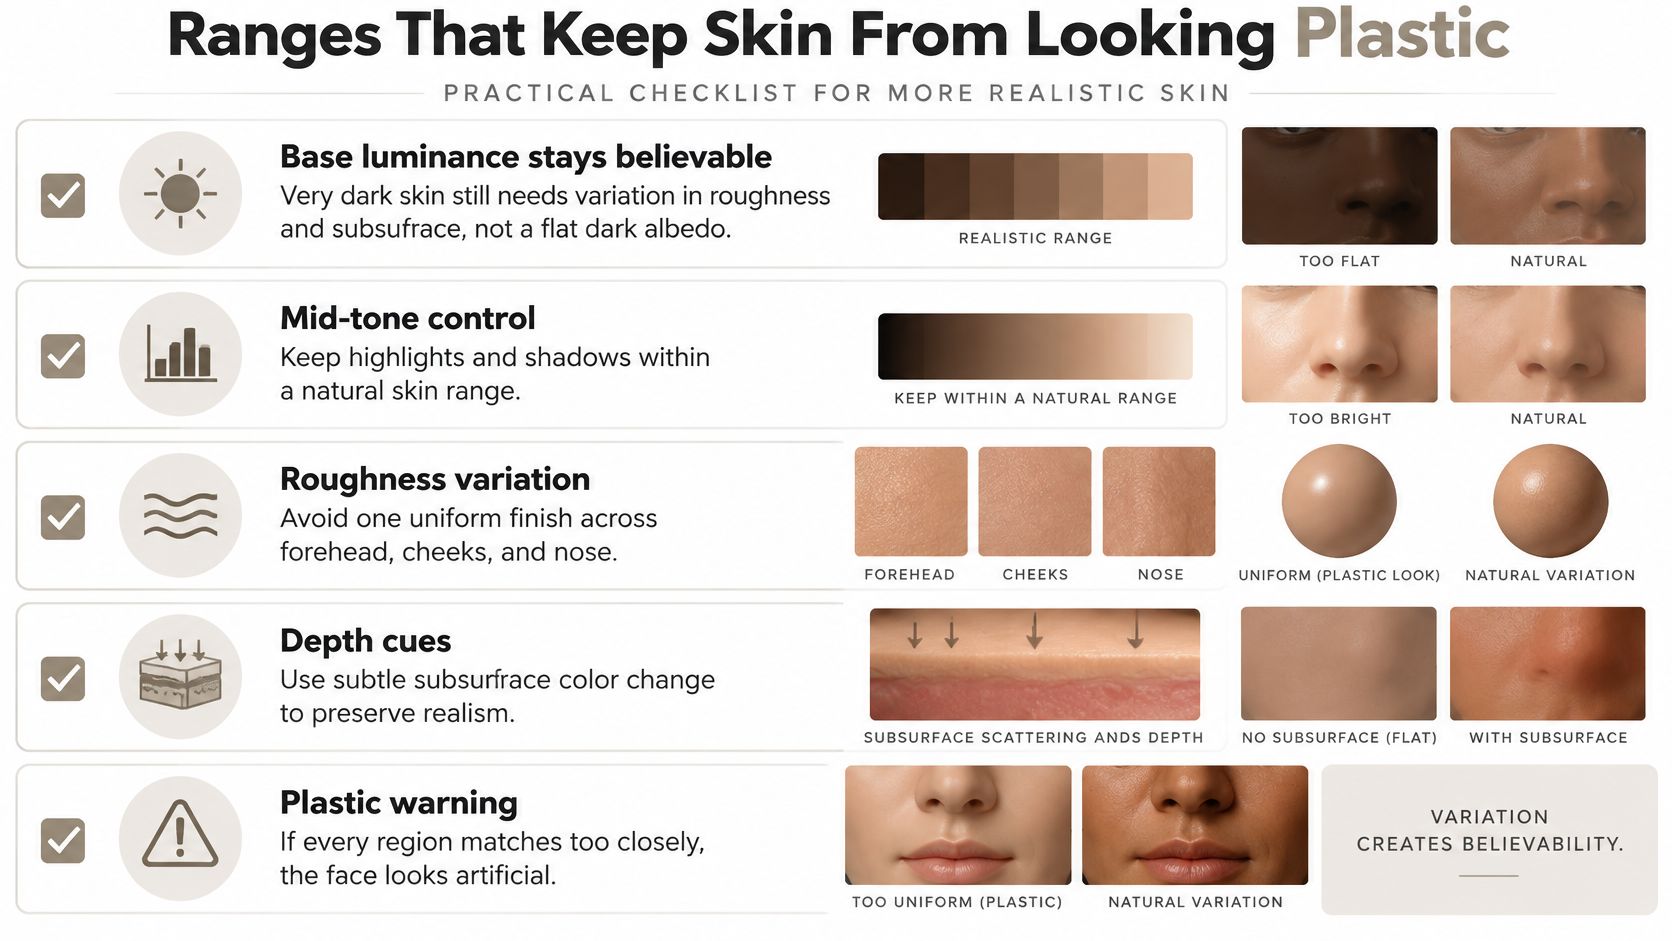
Ranges are checks, not decoration. You can run most of them on a shader ball before you ever put the maps on a face, and a ball that fails will produce a face that fails. Work through them map by map, and treat each edge case as a pass or fail test.
Albedo Luminance and Roughness Spread
Keep base color inside a believable luminance band. Very dark skin still needs variation in roughness and subsurface, because a flat dark albedo with nothing else reads as painted rubber. The material information has to come from somewhere. At the other end, don't push very light skin toward white in the color map. You'll get specular blooms that look like the face is glowing, and you'll have no headroom left for actual highlights.
Roughness needs spread more than it needs a perfect midpoint. A few tenths of variation across the face is what separates a nose from a cheek under the same light. Set the whole head to a single value around the middle and you get latex, no matter how good the albedo is. Paint the breaks where anatomy puts them, oilier in the T-zone and drier on the outer cheek and jaw.
Metallic, Subsurface, and the Non Skin Parts
Metallic above a trace gives you colored reflections, because metals tint what they reflect with their base color. Skin never does that. If a character wears glasses or a nose ring, that's a second material with its own metallic value, not a brighter patch painted into the skin's metallic map.
Set subsurface color warmer than the albedo, since the light that comes back out has passed through blood bearing tissue. Push it stronger in thin anatomy and pull it back on scar tissue, which is denser and more opaque, so a scar shouldn't glow like an ear does. Lips can sit slightly lower in roughness and a touch higher in specular response than cheeks, because they're moister and smoother. Eyes, teeth, and hair aren't skin and shouldn't inherit skin ranges just because they're nearby in the UV layout.
Shader ball test: if the ball looks like a billiard ball, a candle, or a rubber toy, the ranges are wrong and no amount of pore detail will rescue the face.
Age and condition are variations inside these ranges, not new shader types. Drier older skin takes finer pores and higher, more even roughness. Wrinkles need deeper normal and, at close range, height. Acne and scarring are localized roughness and color breaks rather than a global change. You're moving values around inside the same stack.
One technical trap undoes all of it. If you save a roughness, normal, or metallic map as sRGB, the engine applies a gamma curve to data that was never color, and every value you authored shifts. Your carefully placed cheek roughness lands somewhere else entirely. Keep data maps linear and reserve sRGB for albedo and other true color textures. Check the import settings in your engine, not just the file you exported.
Visible Skin Texture Features and Their Maps
Start from what the viewer sees, then assign it to one channel. That order matters because identical looking unevenness can come from different causes, and each cause lives in a different map. If you guess the channel from the look alone, you'll often guess wrong.
Enlarged pores are geometry at a tiny scale, so they're small dents in the normal map with darker cavity inside them. A clogged pore or acne bump is different. It's a local break in color and roughness, slightly raised in the normal, often redder in albedo and shinier at its peak. Same region of the face, opposite normal direction.
Reference helps you tell them apart, and it has to be honest reference. Filtered selfies erase exactly the microrelief you're trying to author. Clean, evenly lit portraits, the kind you'd shoot as studio-style photos for your personal brand, show pore scale and T-zone shine without a beauty filter flattening them, which makes them far more useful for judging how big a pore dent should be.
Lines, Dryness, and Oil
Fine lines are shallow grooves, so they belong in the normal map at low depth. Wrinkles and sagging go further. A nasolabial fold or the raised edge of a scar needs deeper normal and often height, because the surface changes height there. If you're unsure how to build that relief cleanly, work through a practical guide to normal map creation before you start sculpting detail you'll have to rebake.
Dryness reads as higher, flatter roughness across the cheek and around the mouth, with fine flaky microrelief in the normal. Oiliness is a lower roughness patch in the T-zone. Notice that neither is primarily an albedo change. Artists who paint dry skin paler and oily skin darker end up with faces that look dirty instead of dry, because they changed pigment when the main difference was how light scattered.
Why Age Changes the Values
Age adds texture rather than changing the shader. In the 2002 biopsy study of 83 healthy volunteers aged 6 to 84, type I collagen staining in sun-exposed skin fell from 82.5% in the first decade of life to 53.2% in the ninth. Less collagen means less structural support under the surface, so the surface itself gets less even.
The production side drops too. A 2021 review of human skin aging research reports that people aged 80 or older can have approximately 75% less dermal collagen production than young adults. For an artist that translates into deeper wrinkle normals, finer and more irregular microrelief, and reduced firmness in the forms themselves.
Real faces also stack features instead of presenting one at a time. A 2025 analysis of millions of anonymized skincare interactions found more than 65% of users reported at least three simultaneous concerns. So build one feature per channel first, verify it in isolation, then combine pores, redness, and roughness breaks on the same face.
Game Film and Print Map Setups
Delivery decides the map set. Authoring a full film stack for a background mobile character wastes texture memory, and shipping a mobile stack for a cinematic close-up leaves you with nothing to light. Pick the set from the pipeline, then author to it.
Which Skin Maps Each Pipeline Should Ship
| Pipeline | Required maps | Optional maps | Practical note |
|---|---|---|---|
| Real-time game hero | Albedo, normal, roughness | ORM pack, subsurface mask | 2K to 4K face, metallic channel black |
| Film or offline | Albedo, normal, roughness, subsurface | Height, cavity, specular color | Scatter visible in rim light on ears |
| Mobile or background | Albedo, normal or packed roughness | Baked cavity in albedo | 1K, skip SSS and displacement |
| Color 3D print | Albedo for the print profile | Height only as sculpted mesh detail | STL carries no roughness or metallic |
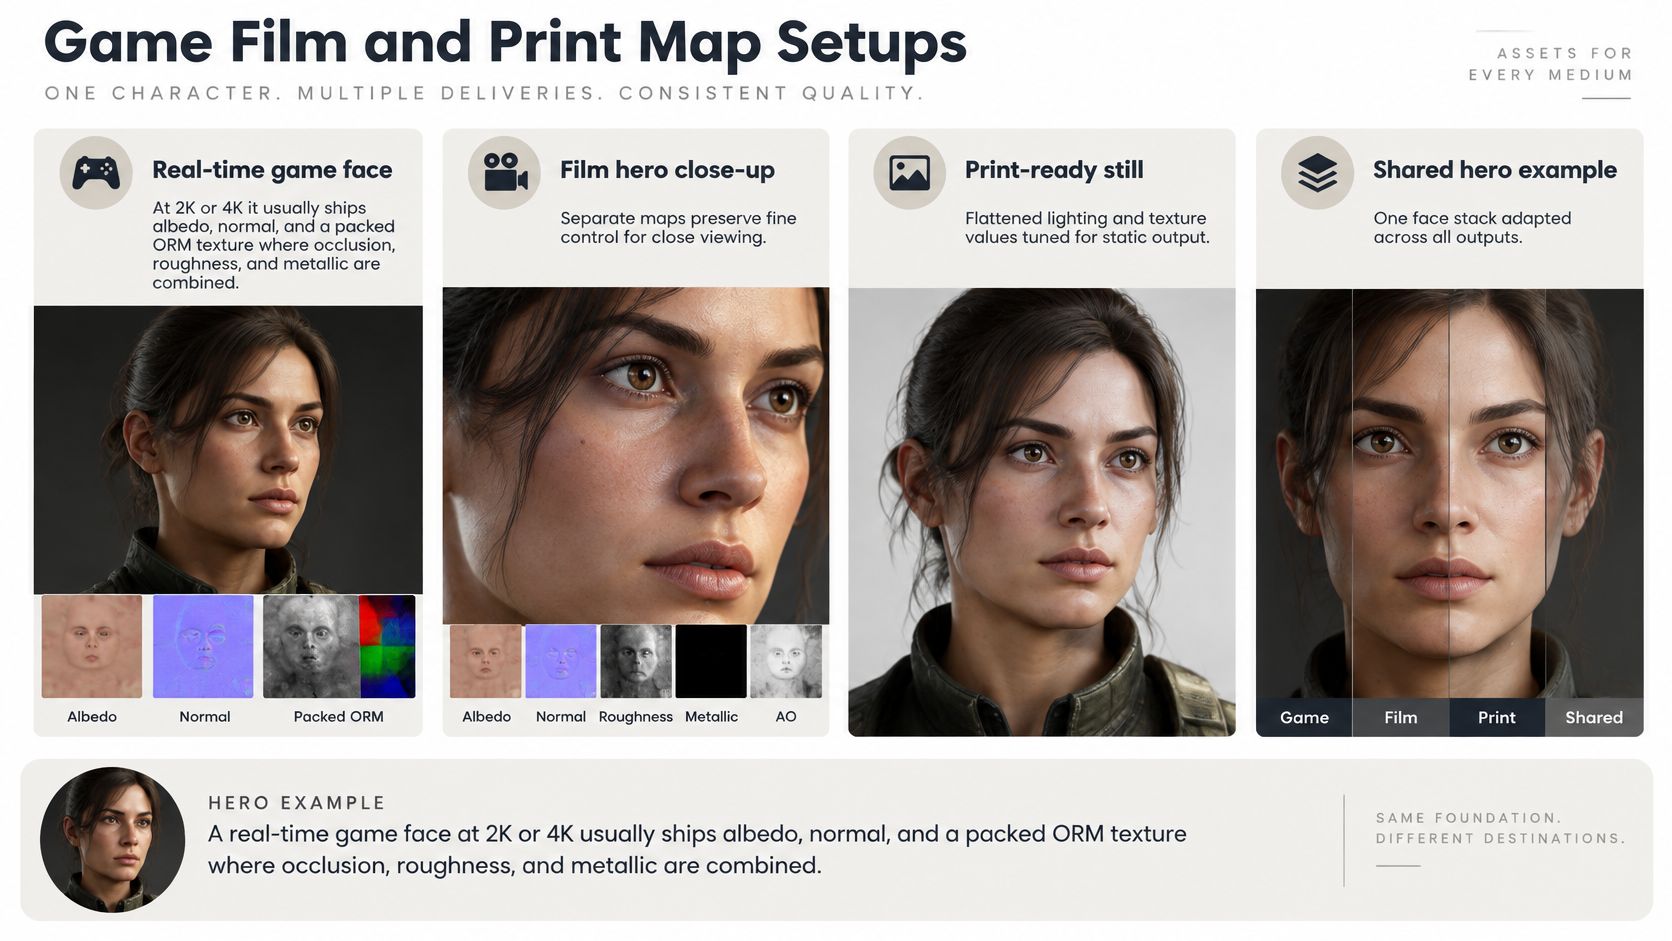
A real-time game hero usually ships albedo, normal, and a packed ORM texture, where ambient occlusion, roughness, and metallic each occupy one channel of a single image. Packing saves texture fetches, which matters when a frame budget is tight. Add a subsurface mask only if the engine has a skin shader to consume it. A mask that nothing reads is dead weight.
Film and offline lookdev can afford separate maps and heavier features. Displacement becomes viable because render time per frame isn't capped at a fraction of a second. A scatter radius or transmittance color earns its place because the camera will sit close enough to catch an ear glowing against a rim light, and that single cue sells skin faster than extra pore resolution does.
A mobile or background character drops subsurface and height entirely. Bake mild cavity into the albedo so pores still read at a distance, since you no longer have a cavity slot doing that work. Smaller maps are fine because the character occupies fewer pixels on screen, and spending resolution nobody sees only costs memory.
Color 3D print is the odd one out. The printer needs color matched to its profile, and any surface relief has to exist in the mesh itself. Roughness and metallic values don't survive the trip, because an STL carries geometry and nothing about material response. If you want a scar to read on a printed bust, sculpt it.
One Hero Face With Numbers
Say you're building a game hero face and need starting values. Try this set, then adjust under your own lighting.
- Forehead roughness: near 0.35, because the T-zone carries more oil
- Cheek roughness: near 0.6, drier and more diffuse
- Lip roughness: near 0.3, moist with a tighter highlight
- Metallic: black across the whole face, no exceptions
- Normal strength: near 0.7, strong enough to rake but not emboss
- Subsurface: masked to the ear, nostril wings, and lips only
That combination gives you three distinct material zones on one head, which is the whole point. For export, stick to the set that Blender, Unity, and glTF style viewers all read the same way, namely base color, normal, and metallic-roughness. If you generate a prompt driven PBR set with an AI texturing pass, treat the output as a draft and still check three things yourself. Confirm metallic is black, confirm roughness varies across the face, and confirm subsurface wasn't faked by painting red into the albedo.
Mistakes That Flatten or Plasticize Skin
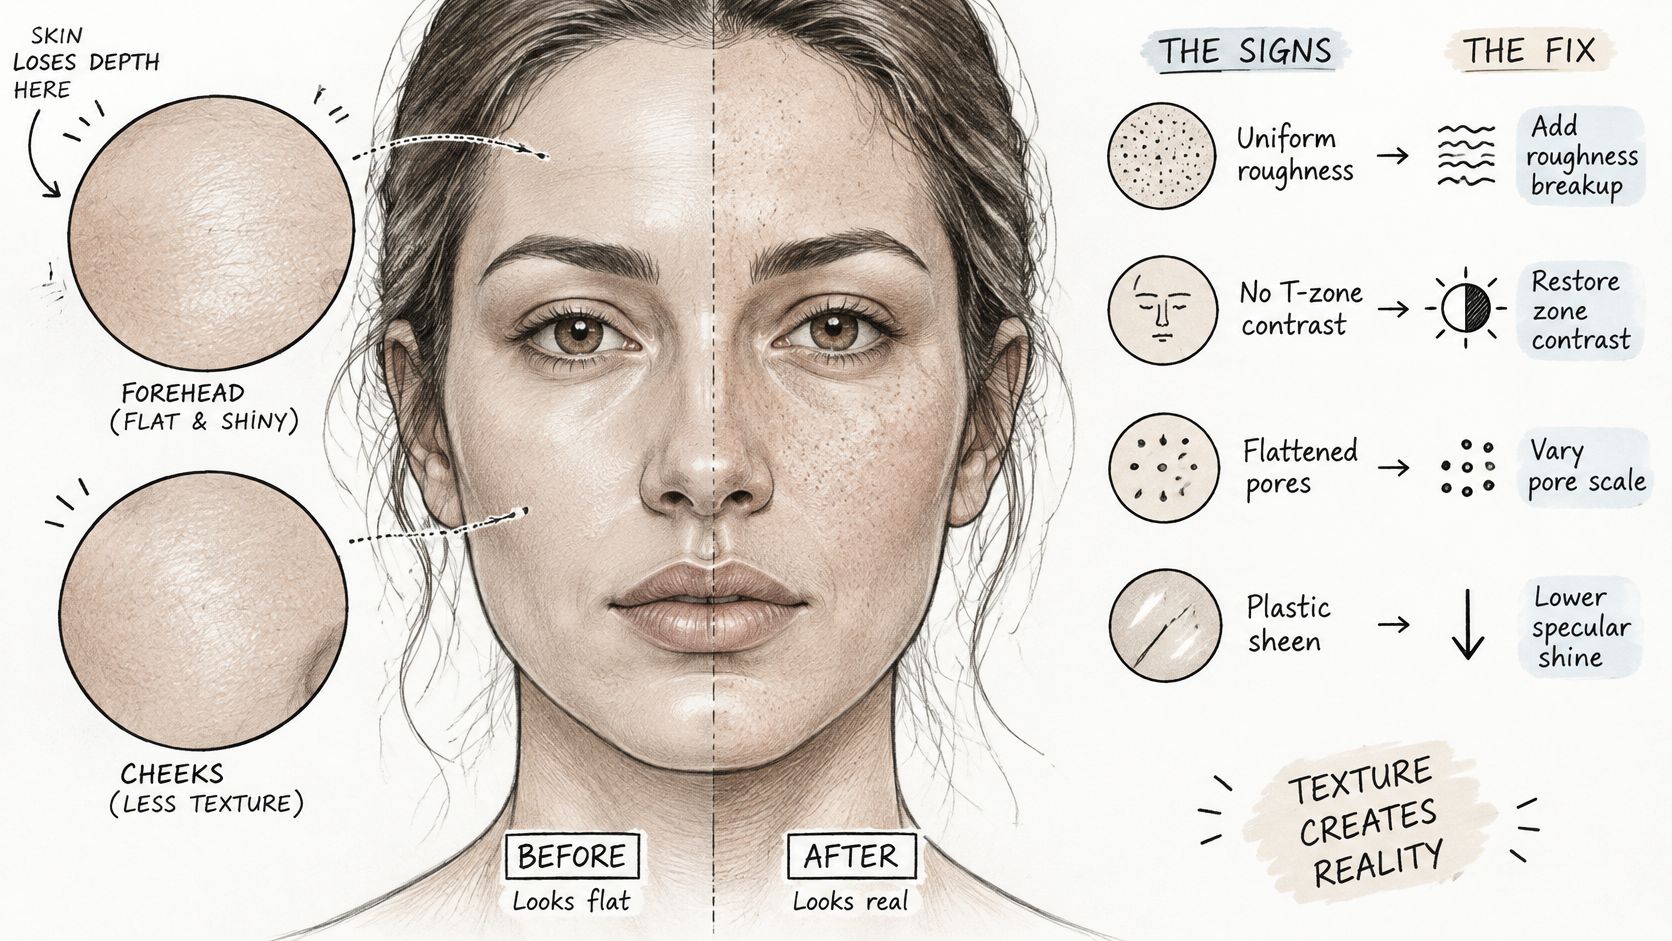
Uniform roughness is the mistake that does the most damage for the least effort. Set the forehead and cheek to the same value and the T-zone disappears, taking the face's material geography with it. What remains is a mannequin with a photograph wrapped around it. Paint broader oil only where sebum would sit and the zones come back.
The comparison below shows how flat shading and broken material zones read against skin with proper variation.
Symptom and Fix Pairs
- Highlights baked into albedo: the shine stays put when the light moves, and doubles up under a real rig. Move that information into roughness, cavity, or engine AO.
- Sharp colored glints on the lips: the metallic channel has drifted above zero, often from a packed texture authored carelessly. Reset it to black.
- Pores reading as bumps: the normal map's handedness doesn't match the engine. Verify under a grazing light, because a front fill hides inverted relief completely.
- Orange peel surface: normal strength pushed toward 2.0 over flat roughness. Lower the strength before you add more pore detail, since more detail at that strength makes it worse.
- Waxy eyes and teeth: subsurface applied to the whole head material. Mask it to thin tissue only.
- Swimming pores: displacement running on a mesh without enough resolution, or height that doesn't match the normal. Let height own the silhouette and normal own the micro detail.
- Over-sharp pores on a distant character: detail frequency fighting the art direction. Match pore scale to camera distance, and let LODs drop the fine normal first.
Watching a lead diagnose these in a viewport is worth more than reading about them, because the symptoms are easier to recognize in motion under a moving light.
Finish every skin pass with a three-light check. Put a key, a fill, and a rim on the head and rotate it. The key exposes inverted normals and orange peel. The fill exposes baked AO, because painted shadow refuses to lift. The rim exposes missing subsurface and metallic glints. Most failures on this list show up in that one test, and none of them need a new map to diagnose.
Choose Your Map Set Before You Texture
Decide the set in one sitting, before you paint a single pore. Retrofitting a shader workflow after the maps exist means repainting, and repainting skin is slow.
If your shader is metallic-roughness, lock the set to albedo, normal, roughness, and a black metallic channel. Add subsurface only when the engine supports it and the shot shows ears or lips against a rim light. If your shader is spec-gloss, swap in a specular map for the F0 values and don't paint metallic at all, since running both workflows at once double counts reflectance. If the delivery is a print or a distant prop, stop at color and sculpted mesh detail. An older character doesn't change this decision either, because age lives in the values you paint, as any detailed 3D old man build shows with its deeper wrinkle relief and drier roughness.
Then author in an order that builds broad to fine.
- Block albedo zones: forehead, cheeks, lips, eyelids, with no lighting in the color
- Set roughness breaks: oil in the T-zone, drier values on cheeks and jaw
- Add normal detail: moderate strength, correct green channel for your engine
- Mask subsurface: ears, nostrils, and lips, kept off eyes and teeth
- Add cavity: multiply into pores and folds so they survive fill light
- Add displacement last: only where the camera sees a silhouette change
Export to GLB, FBX, or your engine's format with base color, normal, and metallic-roughness channels intact, so Blender, Unity, and glTF viewers all read the same material. Then run the three-light test as your acceptance gate. If the ear glows slightly, the nose is oilier than the cheek, and nothing on the skin reflects like metal, your texture types are each doing their own job.
Generate a character mesh, texture it with prompt driven PBR materials, and check your albedo, normal, and roughness breaks in one browser based studio instead of juggling separate tools and accounts. Sculpty brings text to 3D and image to 3D generation, AI texturing, remeshing, and 4K rendering together, with exports to GLB, FBX, and OBJ for Blender and Unity. Start your next skin pass there and spend your time on the material decisions, not the file wrangling.