
Blender 3d Fur
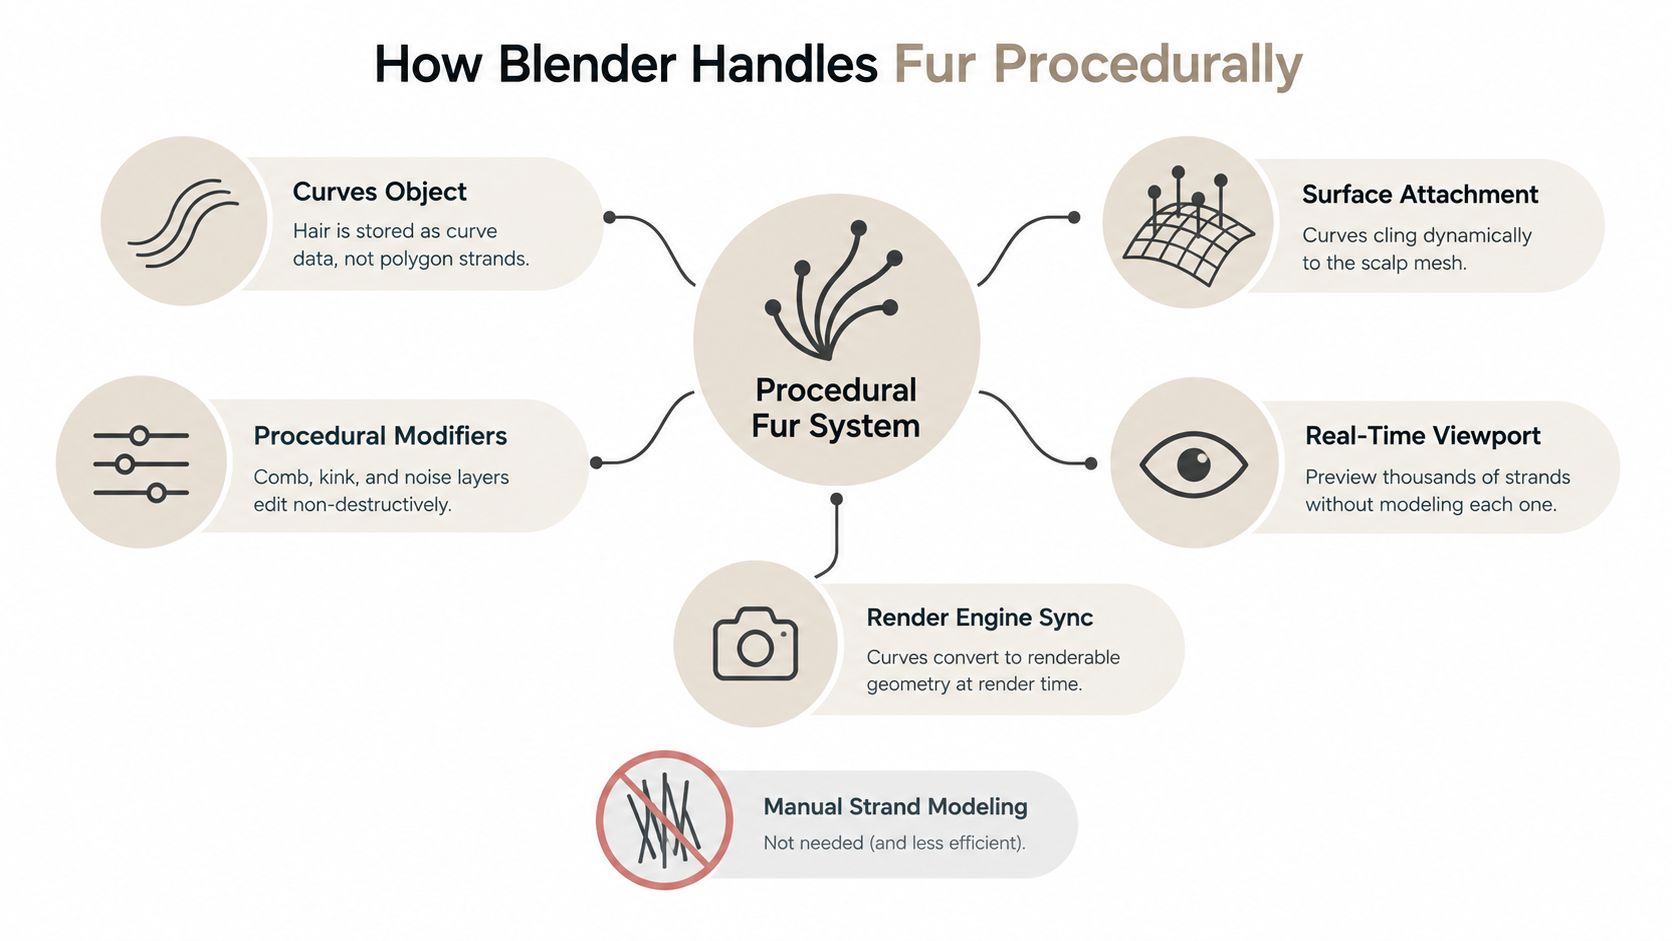
You've got a creature with a convincing silhouette, clean textures, and a rig that deforms well. Then the close-up render exposes the problem: bald patches around the cheeks, identical clumps across the body, and fur that looks like plastic bristles instead of a living coat. The usual cause isn't a lack of strands. It's a grooming pipeline that treats fur as geometry instead of a controlled procedural system.
Modern Blender 3D fur work is built around guide curves, density masks, interpolation, and strand-aware rendering. That approach keeps the groom editable, lets you generate visual density at render time, and gives you control over how a coat behaves across the face, joints, paws, and body.
Table of Contents
- Understanding How Blender Handles Fur Procedurally
- Setting Up Your Grooming Pipeline from Mesh to Guide Curves
- Creating a Realistic Fur Material with Principled Hair BSDF
- Adding Physics and Animation to Living Fur
- Optimizing Fur Performance for Games and Real-Time Workflows
Understanding How Blender Handles Fur Procedurally
Beginners often try to model every strand individually. That approach becomes difficult to edit, expensive to store, and nearly impossible to groom consistently once the coat needs variation. Blender's hair workflow is procedural by design. Its hair-type particle system generates and renders collections of strands associated with a surface mesh, with controls for density, length, children, clumping, roughness, and related appearance properties, as described in the Cycles hair documentation.
The important distinction is between guide strands and visible density. Guides establish direction, flow, length, and grooming decisions. Procedural interpolation expands those guides into many child hairs, so artists can work with a manageable control structure while the renderer produces the dense coat. Blender's documentation describes this kind of system as generating strands from paths rather than requiring every visible strand to be authored manually.
Why the curves workflow matters
Blender's newer hair architecture moves toward dedicated Curves objects. Developer documentation describes the Curves object as a replacement for both the older hair particle system and the previous curve object type, while current tools can generate hair curves directly on a surface mesh through Generate Hair Curves. This gives grooming a more explicit data structure for editing, simulation, and Geometry Nodes processing. The hair introduction documentation outlines this transition from legacy particle workflows toward curve-based hair.
That shift changes how you build assets. Instead of committing to a dense mesh early, you preserve a sparse authored layer and let procedural nodes generate the coat. Curves can also be rendered as circular 3D geometry in Cycles, which improves strand accuracy when the camera gets close.
Practical rule: Guides define the coat's direction. Interpolated children create its visual fullness.
A clean topology foundation still matters. Your scalp mesh controls where curves attach, how they deform, and whether density masks follow the character correctly. If you're preparing the base for deformation, review these 3D modeling topology principles before grooming. A poor scalp won't be rescued by more children or stronger clumping.
Blender's procedural approach also makes assets reusable. You can adjust coat length, density, roughness, and regional behavior without rebuilding every strand. That matters for animation, where the same creature may need a short preview groom, a dense final render, and several poses that expose different coverage problems.
Setting Up Your Grooming Pipeline from Mesh to Guide Curves
Start with a clean scalp mesh that has enough subdivision for stable attachment and deformation. The mesh doesn't need to carry the final visual density, but it must describe the regions where hair can grow. Apply transforms, check normals, remove hidden sliver faces, and make sure the surface follows the intended animation volume.
Create a Curves object and attach it to the scalp using Blender's Attach Curves to Surface workflow. The surface acts as the grooming base, while the curves become the editable description of hair flow.
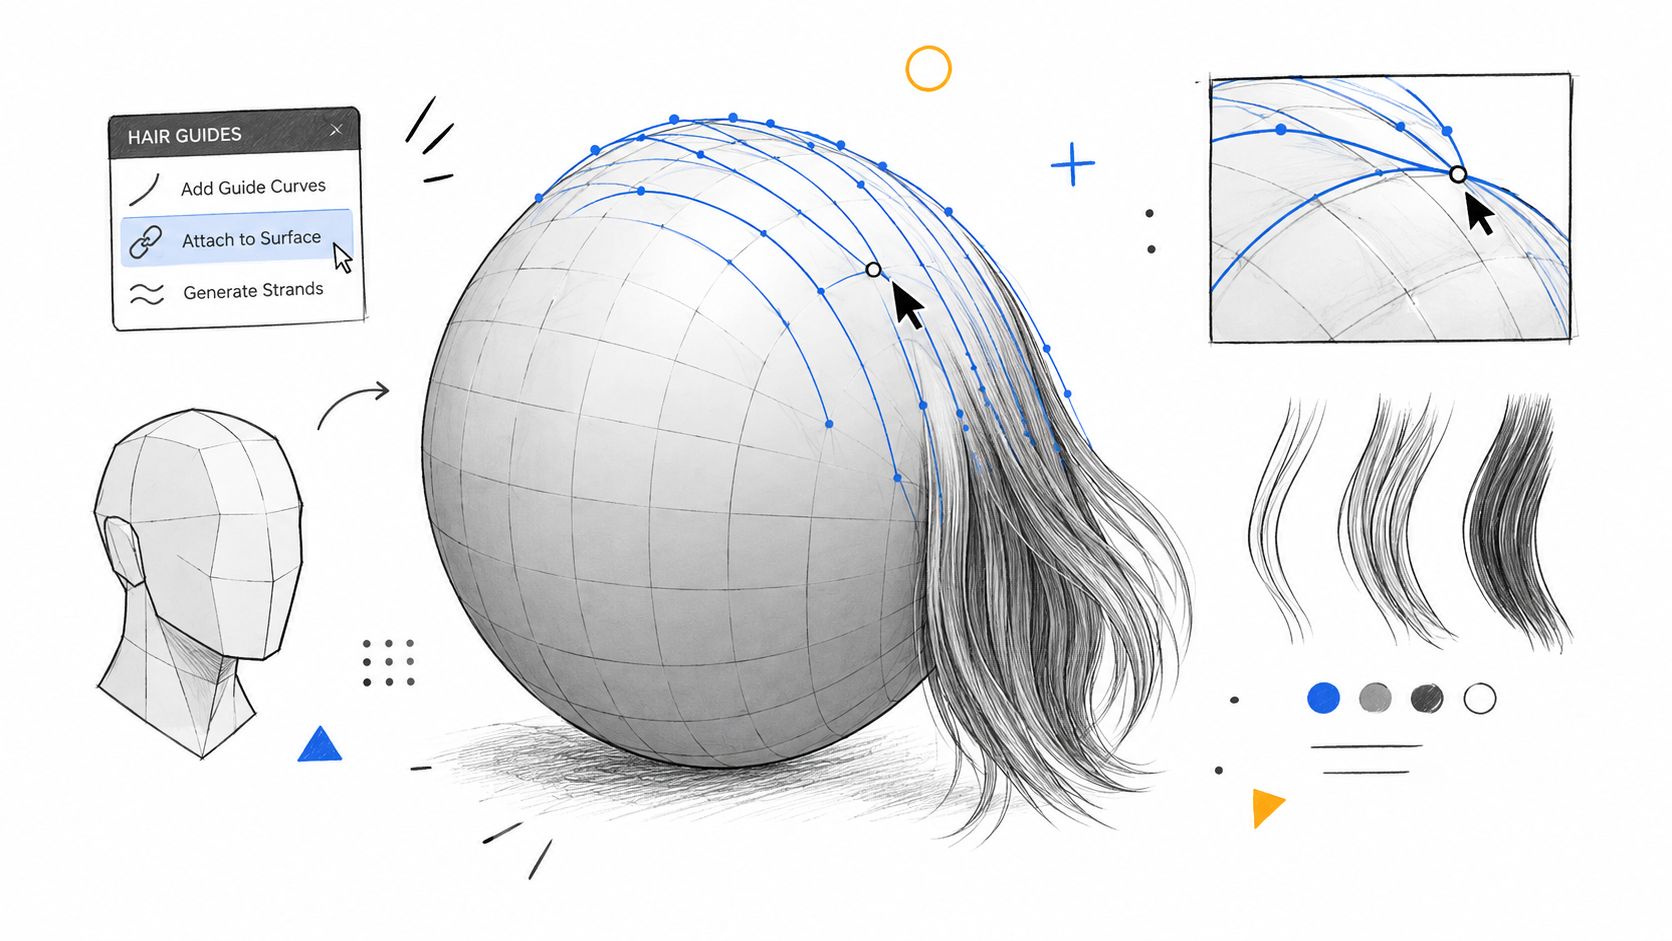
Place a sparse, evenly distributed set of guide curves before adding density. This stage should answer directional questions: does the cheek fur point away from the muzzle, do the ears follow their form, and does the neck transition cleanly into the torso? You're establishing flow, not painting the final number of hairs.
Build density with masks
A common early mistake is treating guide count as final strand count. Guides define the coat's structure, while interpolated children provide the fullness seen in the render. If the guides are too dense, grooming becomes slow and repetitive. If they're sparse but well distributed, procedural interpolation can produce a convincing coat with better control.
Paint a density mask before interpolation. Unmasked children can appear in unsuitable areas, causing sparse regions, abrupt direction changes, or bald patches once the character deforms. A single uniform density value across the whole mesh also produces poor results around high-curvature areas and facial features.
Use separate masks for regions that need different treatment:
- Face mask: Reduce density around eyelids, nostrils, lips, and other areas where fur can obscure expression.
- Paw and pad masks: Keep pads and contact surfaces clean while allowing surrounding fur to transition naturally.
- Ear mask: Control the inner ear separately from the outer silhouette and ear rim.
- Joint mask: Manage elbows, knees, shoulders, and the neck, where deformation can reveal gaps.
- Directional transition masks: Blend changes between short facial fur, longer cheek fur, and body flow.
- Coat-layer masks: Separate undercoat from longer guard hairs and low-density zones.
A useful node order is deliberately restrained:
- Define the curve radius or profile.
- Interpolate child curves through the painted density mask.
- Add clumping to group strands without collapsing their individual paths.
- Introduce controlled length variation and frizz.
- Trim or scale the curves for regional coat length.
The Trim Hair Curves node is especially useful when one scalp supports several coat lengths. It can scale strands toward a specified length, allowing you to control the muzzle, paws, ears, and body without splitting the entire asset into disconnected systems. Blender's curve documentation also identifies interpolation, parting, and non-straight hair behavior as specialized curve-node requirements, which is why procedural layers outperform manual placement alone.
Fur should be judged at full generated density, in the intended pose. Viewport guides can look perfect while the rendered coat exposes gaps.
Keep clumping subtle and directional. Repeated interpolation with identical clump strength creates a combed, manufactured pattern. Length variation should support the animal's coat flow, not introduce random noise everywhere. Frizz belongs near the end of the chain, after the main direction and density are working.
Preview the groom in a neutral pose, then test the most demanding animated poses. Check the silhouette, roots, facial clearance, and transitions around joints. If a bald patch appears only after deformation, fix the mask or guide distribution rather than hiding it with more global density.
A short visual reference can help when arranging the node stages and surface attachment workflow:
Creating a Realistic Fur Material with Principled Hair BSDF
A strong groom can still fail under the wrong shader. Fur needs a strand-oriented material, not a conventional opaque surface shader stretched across the scalp. Blender's curve-based workflow is designed to work with Principled Hair BSDF in both Cycles and EEVEE, giving each strand a response that is closer to fiber than solid skin.
Start with the coat's direction and value before chasing subtle color variation. The shader should support the structure you created in the groom. If the material makes every strand equally bright, clumping and length variation become harder to read.
Radius controls whether fur reads as fiber
Set strand radius deliberately. Excessive radius turns hair into wire-like bristles, while a radius that's too small can disappear in EEVEE or in a low-resolution output. Judge this in the final camera rather than only in a close viewport preview, because a strand that looks visible while orbiting the model may vanish once the image is resized.
Use separate material or density logic for undercoat and guard hairs when the asset needs layered breakup. The undercoat can provide soft visual coverage, while longer guard hairs create directional accents and silhouette variation. Low-density areas around the nose, eyelids, paw pads, and inner ears should remain controlled so the shader doesn't fill spaces that the groom intentionally left open.
The coat's color should vary gradually. Small changes in tone can separate clumps, but strong random shifts make the animal look noisy. Use the strand position, length, or regional masks to introduce variation where it reinforces form.
Validate the material in three camera distances
A practical validation pass uses three renders:
- Close-up: Look for individual strand breakup, radius consistency, and shader response at the face or another focal area.
- Mid-shot: Check clump rhythm, density transitions, and whether the coat still has readable flow.
- Full-body shot: Inspect the silhouette, bald spots, and the balance between fur volume and the underlying character design.
Evaluate all three in the intended pose and lighting. Deformation can separate guide regions and expose gaps that stay hidden in a static T-pose. Lighting can also flatten clumps or make an overly glossy material resemble synthetic fibers.
Avoid identical clumps. Interpolation without variation in length, alignment, and clump strength creates the familiar paintbrush appearance. Controlled randomness works best after the main directional flow is established.
Material check: If the coat looks artificial, inspect radius and clump repetition before adding more noise.
Excessive frizz is another common failure. Noise applied too early destroys the readable coat pattern and makes later grooming harder. Establish root coverage, direction, length, and clumping first. Add restrained frizz afterward, concentrating it where wind, wear, or naturally irregular guard hairs would justify it.
For the broader relationship between geometry, material information, and reusable assets, see these 3D models and textures workflows. Fur looks convincing when the shader reinforces the groom. It can't compensate for poor strand direction or missing root coverage.
Adding Physics and Animation to Living Fur
Static fur often looks acceptable until the character moves. A turn of the head can separate the cheek groom, a shoulder compression can expose skin, and a fast body motion can make the coat lag behind the deformation. Simulation should solve those problems without replacing the grooming structure that defines the animal's look.
Use the authored guides as the simulation layer whenever possible. Running physics on the full generated child population wastes computation and makes the result harder to art-direct. Simulate the sparse curves, then let the procedural system regenerate children at render time or in a controlled preview mode.
Match the solver to the motion
Simple wind and gravity behavior can fit a particle-based approach, especially when the movement is broad and predictable. More involved interactions, including procedural control and node-based processing, benefit from a Geometry Nodes-oriented setup. The right choice depends on how much direct control the shot needs, not on whether one system sounds newer.
The settings that shape the result are familiar but easy to misjudge:
- Mass: Heavier guides resist sudden movement and preserve the coat's weight.
- Damping: Higher damping reduces oscillation, while too much makes the fur feel rigid.
- Collision objects: Use the body, clothing, accessories, and nearby props where contact affects the groom.
- Deformation order: Make sure the curves follow the animated scalp before simulation adds secondary motion.
- Cache behavior: Cache the guides for consistent playback and frame-accurate rendering.
Joint areas need special attention. Elbows, knees, shoulders, and the neck compress and stretch as the character moves, so a groom that works on a static mesh can bunch into unnatural clumps during animation. Regional masks, controlled clump strength, and guide flow that follows the joint's deformation all help preserve continuity.
Simulate the coat's behavior, not its entire visible population.
After simulation, inspect the generated children in motion. Interpolation can magnify small guide errors, especially where a guide crosses a parting or changes direction abruptly. If children explode outward or reveal a gap, correct the guide path, attachment, or mask before increasing solver complexity.
For shot work, bake only after the deformation, collision, density, and material tests are stable. A cached guide layer gives the animator predictable playback while preserving the procedural advantages of the coat. That separation also makes revisions less painful, because you can adjust render density without resimulating every visible strand.
Optimizing Fur Performance for Games and Real-Time Workflows
Fur performance comes down to three choices: how much information you author, how much density you generate, and what your destination supports. A cinematic Blender scene can keep guides sparse and generate children procedurally for Cycles or EEVEE, while a game asset often needs a representation that survives export and runs inside a real-time engine.
Storing every final strand as editable geometry is usually the wrong default. It inflates the scene, slows grooming, and makes even simple revisions expensive. Keep the authored guides sparse, generate children at render time where possible, and use controlled preview density while working.
Choose the representation for the deliverable
For offline work, curves and procedural children preserve the most flexibility. For games, you may need cards, baked textures, engine-native groom data, or simplified mesh strips, depending on the target renderer. Export formats such as GLB, FBX, and USDZ don't necessarily preserve Blender's complete procedural hair setup, so verify which curve, material, mask, and simulation data survives before committing to an export path.
The core trade-offs look like this:
| Use Case | Guide Curves | Child Density | Render Method | Export Format |
|---|---|---|---|---|
| Offline character close-up | Sparse, carefully groomed guides | Dense procedural generation | Cycles curve rendering | Native Blender scene or USD pipeline |
| Animated creature | Sparse guides with cached motion | Generated after guide simulation | Cycles or EEVEE validation | Pipeline format confirmed per production |
| Real-time preview | Lightweight guide structure | Reduced, controlled preview density | EEVEE or target engine preview | Engine-supported groom or mesh representation |
| Game-ready asset | Author only what the target can evaluate | Baked or engine-generated detail | Real-time renderer | GLB, FBX, or another target-supported format |
| 3D visualization handoff | Reusable guides where supported | Moderate render-time density | Cycles or EEVEE | Confirmed interchange format |
Do not treat a high strand count as a quality target by itself. The viewer reads silhouette, breakup, direction, and contact behavior first. A well-masked coat with restrained density can look more convincing than a heavy groom with repeated clumps and uneven roots.
For game-focused topology and asset constraints, use this modeling for games guidance. Test the actual target early. A Blender viewport can hide export problems, unsupported materials, or a curve system that the receiving engine interprets differently.
Keep separate levels of detail for camera distance. Near shots need individual strand breakup and carefully controlled facial density. Mid-range shots can rely more on clumps and silhouette. Distant shots may need only a simplified shell, cards, or a baked appearance. The exact switch depends on the project, but the principle is stable: reduce procedural work as the camera loses the ability to resolve it.
The most reliable production workflow is to preserve the groom source, create a lighter preview, validate the intended export, and only then bake or convert anything that the final platform requires.
Sculpty can help you create and prepare supporting 3D assets around a Blender fur workflow, with text-to-3D and image-to-3D generation, AI texturing, remeshing, retopology, rendering, and exports for downstream tools. Use Sculpty to generate a starting mesh or cleanup pass, then bring the result into Blender for topology checks, curve grooming, density masks, and final fur rendering.