
Image to 3D Online: From Photo to Usable Mesh
You dropped one product photo into a browser tool, got a glossy mesh in about a minute, and figured the hard part was over. Spin the model and the front still matches the picture. The back is a smooth guess. Send it to a printer and the handle is missing, or a wall is so thin the nozzle skips it.
That first session is how newcomers first encounter image to 3D online. A closed shell can look finished and still be unusable. A watertight mesh is the starting point, not a print file and not a game asset. The path below runs from one photo, or a few views, to a file you can slice or import.
Table of Contents
- Upload-to-Mesh Workflow in Order
- Choose Input and Engine for Each Object
- Capture Photos That Survive Reconstruction
- Remesh and Retopologize for Your Destination
- Fix Common Mesh Problems Before Export
- Confirm the Mesh Is Ready Before You Download
- Export Formats by Destination
Upload-to-Mesh Workflow in Order
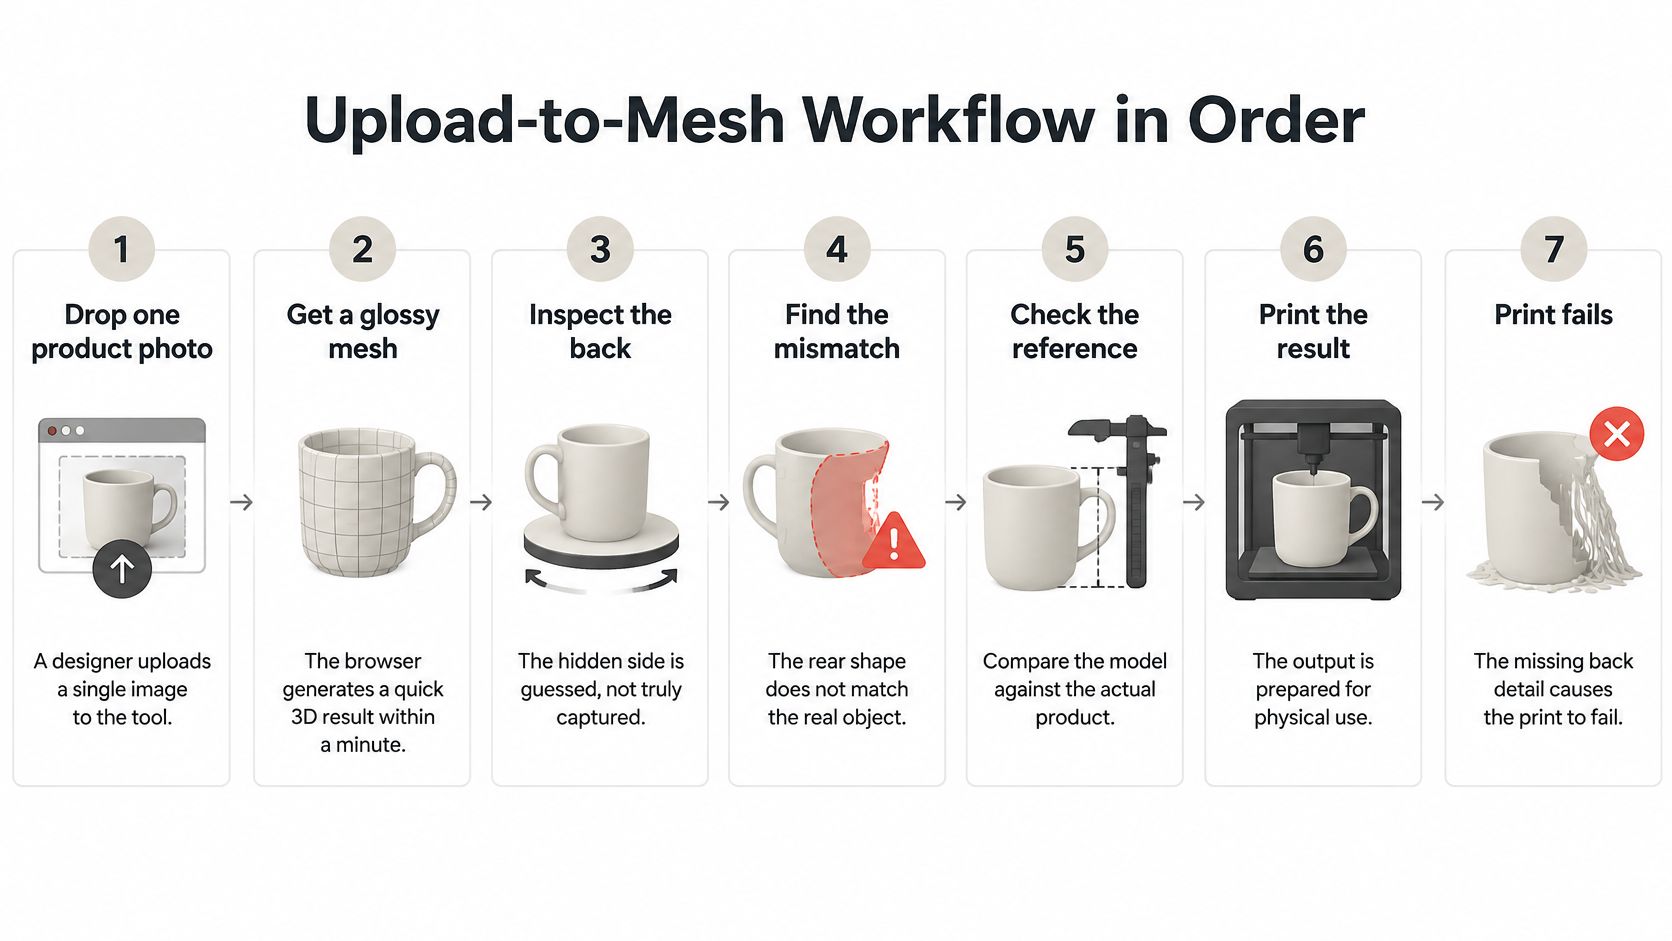
A designer uploads a single product photo, receives a shiny mesh within a minute, and only later finds the rear shape was invented. The print fails on the detail the photo never showed. The diagram below is that failed path.
Treat the job as seven stages. Each one exists because the next stage cannot undo what you skipped.
The first four stages
Crop to one silhouette. Cut the subject free of table edges, nearby props, and busy backgrounds so the model reads a single outline. Nearby edges get treated as part of the object, and a leftover tabletop becomes a shelf. Common slip: framing the whole desk because the product looks small in the shot.
Pick the input, then compare engines. One clear photo is enough for a concept. A part with a hidden side needs several views. Run the same photo through two engines and keep the mesh whose unseen side is less invented. Common slip: using a single photo for a bracket and expecting the underside to be measured.
Generate the base mesh and wait. Let the job finish before you judge shape, holes, or texture. A preview that is still computing hides open edges and unfinished normals. Common slip: accepting or rejecting a half-finished preview.
Inspect the silhouette from at least four virtual angles. Turn to the back, the underside, and both sides, and compare each outline with the physical object. The default front view is the angle the photo already proved. Common slip: approving the mesh from that front camera alone.
Practical rule: Don't texture, decimate, or export a mesh you have only seen from the front.
The last three stages
Remesh or retopologize for the destination. Even triangle density suits printing and inspection. Planned quads, or a lean triangle budget, suit rigs and games. Common slip: decimating before you confirm the key contour is still there.
Apply PBR texture only after the geometry passes. A broken shape bakes stretch into the UV layout, and you repaint work you will throw away. Common slip: texturing first because the clay preview looks dull.
Validate scale, wall thickness, and manifold edges, then export. Proportions can look right on screen while the part is far too small, or too thin to slice. Common slip: skipping the scale check.
Cropping stops extra geometry. Input choice limits how much gets invented. Waiting stops a false verdict. The orbit catches the guessed back. Topology matches the next tool. Texture waits for a stable shape. Validation is the gate between a preview and a file another program will accept.
Choose Input and Engine for Each Object
A single photograph is underconstrained. It doesn't show the backside, absolute scale, or reliable depth. Thin, reflective, transparent, and highly symmetrical parts are the ones most often inferred rather than observed. A single-view facial reconstruction benchmark shows how wide the spread can be even on one category: one baseline posted success rates of 85.3% and 85.9% on separate settings, while another method reached 100% on one listed setting. Those figures are for faces. They are not a success rate for brackets, props, or product shells.
For a production asset, define success in checks you can fail: an acceptable silhouette from the cameras you need, watertight geometry, correct orientation and scale, no self-intersections, and topology that matches the destination.
Match input to the object
| Object type | Input to use | Engine approach | Main risk |
|---|---|---|---|
| Stylized character or concept sketch | Single clear photo | Fast single-image engine | Invented back and sides |
| Hard-surface product or bracket | Four to eight overlapping views | Multi-view engine | Hidden undersides and wrong proportions |
| Printable functional part | Multi-view photos plus a ruler or coin | Multi-view engine, then wall-thickness check | Thin walls that pass watertight tests but fail to print |
| Reflective or glossy object | Diffuse light with several views | Multi-view engine, then check highlights | Highlights read as surface detail |
| Organic figure or animal | Two to four views with clear front and side | Engine with clean topology | Limbs or features hallucinated |
Read the row before you shoot. A concept sketch can live with an invented back if you plan to sculpt it. A hard-surface product can't, because a wrong underside changes fit. A printable part needs a ruler or a coin in frame, then a thickness check, since a closed skin can still be too thin to extrude. Glossy plastic needs soft light, or bright spots become ridges. A figure needs a clear front and a clear side so a limb is seen, not filled in.
Start with the cheapest input that might pass the silhouette check, and add views when that pass invents a side. Sculpty can send one photo to several engines, so you compare two outputs side by side instead of trusting a single result. If the hidden side still fails, shoot more angles. Regenerating the same single view only gives you a new guess.
Capture Photos That Survive Reconstruction
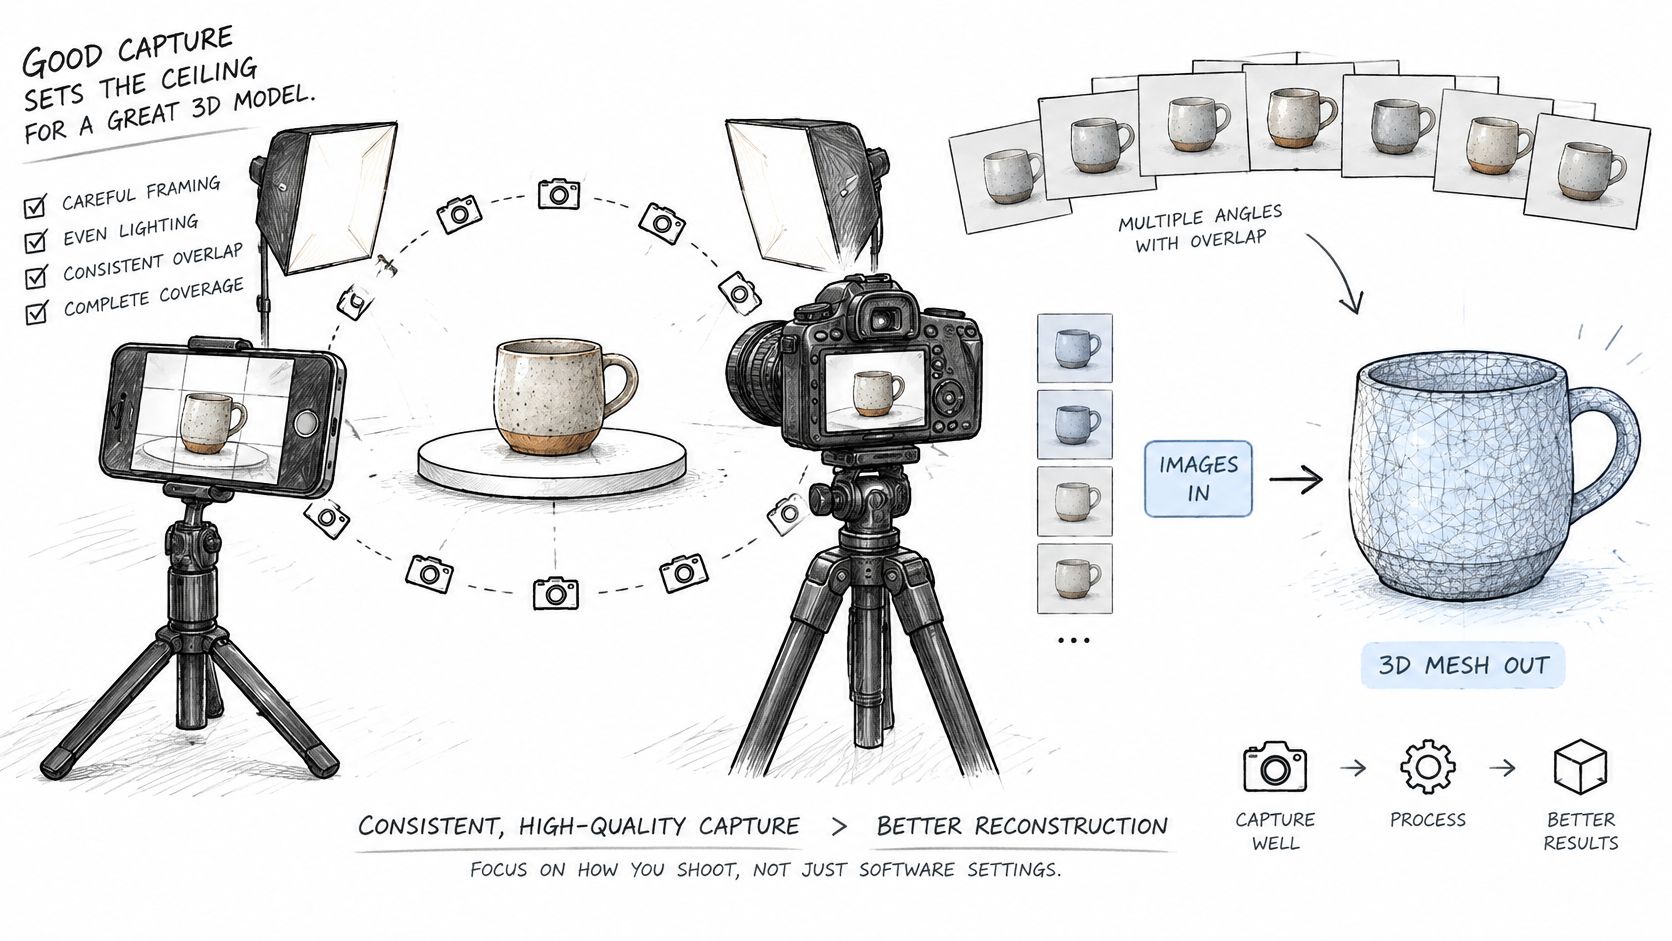
The photos set the ceiling for the mesh. No engine setting can invent a surface the camera never saw, and a watertight result can still be wrong if the missing side was guessed. Treat capture as a staged pipeline: select images with consistent exposure and a strong silhouette, estimate camera position and depth, reconstruct the surface, make it watertight, then validate accuracy, completeness, scale, normals, and polygon density. Beginners rush the orbit. The orbit is the part that supplies the evidence.
Shoot so the mesh has evidence
- Lock exposure and focus. Brightness that drifts between frames reads as a change in the surface, not a change in the light.
- Use diffuse light. An overcast window or a softbox beats one hard overhead bulb, which carves false shadows into the form. A hard shadow can read as a ridge because the reconstruction cannot separate lighting from geometry.
- Use a plain surface and a clean background. The subject should be the only strong shape in frame.
- Leave margin. A cropped edge becomes a missing face.
- Orbit at two heights. Each frame should overlap the next by roughly half, all the way around the object.
- Include a known length. A ruler, a coin, or any object of known size belongs in at least one shot when dimensions matter.
The usual failures are insufficient overlap, chrome or textureless black plastic, uneven lighting, and an underside nobody photographed. A ceramic mug photographed under one overhead bulb can lose its handle. A second set beside an overcast window, with one camera dropped toward the handle, restores it. The model did not get smarter. The photos finally contained the surface.
Diffuse light and locked exposure matter more than a higher generation setting, because the photos set the ceiling.
Judge the result by missing surface and geometric error. A pleasing preview can hide both. Multi-view stereo benchmarks typically report accuracy as the distance within which 90% of reconstructed points fall from the ground-truth mesh, and completeness as the share of ground-truth points recovered within a threshold such as 1.25 mm. Benchmarks across many scenes and viewing directions show the same pattern: recall drops where the camera never looked, especially in hidden, concave, or repetitive regions. Extra views are what recover those areas. When overlap is the weak point, a multi-view reconstruction workflow is the next step, not another retry of the same single photo.
Remesh and Retopologize for Your Destination
A generated mesh piles dense, uneven triangles around details the model invented. That density is not a style choice. It is leftover computation, and the right cleanup depends on where the file is going.
Remeshing rebuilds a more even triangle density. That is the path for sculpting, 3D printing, and inspection, where you care that the surface is solid and the contour holds. Retopology rebuilds flow. Animation wants clean quads around joints. A real-time game wants a lean triangle mesh that still reads at the camera distance you ship.
Density for print, flow for games
- Remesh at a density that keeps the key contour, and decimate only for games. If you reduce first, a handle or a lip disappears and you can't get it back from the low-poly file.
- Bake normal and ambient occlusion maps from the dense mesh onto the low-poly mesh. Surface detail survives the reduction, which is the point of keeping the heavy mesh until the bake is done.
- Keep edge loops around joints, eyes, and mouths on any character you will pose. A pretty quad layout that ignores the bend points will collapse as soon as the rig moves.
- Check UV islands after retopology. Poor unwrapping, not the texture model, is the usual cause of stretch.
- Set a polygon budget per asset class before you start. A background prop and a hero character shouldn't share one number.
Say a character comes out of a single photo as a very dense mesh. Retopologize it to a much lower count, bake the normals, and the face still reads in a mobile scene while the file stays light. The bake is what preserves the pores and the brow. The low mesh is what the engine can draw.
After any automated topology pass, orbit the silhouette again. The tool can smooth away a handle, a finger, or a thin strap while the polygon count looks tidy. Topology for 3D assets is worth settling before you spend time on materials, because a bad edge flow makes every later map harder to fix.
Fix Common Mesh Problems Before Export
Most faults show up in the viewer before a slicer or a game engine complains. Each symptom usually has one common cause, and the fix is either a few minutes in the mesh or a new capture.
Holes are the frequent one. They sit on the back and the underside, the surfaces the photos never contained. Inverted faces are next, then stray bits picked up from the background.
| Symptom | Likely cause | Fix |
|---|---|---|
| Holes or open edges | Back surfaces never visible in the photos | Add a view, or fill holes in a remesh pass |
| Dark or inverted faces | Normals inconsistent after generation | Recalculate normals outward, then check in the viewer |
| Floating pieces | Stray fragments from background or extreme angles | Keep the largest shell and delete the rest |
| Non-manifold edges | Merged or internal faces | Run manifold repair, then recheck watertightness |
| Walls too thin to print | Generated skins under nozzle width | Thicken the shell or scale the part up |
| Stretched texture | Poor UV layout after retopology | Re-unwrap, then regenerate texture on final geometry |
| Correct shape but wrong size | No scale reference during capture | Set real-world units and measure a known dimension |
What repair can and cannot fix
Automated repair closes holes and recalculates normals. That clears file-level defects: open edges, flipped faces, and stray shells. It takes minutes, and you should recheck the mesh in the viewer afterward rather than trusting the repair log.
It can't correct a shape that is wrong. A missing handle, a fused finger, or a limb the model invented will still be wrong after the holes are filled. Those need another photograph or a manual edit. Filling a hole across a missing handle gives you a watertight mug you still can't use.
Thickness and scale sit in the same split. Thickening a shell or typing real-world units is a short edit when the form is already right. If you never captured a known length, you are guessing the size, and a new shot with a ruler is more honest than nudging the scale slider until it "looks about right."
Scale first, then silhouette, then watertightness and normals, then topology, then texture. Each later step inherits the earlier error.
Texture comes last on purpose. Regenerating a material on geometry you are about to retopologize throws the UVs away.
Confirm the Mesh Is Ready Before You Download
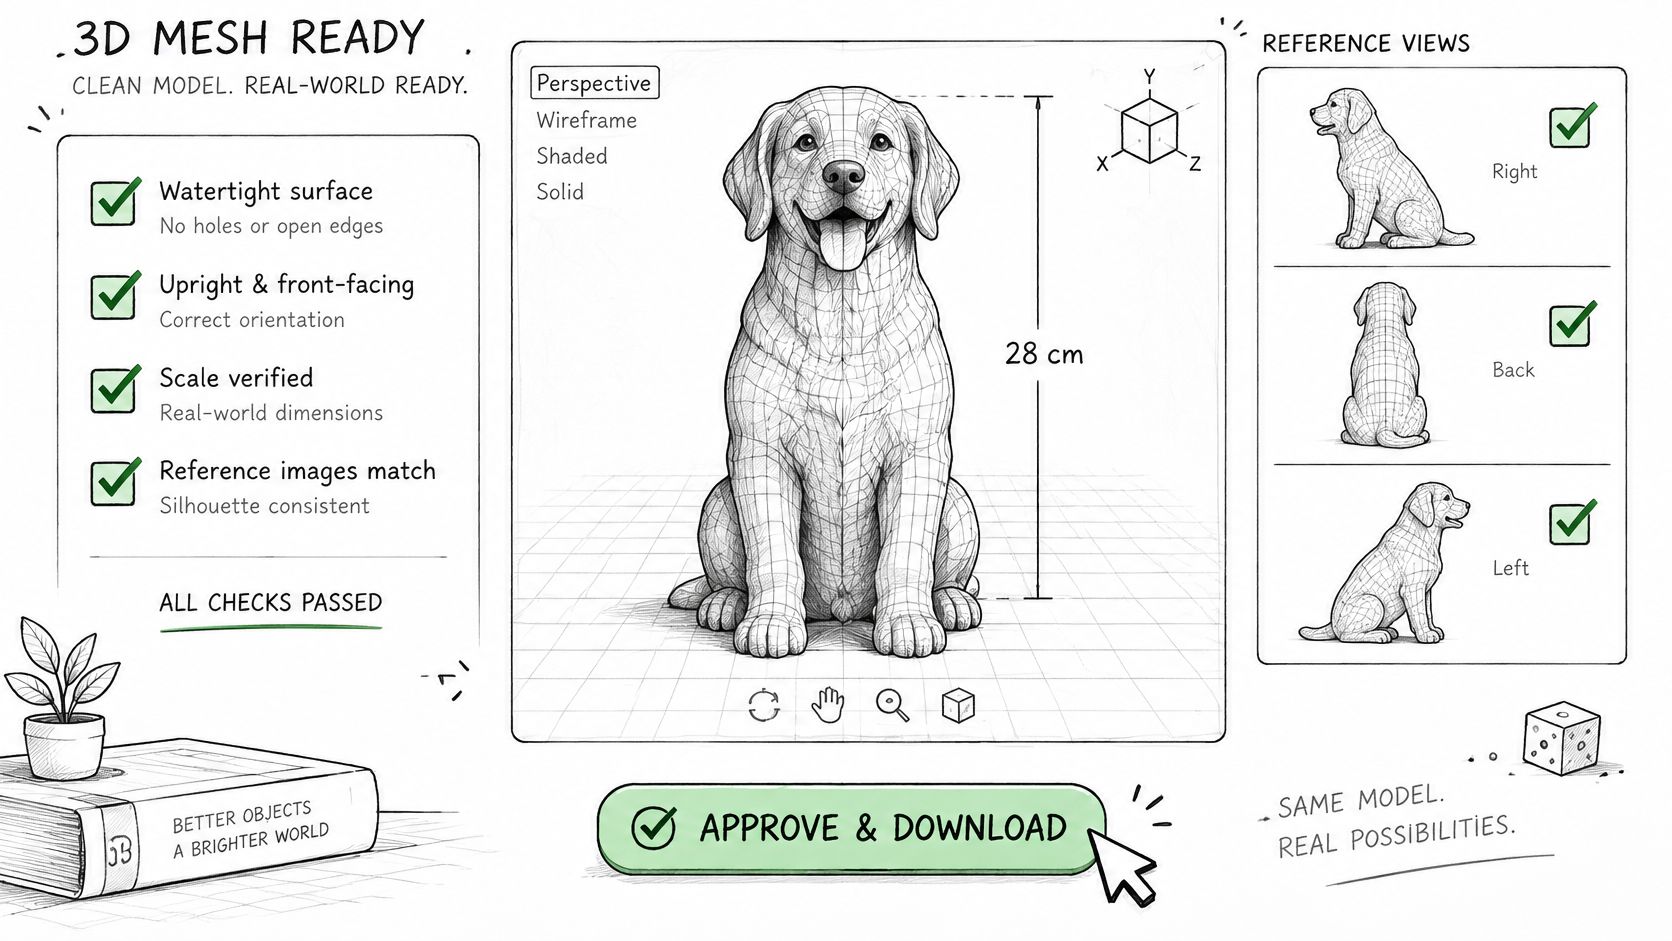
Download only when every check below is true. A plausible render is not the same decision.
- Watertight in the viewer, with no open edges.
- Upright and front-facing, so the next tool doesn't import it on its side.
- Real-world scale that matches the ruler, coin, or known length in the photos.
- Silhouette that matches the photos from each angle you required.
- No floating pieces, only the shell you meant to keep.
- Topology suited to print, to a game budget, or to a rig.
- Texture aligned to the final UVs, not to an older mesh.
- Format matched to the tool that will open it next.
Open the file in a browser viewer that reads STL, OBJ, GLB, FBX, STEP, 3DM, and PLY, and keep the earlier version so you can compare. If a check fails, fix that fault before the next one. Paid plans are what usually grant commercial use, so confirm the license before a client file or a store listing goes out.
Run one test this week. Pick one object. Generate it once from a single photo and once from a multi-view set on the same engine. Score both lists. Keep the mesh that passes, and treat the other as a draft.
Export Formats by Destination
Pick the destination first, then the format. The last column is the check the format itself will not run for you.
| Destination | Primary format | What the file keeps | Main check before export |
|---|---|---|---|
| Blender or general 3D editing | OBJ or GLB | Geometry with separate texture files (OBJ) or embedded texture (GLB) | Keep OBJ material and texture files together |
| Unity or web real-time | GLB | Geometry, PBR materials and embedded textures | Texture size and polygon budget |
| Unreal or animated rigs | FBX | Geometry, skeleton and animation data | Units and axis orientation on import |
| FDM or resin 3D printing | STL or 3MF | STL keeps geometry only; 3MF also keeps units and color | Wall thickness and scale in millimetres |
| Apple AR Quick Look | USDZ | Geometry and materials for AR preview | Moderate polygon count for smooth loading |
Use the row as a lookup, then run its check before you export. An OBJ without its texture files looks untextured in Blender even when the mesh is fine. A GLB for Unity or the web needs a texture size and a polygon budget you already set. FBX for Unreal needs a glance at units and axis on import, or the rig stands in the wrong place. USDZ for Quick Look should stay moderate in polygons so the preview loads smoothly. A fuller pass over containers sits in this guide to 3D file formats.
A watertight file can still be too thin
Printing needs a step no format badge settles. A measured benchmark of 16 AI-generated models found that 11 were watertight as downloaded, yet several had internal skins about 0.15 to 0.16 mm thick at an 80 mm print size, which can sit below a practical nozzle line and stay unsuitable after automated repair, according to a gen-mesh baseline. Check wall thickness, scale in millimetres, and a slice preview. Treat a thin-skin warning as a rebuild or a thicken, not as a hole fill.
Games don't use that thickness test. Check manifold geometry, outward normals, the polygon budget, UVs, and texture compression. Hole repair can close a file-level gap and still leave a missing handle untouched. One generated asset can feed both a print file and a game file, as long as each copy passes its own check before it leaves the browser.
Sculpty is a browser studio for image to 3D online work, from a single photo or several views through to remesh, retopology, PBR textures, and export. You can turn a checked mesh into STL, 3MF, GLB, FBX, OBJ, or USDZ without juggling separate engine accounts. Visit Sculpty and run one object from a photo set through to a print file or a game asset.