
Image to 3D Model Guide from Photo to Watertight Mesh
You've got a clean product photo, a client waiting for a game asset, or a small object you'd like to print. The first preview looks convincing, so you export it, open it in Blender or a slicer, and discover the back is malformed, the base is floating, the mesh has holes, and the texture only works from one camera angle. That gap between visually plausible and usable is where most image-to-3D workflows fail.
A dependable result needs more than a good-looking generation. It needs a sensible input photo, an engine suited to the job, closed geometry, clean topology, appropriate scale, usable UVs, and materials that survive outside the preview window. The workflow below treats AI as a fast reconstruction and drafting tool, not a substitute for inspection.
Table of Contents
- Why a Single Photo Can Become a Usable 3D Mesh
- Preparing Your Photo for Reliable Image to 3D Results
- Turning a Single Image Into a Watertight Mesh in Sculpty
- Choosing Between Single View and Multi View Workflows
- Refining Meshes With Remesh Retopology and PBR Texturing
- Final Checks and Next Steps for Your 3D Model
Why a Single Photo Can Become a Usable 3D Mesh
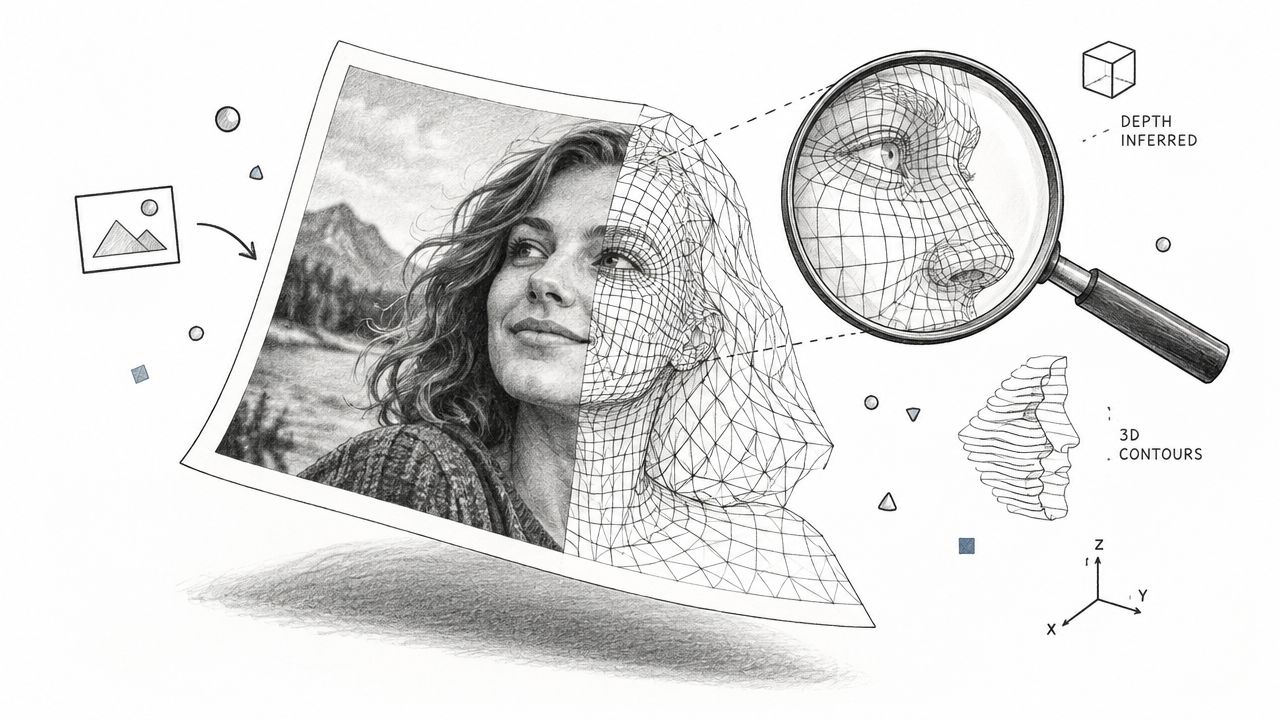
A single image contains more spatial information than it first appears to. Silhouettes reveal outer shape, perspective suggests depth, shadows indicate contact and volume, and familiar object structure helps a model infer surfaces that the camera cannot see. That's the basic promise of single-image 3D reconstruction, a field that has been studied for at least two decades.
Early systems also show why expectations need to stay grounded. A 2005 SIGGRAPH paper on rapid interactive reconstruction reported that fully automatic methods succeeded on 48.1% of images in its experiments, while the Make3D system reported qualitatively correct models for 64.9% of 588 internet images by 2009, as documented in the original single-image reconstruction paper. Those results established the premise, but they also exposed the central weakness: a photograph constrains the visible side far better than the hidden side.
A preview is not a production mesh
Suppose you upload a three-quarter photograph of a small figurine. The generator can infer the head, torso, limbs, and broad proportions. It may produce a convincing front and side view, but it still has to invent the rear surfaces, undersides, joins, and internal assumptions. A render can hide those weaknesses. A slicer, game engine, or physics system won't.
A watertight mesh has connected surfaces that enclose a volume. For printing, that means the slicer can identify the model's interior and exterior instead of encountering open borders or non-manifold edges. For games, watertightness alone isn't enough, but it's still a useful foundation before retopology, UV work, collision setup, and material authoring.
Single view works well for concept props, stylized objects, decorative forms, and assets where exact hidden geometry doesn't matter. It's a poor fit for a faithful replica when the back, underside, or functional dimensions carry the value.
Treat the image as a geometry brief
The most productive mindset is simple: the photo gives the engine evidence, while your workflow decides whether the result ships. Use Sculpty as a browser-based studio when you want image-to-3D generation, engine selection, texturing, remeshing, retopology, review, and export in one gallery. For a broader visual explanation of how a flat image can suggest depth and volume, this practical guide by Veo3 AI provides useful context.
The reliable path is therefore:
- Prepare the photograph: remove ambiguity before generation.
- Generate a base mesh: select a model according to speed, fidelity, and object type.
- Inspect hidden surfaces: rotate the asset instead of trusting the hero view.
- Repair the structure: remesh, retopologize, close openings, and establish scale.
- Texture for the destination: use PBR materials for games, or keep geometry and surface detail appropriate for print.
- Export deliberately: choose GLB, FBX, OBJ, STL, USDZ, or 3MF according to the receiving application.
That sequence turns an image-to-3D result from a novelty into a workable starting asset.
Preparing Your Photo for Reliable Image to 3D Results
Photo preparation is the cheapest quality improvement in the entire process. A model can't recover information that the image hides behind glare, a hard shadow, a cropped edge, or a busy background. Spend a few minutes judging the photo before you spend credits generating from it.
Start with readable geometry
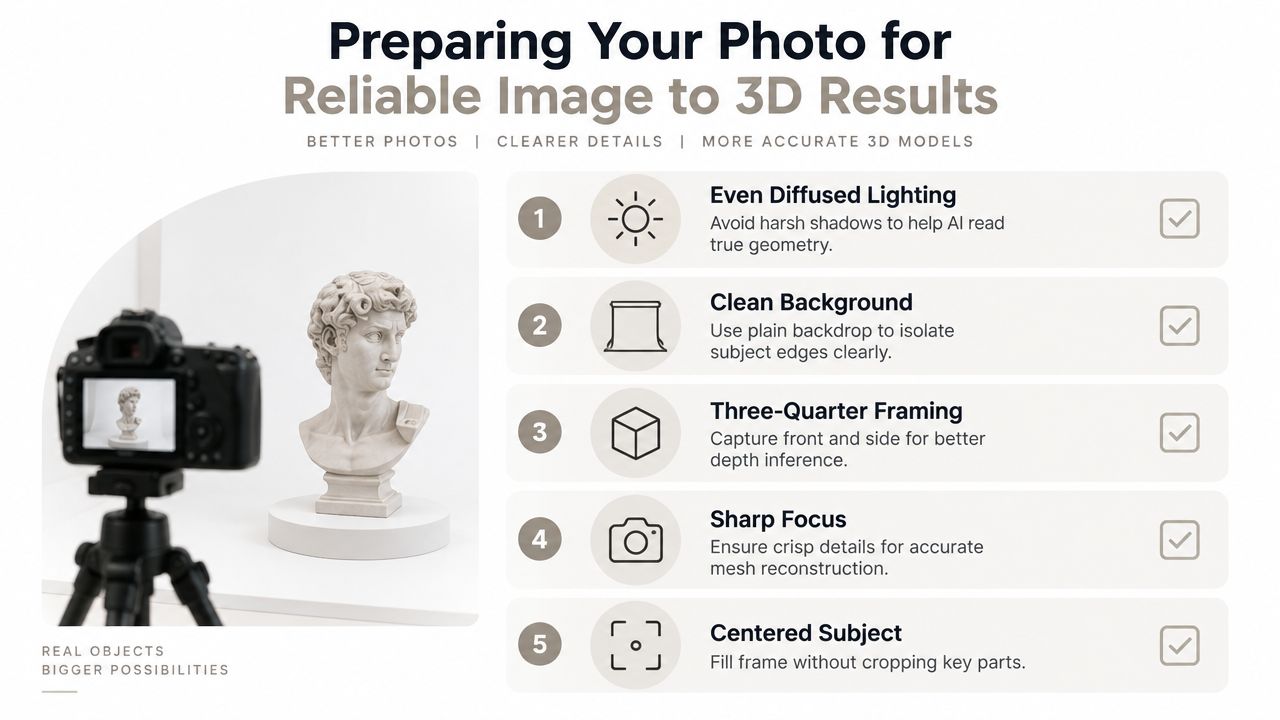
Use even, diffused lighting whenever possible. Large soft light sources reveal curvature without carving deep black shadows into seams. Harsh directional light can make a flat panel look bent, or make a recessed feature disappear entirely. A plain background also matters because clean separation helps the system identify the subject's silhouette.
A straight-on product hero shot often looks polished but gives the model little depth evidence. A three-quarter view exposes the front and one side at the same time, giving the generator more information about thickness, taper, and how major forms connect. Keep the camera level, avoid extreme perspective, and leave enough space around the object that no important part touches the crop.
Practical rule: Choose the image that explains the object, not the image that sells the object.
Use this preflight checklist
Before uploading, check the following:
- Lighting: The subject has soft, balanced illumination, with no strong glare masking its surface.
- Background: The backdrop is simple enough that the outline is easy to isolate.
- Viewpoint: The object shows meaningful depth, preferably through a three-quarter composition.
- Focus: Edges, small features, and material boundaries are sharp.
- Framing: The complete subject is visible, centered, and large enough to inspect.
- Surface detail: Fine texture is present where possible, especially on broad matte areas.
- Stability: Nothing in the subject is moving, dangling, or changing shape between captures.
Reflective, transparent, and low-texture objects deserve extra caution. Standard structure-from-motion and multi-view stereo assumptions depend on stable visual features. Reflections change as the camera changes, transparent surfaces don't present a consistent visible boundary, and blank glossy panels offer little texture to track. Research on reflective and transparent reconstruction found that diffuse surfaces performed best, while metallic and transparent materials degraded severely as complexity increased. The same work reported PSNR rising from roughly 23 to 27 dB at roughness 0.0 to about 34 to 35 dB at roughness 0.9, illustrating how surface roughness affects reconstruction quality in that benchmark (research on reflective and transparent reconstruction).
For a shiny object, change the lighting before changing the prompt. Use a temporary matte covering or add removable visual texture where appropriate, then remove that appearance during texturing. For glass, expect missing or distorted surfaces and plan to model the critical contours manually.
Know when to capture more angles
A single image is suitable when speed matters more than exactness, or when hidden geometry can be simplified. Capture multiple angles when you need a faithful replica, consistent rear surfaces, reliable openings, or better print proportions. Keep the object and surroundings still, maintain overlapping views, and avoid changing lighting between shots. Additional images don't eliminate cleanup, but they reduce the amount of geometry the engine must guess.
Turning a Single Image Into a Watertight Mesh in Sculpty
A practical Sculpty workflow starts with the object's destination, not the upload button. A printable figurine needs closed volume and stable contact with the build plate. A Unity prop needs sensible topology, usable UVs, and a material setup that can be inspected in the engine. The same photograph can support both jobs, but the cleanup decisions won't be identical.
Upload the image and define the job
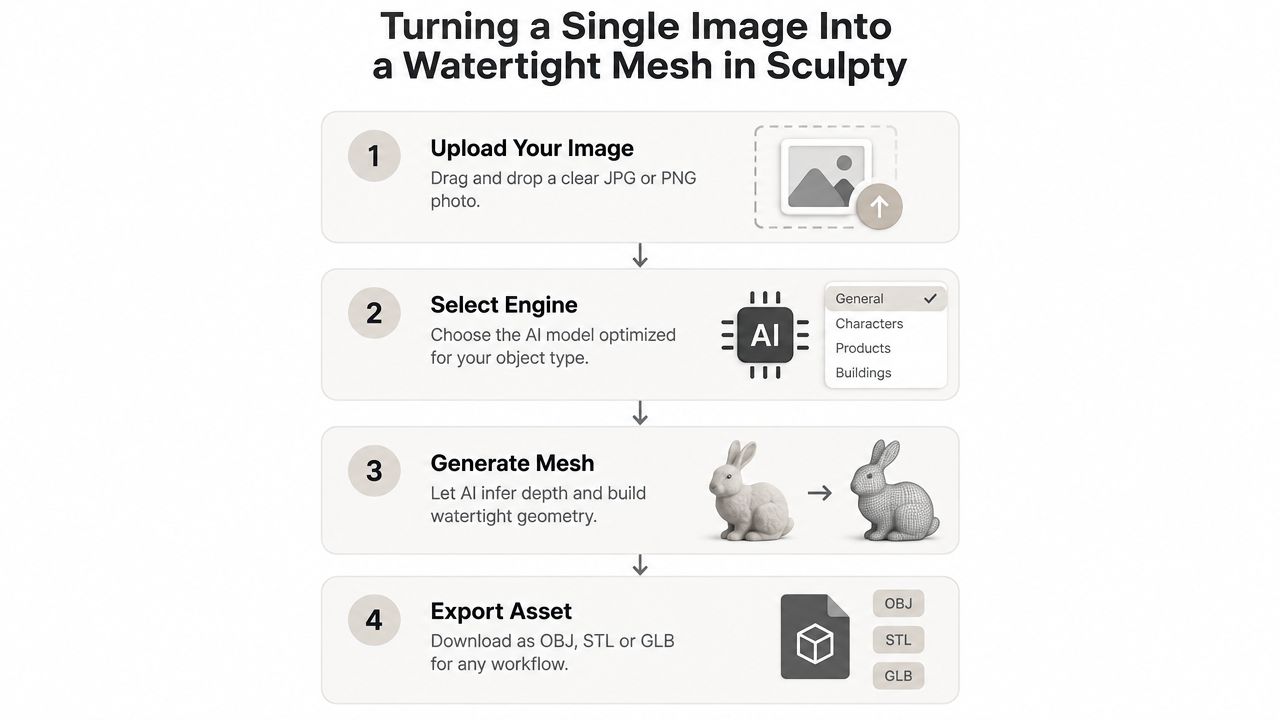
Upload a sharp JPG or PNG with the subject isolated as clearly as possible. If the image contains several objects, a single-object crop usually gives the generator a cleaner assignment. Keep the original file available because you may need it later for texture reference or a second generation with a different crop.
Before generating, decide whether you're optimizing for shape fidelity, speed, printability, or real-time use. Sculpty provides access to Meshy, Hunyuan 3D, Rodin, Tripo AI, and TRELLIS 2 through a shared interface, so engine selection can be treated as part of the asset brief rather than a separate account-management task.
Select an engine by failure tolerance
No engine is universally correct. A fast feed-forward model can be a strong choice for an early blockout, while a more detailed method may be preferable when surface structure matters. Open and closed systems also differ in how they handle uncertainty, topology, and iteration.
Recent research describes the broader trade-off clearly. Regression methods are fast but can fail on occluded regions, while diffusion methods handle ambiguity more flexibly but require more computation (the 2025 survey and CVPR discussion). Use that distinction practically. If the first result only needs to establish a silhouette, prioritize turnaround. If the asset will be judged from every angle, prioritize geometry and plan a multi-view pass when possible.
Generate, rotate, and inspect
Generate the mesh, then review it in the private gallery and web viewer before opening a downstream application. Rotate underneath the object. Look inside handles, under overhangs, behind ears, between limbs, and along the base. A polished front view can conceal a collapsed back or a floating section.
For a product photo becoming a printable figurine, check these areas first:
- Contact points: Feet, base, or other supports should meet the ground cleanly.
- Thin features: Antennas, fingers, straps, and rims may be fused or missing.
- Negative space: Holes and gaps need deliberate geometry, not accidental openings.
- Rear surfaces: The model often invents these most aggressively.
- Wall thickness: A visually correct shell may still need strengthening for fabrication.
Regenerate when the silhouette, proportions, or major hidden forms are wrong. Refine when the object is correct but has rough topology, holes, shading artifacts, or weak materials. Texturing won't repair a missing handle, and remeshing won't restore a back surface that was never inferred correctly.
A short walkthrough can help orient new users to the visual sequence before they begin:
Export for the receiving tool
Use GLB for a compact asset with materials and broad viewer compatibility. Use FBX when a game pipeline expects it, OBJ when you need a broadly supported mesh exchange, STL for common print workflows, USDZ for supported Apple-oriented viewing, and 3MF when your fabrication workflow benefits from a richer print package. Sculpty also supports format conversion and stores generated assets in a private gallery, which keeps alternate engine outputs available for comparison instead of forcing you to overwrite the first attempt.
Choosing Between Single View and Multi View Workflows
The right question isn't “Which model is best?” It's “Which failure can my project tolerate?” A single view is efficient because the engine fills in missing evidence. Multi-view reconstruction takes more preparation, but each additional angle reduces the amount of hidden geometry that must be invented.
The distinction shows up in measurable reconstruction metrics. In one multi-view diffusion study, increasing the input views from 2 to 5 improved Chamfer Distance from 0.0341 to 0.0252 and Volume IoU from 0.5562 to 0.6635, as reported in the study's results. The practical meaning is straightforward: even a modest increase in observation count can materially improve recovered geometry.
Match the workflow to the deliverable
| Workflow | Best For | Quality Tradeoff | When to Use in Sculpty |
|---|---|---|---|
| Single view | Concepts, stylized props, early blockouts | Fast output, but hidden surfaces remain uncertain | Start here when the silhouette matters more than exact rear geometry |
| Multi view | Product replicas, collectible forms, fabrication references | More preparation, stronger geometric consistency | Use several controlled angles when the back, underside, or openings matter |
| Single view plus manual repair | Print prototypes and presentation assets | Efficient base mesh, but artist-led correction is required | Generate quickly, then close holes, establish scale, and correct contact surfaces |
| Multi view plus retopology | Game props and reusable production assets | Better shape evidence, but topology still needs authoring | Generate from angles, then optimize for the target engine |
For a game-ready asset, topology and UV behavior may matter more than the raw reconstruction score. A mesh can match the reference shape and still deform badly, shade poorly, or waste memory. For 3D printing, watertightness, manifold geometry, scale, wall thickness, and support strategy take priority over clean animation loops. For a client turntable, image fidelity and material continuity may matter most, even if the internal topology is not elegant.
The 2026 benchmark described in the research brief adds an important warning. Closed-source feed-forward systems outperformed open-source optimization-based baselines on geometric fidelity, mesh quality, and cycle stability, yet even the strongest methods scored below 48 on cycle stability (the benchmark discussion). A convincing render, therefore, doesn't prove strong 3D understanding.
Use Sculpty's multi-view 3D reconstruction workflow when the project cannot accept major invented surfaces. Keep single-view generation for fast exploration, and move to multiple angles when inspection exposes repeated failures in the same hidden region.
Refining Meshes With Remesh Retopology and PBR Texturing
Raw AI geometry rarely has production topology. It may contain dense triangulation, stretched faces, lumpy transitions, internal fragments, open borders, or surface noise that only becomes obvious under a moving camera. Treat the generated mesh as a draft that has already solved part of the modeling problem.
Remesh before you judge the surface
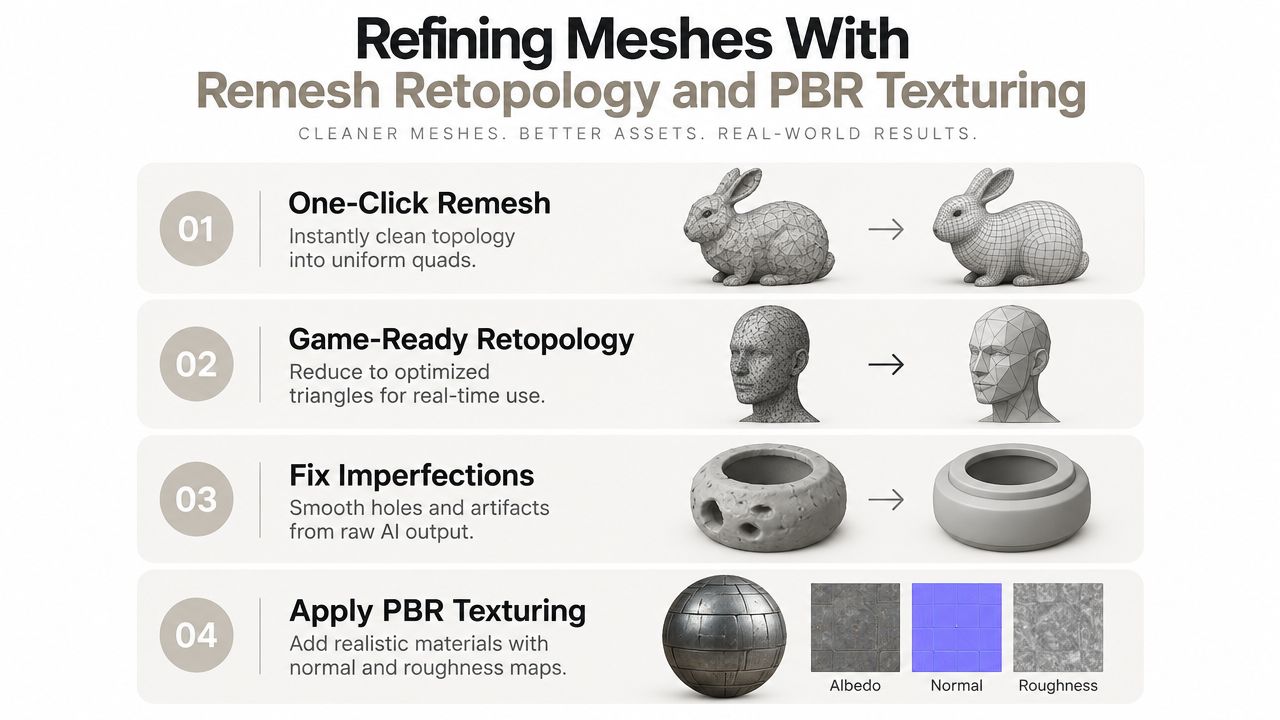
Remeshing creates more uniform topology and can eliminate irregular face distribution from the first reconstruction. It's useful when the object has the right broad form but the surface is difficult to edit or shade. Inspect the result afterward, because aggressive remeshing can soften small features and alter sharp transitions.
For a print asset, keep the high-resolution form where it carries visible detail, then simplify only where the slicer and fabrication process can tolerate it. For a real-time asset, use the high-resolution mesh as a source and build a lighter retopologized version around the important silhouette and deformation zones.
Retopologize for the destination
Retopology is not cosmetic cleanup. It determines how the asset behaves in an engine, how efficiently it renders, and how easily an artist can edit it later. A static rock can accept a different topology strategy from a character, hinged product, or prop that needs clean subdivision.
A practical pass should address:
- Non-manifold geometry: Find edges shared incorrectly, internal faces, and disconnected fragments.
- Open borders: Close holes that compromise watertightness, especially on print models.
- Face density: Preserve detail around the silhouette and functional features, while reducing unnecessary interior complexity.
- Normals and shading: Recalculate normals and inspect the asset under neutral lighting.
- Scale and orientation: Set a meaningful unit scale before export, particularly for fabrication.
Game assets generally benefit from optimized triangles, clean UV islands, predictable normals, and a separate collision strategy. Print assets need a closed volume, a stable base, and geometry that the slicer can interpret consistently. Don't decimate a print model just because a real-time asset would be lighter, and don't send a dense sculpt into Unity when a cleaner retopology pass would provide better control.
Build materials without rebuilding geometry
Once the shape is stable, apply prompt-driven PBR texturing. Separate geometry problems from surface problems. If the object has the wrong thickness, regenerate or remodel it. If the shape is correct but the plastic looks like stone, change the material pass instead.
PBR maps should describe how the surface reacts to light, not just paste color over the mesh. Use base color for albedo, roughness to control highlight spread, metallic for conductive materials, and normal information for small relief that doesn't justify extra geometry. Sculpty supports AI texturing with PBR materials and 4K texture output, while its guide to PBR texture maps gives a useful reference for assigning those channels.
Render the asset under neutral and dramatic lighting. A texture that looks convincing in one studio setup may reveal seams, stretching, or inconsistent roughness in a turntable. Render Studio can stage the result for high-resolution review, and a 360-degree export makes it easier for a client or teammate to catch defects that a still image hides.
For iteration, keep geometry fixed while testing materials. Generate alternate roughness, color, and surface treatments without rebuilding the mesh unless the reference itself demands a structural change. That separation saves time and makes approvals easier.
Final Checks and Next Steps for Your 3D Model
Before handing off an image-to-3D asset, rotate it one more time and verify the parts that previews hide. A short checklist catches more problems than another round of decorative texturing.
- Watertightness: Confirm the print version has a closed, coherent volume with no visible openings or disconnected shells.
- Topology: Inspect dense areas, non-manifold edges, stretched faces, and shading artifacts.
- Scale: Set the correct real-world dimensions before sending the model to a slicer or production tool.
- UVs: Check that important surfaces have usable islands without severe stretching or unexpected overlaps.
- Materials: Confirm base color, roughness, metallic response, normals, and texture resolution in the target viewer.
- Export: Reopen the exported GLB, OBJ, FBX, STL, USDZ, or 3MF rather than assuming the export preserved everything.
- Presentation: Use a neutral render and a turntable to review the entire object, including the rear and underside.
The most common avoidable mistakes start with the source image. Over-polished front shots conceal depth, shiny materials create unstable visual evidence, and cropped objects force the model to guess where forms end. If the same defect appears across generations, improve the photograph or add views before switching engines.
For print work, review the STL file guide for 3D printing before export, then open the file in your slicer and inspect the layer preview. For game work, import the asset into the actual engine, check scale, lighting, normals, materials, and collision behavior there. The final test is always the destination, not the generator's gallery.
Sculpty brings image-to-3D generation, engine selection, remeshing, retopology, PBR texturing, rendering, gallery review, and exports into a browser-based workflow. Upload a carefully prepared photo, compare the resulting mesh against your print or game requirements, and visit Sculpty to turn the usable version into an asset you can ship.