
Create a 3D Character Online for Free: The Complete Workflow
You type a prompt, wait for the browser preview, and get a character that looks convincing from one carefully chosen angle. Then you try to open it in Blender, rig it for a game, or send it to a slicer, and the illusion falls apart. The download may be locked, the mesh may contain overlapping faces, and the character's back may look nothing like its front.
That's the practical difference between creating a 3D character online for free and producing a usable asset. Free generation removes the first barrier, but it doesn't remove topology, UV, material, export, or licensing work. A reliable workflow treats AI as a fast base-mesh assistant, not as a replacement for production judgment.
Table of Contents
- The Reality of Free AI Character Generation
- Generating the Base Mesh with Multi-View Inputs
- Fixing Topology and Preparing for Animation
- Applying PBR Textures and Materials
- Navigating Export Limits and Commercial Rights
- Exporting for Games, Rendering, and 3D Printing
The Reality of Free AI Character Generation
Browser-based 3D character creation has become accessible because creators no longer need to begin with a large desktop installation, a powerful local workstation, or a long modeling session. The broader market reflects that shift. The global 3D generative AI platforms for XR content creation market is projected to grow from USD 1.02 billion in 2025 to USD 4.72 billion by 2031, at a 27.15% CAGR, while text-to-3D held 35.34% of market share in 2025, according to Mordor Intelligence's market analysis. Character generation is a natural entry point because it gives game developers, educators, indie creators, and social-content teams a visible result quickly.
The preview is not the deliverable, though. A rendered turntable can hide reversed normals, internal geometry, disconnected limbs, stretched textures, and geometry that only works from the camera angle used by the generator. A game-ready character needs predictable topology, a sensible pivot and scale, usable materials, and an export format your target application can read. A printable model needs something different, namely a closed, manifold volume with adequate wall thickness and no accidental internal shells.
Free tools have a credible history outside AI as well. Blender is reported to have 3 million monthly active users, to appear in 30% of independent film productions, and to have exceeded 14 million annual downloads in 2023, according to the cited 3D industry statistics overview. Sketchfab is reported to host 3 million uploaded models and attract 100 million monthly visitors in the same overview. Those figures show why creators now expect browser access, online viewing, and portable assets, but they don't mean every free AI preview includes a production-ready download.
What a usable mesh must contain
A visual preview answers, “Does this character look right from here?” A usable asset answers several harder questions:
- Geometry: Are the surfaces connected, free of self-intersections, and shaped correctly from every angle?
- Topology: Can the mesh deform around the shoulders, elbows, knees, mouth, and eyes without collapsing?
- UVs: Can textures be placed without severe stretching or seams across the face?
- Materials: Are the albedo, normal, roughness, and metallic maps separated and aligned?
- Export: Can you download a file such as GLB, FBX, OBJ, STL, or 3MF, rather than only a browser render?
- Rights: Can you use the downloaded asset in a commercial project under the platform's terms?
Single-image generation makes the geometry problem worse. Research on single-image character reconstruction identifies self-occlusion, pose ambiguity, and front-view bias as persistent problems. The “Janus” artifact can also produce a head with conflicting or duplicated facial structure on the rear side. That's why a character that looks excellent in a portrait preview may need major reconstruction before rigging or printing.
Practical rule: Treat every AI-generated character as an unverified draft until you've checked it from the back, underneath, and inside the major joints.
The wider discussion around the future of AI metaverse is useful context here. More immersive content will increase demand for rapid asset creation, but immersive applications also expose weak geometry quickly because users view characters from unrestricted angles.
Generating the Base Mesh with Multi-View Inputs
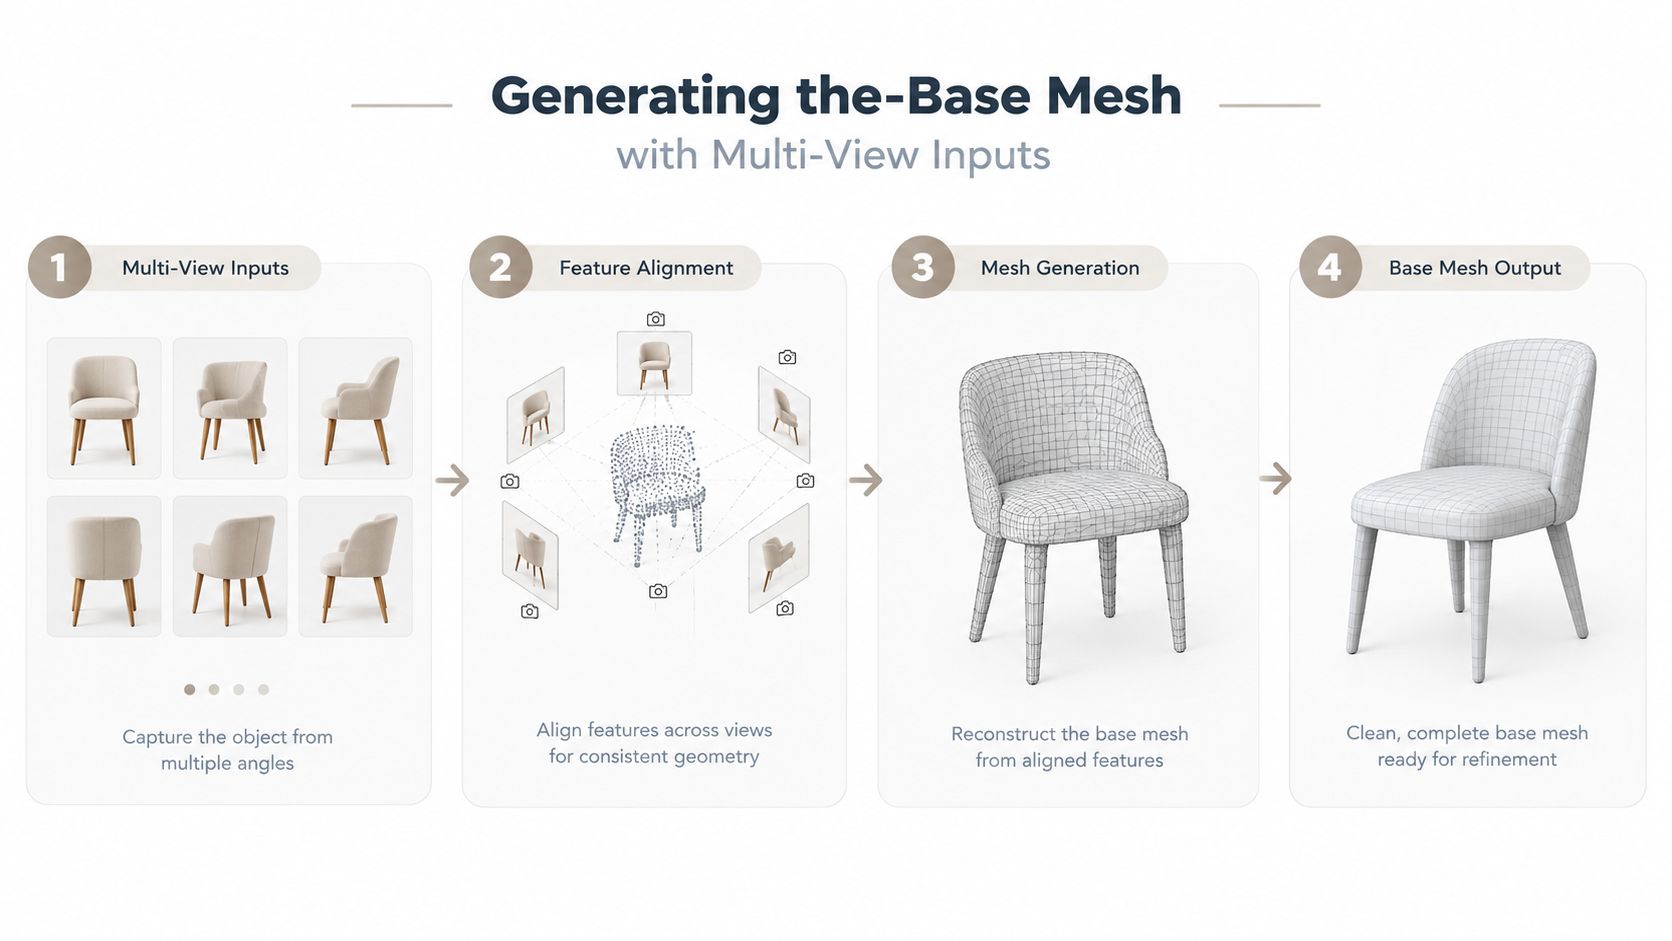
A free 3D preview can look convincing while hiding missing geometry, distorted proportions, and unusable surfaces. A single photo gives the generator too much freedom. It must infer the back of the head, clothing thickness, arm placement, and foot shape. Supply more visual evidence before requesting a mesh if those details will affect animation, games, or printing.
Create a reference sheet with 3–8 views. Include front, rear, and both side views. Add a top or raised view when the character has a large hat, backpack, coat, or unusual footwear. Keep the pose neutral, with the arms separated from the torso. Consistent lighting and a plain background make landmarks easier to match.
Build references before you generate
If you have only one illustration or selfie, create additional views with image generation or multi-view synthesis first. Inspect every view manually. Generated references commonly drift in hairstyle, clothing seams, eye placement, and limb length. Correct those mismatches before sending the set to a mesh generator, or the resulting model will preserve conflicting identities across its surfaces.
A workable reference set includes:
- Stable landmarks: Keep eye spacing, jaw width, shoulder width, and overall height consistent.
- Visible silhouettes: Separate hands, elbows, knees, shoes, and accessories from the body.
- Controlled pose: Use an A-pose or relaxed neutral stance for a character intended for rigging.
- Readable surfaces: Avoid motion blur, heavy shadows, transparent clothing, and extreme perspective.
- Design priority: Decide whether likeness, costume detail, silhouette, or printability has priority.
The same multi-view workflow is explained in this guide to multi-view 3D reconstruction. More views reduce the hidden geometry the system has to invent, but they do not produce clean edge flow or animation-ready topology by themselves.
Write a constrained generation prompt
Write the prompt as a model specification rather than an artistic mood. “A cool fantasy warrior” leaves room for extra armor, weapons, layered cloth, and asymmetric details. Those additions may improve a preview while creating more work during cleanup, retopology, and UV preparation.
Use a structure such as:
- Subject: humanoid character, full body, neutral stance.
- Design: short hair, padded jacket, trousers, boots, defined accessories.
- Geometry intent: clean closed mesh, separate semantic parts, symmetrical base form.
- Surface intent: matte cloth, smooth skin, low-gloss hard surfaces.
- Output constraints: no extra limbs, fused fingers, floating parts, text, or background objects.
Generate one character at a time. Combining a character, vehicle, weapon, environment, and props usually produces a fused sculpt unless that result is intentional. Check whether the service can export a usable file before spending time on materials. T3Bench results show the variation between systems: reported averages range from 18.7 for SJC and 21.7 for DreamFusion to 43.3 for ProlificDreamer and 32.7 for Magic3D, as summarized on the T3Bench benchmark page.
Prompt syntax can also fail before geometry quality matters. The same benchmark reports that syntax caused 73% of failures for descriptive prompts and 50% for parameterized prompts. Use short, explicit specifications, inspect intermediate results, and regenerate only the failed component instead of changing the entire character. Treat the first mesh as a base for retopology and texture baking, not as the finished game or print asset.
Fixing Topology and Preparing for Animation
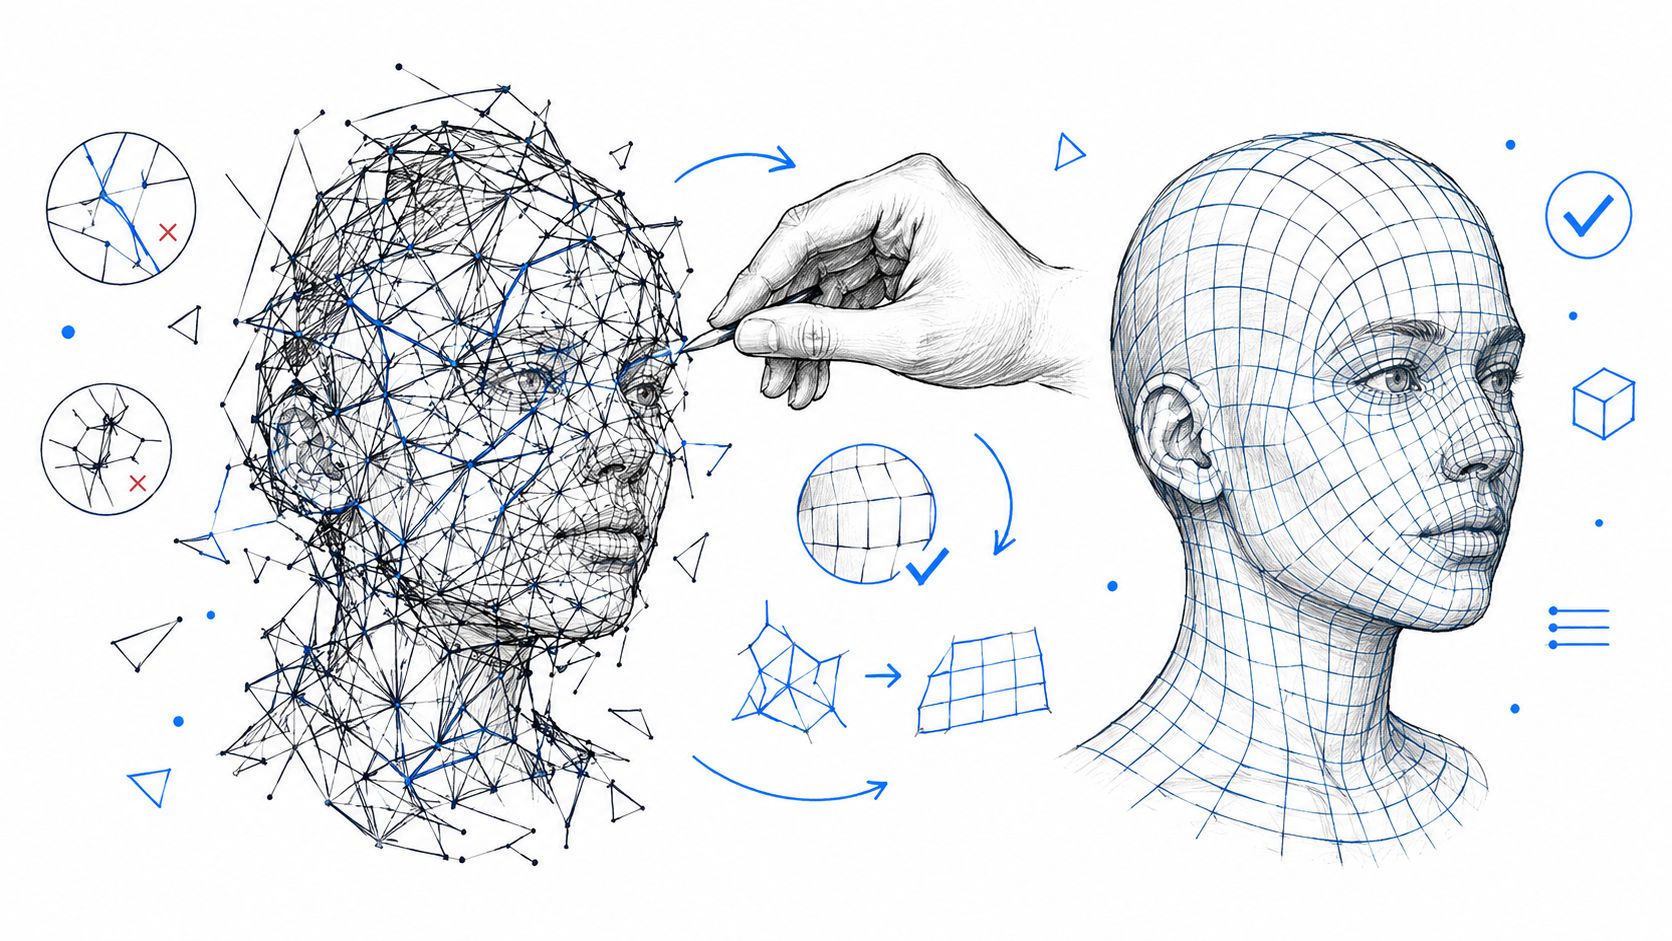
The first mesh often looks finished because the renderer hides its construction. Open the wireframe, enable face orientation, and rotate the character under a harsh light. Chaotic triangles, pinched surfaces, overlapping shells, and holes become obvious immediately. This inspection is where a promising preview turns into a production task.
Clean the generated surface
Begin with a duplicate of the imported mesh so you can compare every revision. Remove floating fragments, hidden internal faces, and duplicate vertices. Merge by distance carefully, because an aggressive merge can collapse thin accessories or separate fingers. Recalculate normals, then inspect openings around the mouth, eyes, cuffs, shoes, and underside of the model.
Automated remeshing helps create a coherent surface, but it can also erase important forms. Preserve the original high-detail mesh as a sculpt or bake source, and use the remeshed version as the object you'll rig or print. For a symmetrical character, establish a centerline and mirror the base form before adding deliberate asymmetry such as scars, badges, or uneven clothing.
Retopologize for deformation
Retopology is not just polygon reduction. It places edges where the character needs to bend. Around the shoulder, create loops that flow from the torso into the upper arm. Around the elbow and knee, use supporting loops that preserve the joint's volume. The mouth, eyelids, and cheeks need especially controlled edge flow if the face will animate.
For a static game prop or a distant background character, automated retopology may be enough after manual cleanup. A hero character usually needs targeted edits around the face, hands, shoulders, hips, and feet. The practical distinction is simple: use automated tools for broad structure, then make manual decisions where deformation changes the silhouette.
Research on character reconstruction reports uneven semantic-part fidelity even with multi-view masks, including IoU scores of 0.73 for hair, 0.86 for cloth, and 0.88 for the base human model across eight-view masks in one method, as documented in the associated character-generation research. The result may be recognizable while still needing separate-part correction.
A rig exposes topology defects faster than a beauty render. Test a simple skeleton early, before you spend hours polishing materials.
After retopology, unwrap the model with seams placed along less visible areas and natural breaks in clothing. Check the UV layout with a checker texture. Squares that become long diamonds reveal stretching, especially on the face, fingers, and curved boots. The topology workflow reference from Sculpty provides useful terminology for evaluating edge flow and mesh organization.
For further context on how character assets support animation production company workflows, focus on the handoff requirements rather than the preview image. Animation teams need stable deformation, predictable naming, clean pivots, and materials that survive translation between applications.
Applying PBR Textures and Materials
A clean mesh with a single flat color still looks unfinished. Physically Based Rendering, or PBR, gives the character separate information for color, surface direction, reflectivity, and light response. The usual map set includes albedo or base color, roughness, metallic, and normal data. A character's skin, cloth, leather, and painted metal should not all share the same response.
UV unwrapping comes first. Place seams where the viewer is less likely to notice them, split complex forms into islands, and keep enough space between islands for texture filtering. The face deserves a deliberate layout because stretching across the nose, lips, eyelids, or ears becomes visible under close lighting. Hands and fingers often need separate islands because cylindrical forms distort quickly when flattened.
Use materials to preserve the design
Generate or paint the base color from the approved character reference, not from an unverified preview. If the generator changed the jacket trim or facial markings, baking that mistake into the texture makes later corrections harder. Keep skin, hair, eyes, cloth, and hard accessories as separate materials when the target engine needs independent shader controls.
Prompt-driven texturing can accelerate this stage, but inspect the result at the intended camera distance. AI texturing often creates plausible detail that doesn't match the geometry, such as seams floating above a sleeve, buttons painted onto a flat surface, or hair strands that point in conflicting directions. The PBR texture map guide is a useful reference for separating map roles and checking whether a material is describing color or actual surface relief.
A practical material pass follows this order:
- Base color: Correct the large color regions first, including skin tone, costume panels, and accessories.
- Roughness: Make cloth broader and softer, polished metal sharper, and oily skin more controlled.
- Normal detail: Add small relief only after the low-poly surface is stable.
- Metallic response: Reserve metallic values for genuine metal surfaces rather than using them as a generic gloss control.
- Ambient occlusion: Bake or generate contact shading to clarify overlaps around collars, belts, hair, and footwear.
Validate under more than one light
A texture that works under a bright studio setup may fail in a dark game scene. Test a neutral light, a strong side light, and the final engine's default environment. Look for seams, inverted normals, texture swimming, and normal-map artifacts around sharp corners.
Don't assume a larger texture solves poor UVs. Resolution can preserve detail, but it can't repair distorted islands or misaligned material boundaries. If a face texture stretches, fix the UV layout and rebake. If a normal map produces dents instead of raised detail, check its channel convention and tangent-space settings in the target application.
Navigating Export Limits and Commercial Rights
The word “free” describes different things across browser tools. It may mean that you can generate a preview, orbit a model, save a project in a private gallery, or download a limited file. Those are not equivalent outcomes. Meshy says browser previewing is free, while full export of rigged models requires workspace credits, and Picsart limits free use to a small number of generations before a subscription is required, as noted in the Canva 3D character creator comparison.
Before generating a detailed character, open the export panel and the license page. Check whether the free tier includes the original mesh, textures, rig, and commercial usage. A watermark-free image does not prove that the underlying geometry is downloadable, and a downloadable OBJ does not automatically grant rights to sell the asset or include it in a paid game.
Compare the actual deliverable
| Feature | Typical “Free” Preview Tools | Unified AI Studios, such as Sculpty |
|---|---|---|
| Browser generation | Often available for previews | Available through a browser workflow |
| Mesh download | May be restricted or limited | Check the selected plan and export terms |
| Texture download | Can be restricted separately | Check whether maps are included with the chosen export |
| Rigged files | Frequently reserved for paid tiers | Verify rigging availability before generation |
| File formats | May offer a narrow selection | Export options can include common game and print formats |
| Commercial rights | Must be read in the platform license | Commercial rights are tied to paid plans according to the supplied product information |
| Asset retention | May depend on account status | The supplied product information says assets remain in user galleries after cancellation |
Sculpty is one browser-based option that combines text-to-3D, image-to-3D, multi-view generation, PBR texturing, remeshing, retopology, rendering, and exports including GLB, STL, OBJ, FBX, USDZ, and 3MF. Its supplied product information says the free workflow can start without a credit card, while commercial usage rights are granted on paid plans. Treat those statements as plan-specific, and verify the current terms before using an asset commercially.
Read rights like a producer
Look for ownership language, permitted commercial use, restrictions on reselling raw outputs, and rules for training or public galleries. If a client is paying for the character, keep the generation record, source references, exported files, and applicable terms together. That documentation won't fix a restricted license, but it will show which version of the asset you delivered and under what permission.
A sensible test is to generate a deliberately simple character first. Download every available file, import it into Blender, inspect the textures, and confirm that the license matches your intended use. Only then should you invest in a complex costume or production-specific design.
Exporting for Games, Rendering, and 3D Printing
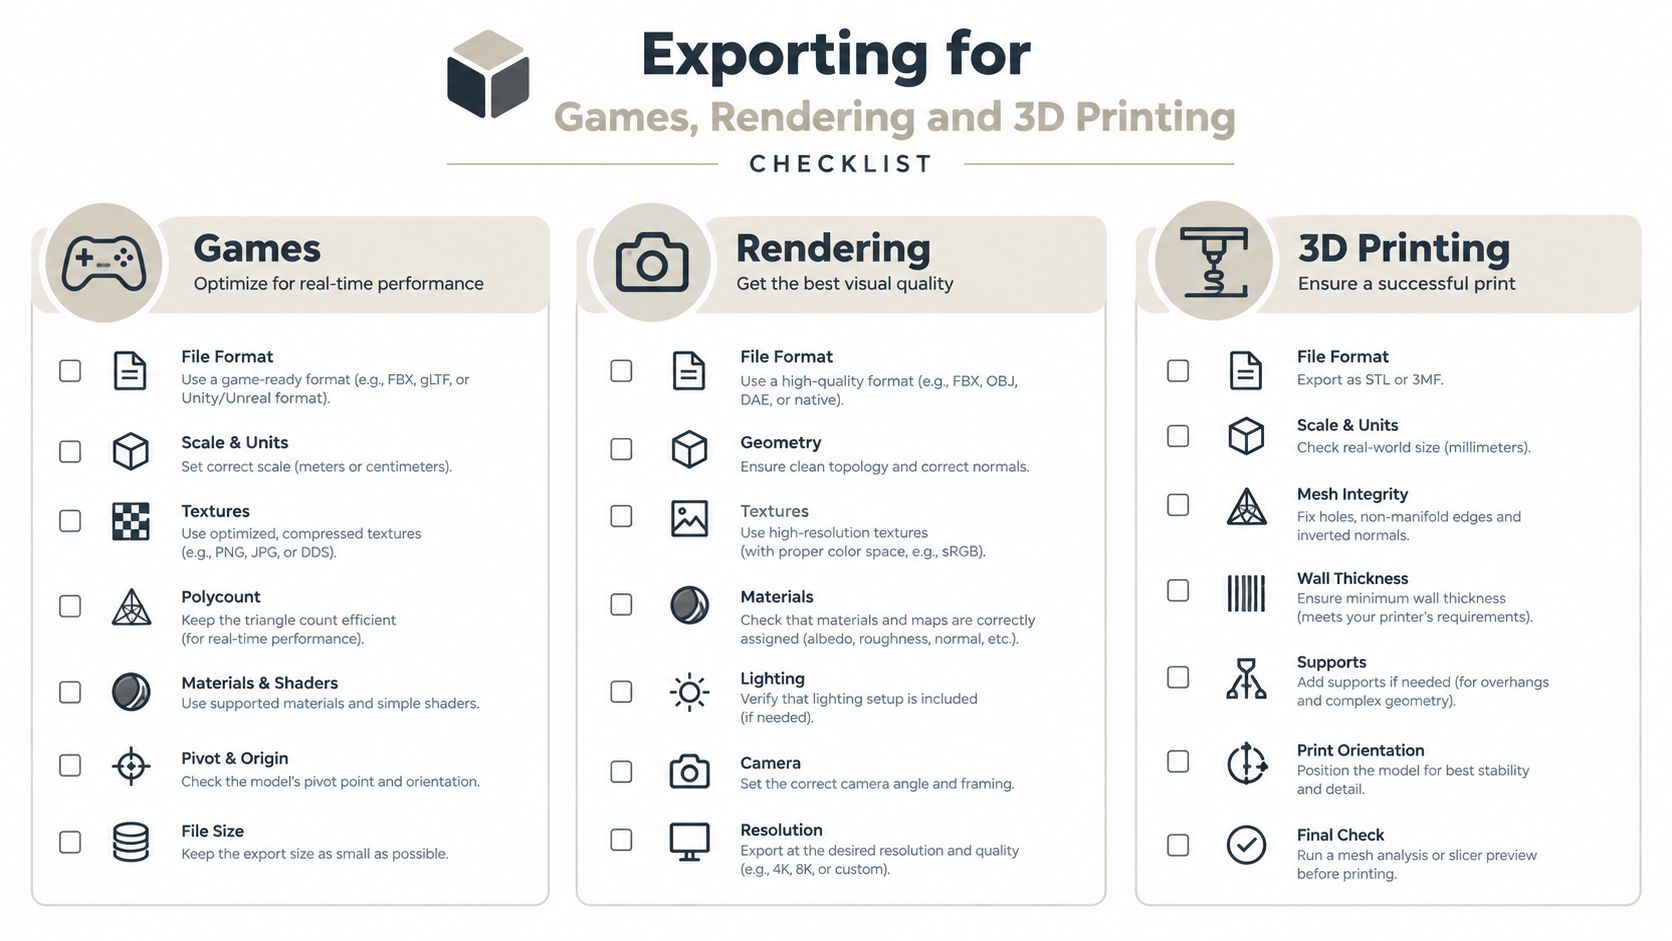
The correct export depends on where the character is going next. For a browser viewer or quick review, GLB is convenient because it can package geometry, materials, and textures in one portable file. For Blender or a wider DCC pipeline, OBJ can be useful for static geometry, while FBX is commonly chosen when a rig and animation data must travel with the character. For printing, STL and 3MF serve different workflow needs, and the slicer should determine which one you choose.
Game and rendering handoff
Before exporting to Unity or Unreal Engine, apply the intended transforms, confirm the character's forward axis, and set the origin at the feet or another deliberate root location. Use the engine's unit convention consistently. Don't fix scale by guesswork after import, because inconsistent scale affects animation, camera framing, physics, and lighting.
For a game asset, check:
- Deformation: Test the rig at shoulders, elbows, knees, hips, wrists, and neck.
- Materials: Confirm that texture paths are embedded or packaged, and verify normal-map interpretation.
- Performance: Remove hidden geometry and unnecessary material slots.
- Naming: Use stable names for the body, clothing, eyes, hair, skeleton, and materials.
- Variants: Export separate clothing or accessory pieces when the game needs customization.
- Review renders: Use a transparent-background turntable when you need to inspect the silhouette without a distracting environment.
A 360-degree render is a presentation output, not a substitute for the mesh review. Rotate slowly and look for asymmetry, missing back details, texture seams, and parts that disappear at certain angles.
Printing and physical validation
A printable character must be a closed volume. Run a manifold check, repair holes, remove internal shells, and merge intersecting parts where the slicer needs one continuous body. If you want movable parts, keep intentional clearances and export those components separately. A model that is visually watertight can still contain non-manifold edges, so inspect it with a mesh-repair tool before slicing.
Set the scene in millimeters when preparing STL or 3MF. Confirm the model's physical height in the slicer, then inspect the layer preview for missing fingers, paper-thin accessories, isolated islands, and unsupported overhangs. Scale changes after export can produce fragile details, so make the final thickness decision before sending the file to the printer.
Final release checklist
Use this short gate before calling the character finished:
- Inspect all views: Check front, rear, side, underside, and close-up joint areas.
- Validate geometry: Remove holes, floating fragments, duplicate faces, and self-intersections.
- Confirm topology: Test deformation if the character will be animated.
- Verify UVs: Apply a checker map and correct visible stretching.
- Test PBR materials: Confirm base color, roughness, metallic, and normal behavior in the target renderer.
- Confirm rights: Save the plan terms and ensure the intended use is permitted.
- Export deliberately: Choose GLB, FBX, OBJ, STL, or 3MF based on the destination pipeline.
- Reopen the export: Import the final file into Blender, Unity, Unreal Engine, or the slicer and inspect the result there.
The fastest route to a useful free character isn't the shortest route to a preview. It's the workflow that gives you enough views to build a coherent base, enough topology control to support the intended use, and enough export and licensing clarity to avoid rebuilding the asset later.
Sculpty provides a browser-based workflow for text-to-3D, image-to-3D, multi-view generation, PBR texturing, remeshing, retopology, rendering, and export for downstream game or printing tools. Start by testing a simple character, inspect the generated mesh and available files, then visit Sculpty to build the version that fits your production pipeline.