
Anime 3D Modelling: A Practical Production Guide
The popular advice is to make the model look beautiful first and worry about animation later. That order produces excellent portfolio renders and unreliable production assets. In anime 3D modelling, the hard problem isn't adding detail. It's preserving the character's silhouette, expression, line treatment, and proportions when the camera moves, the joints rotate, and the same asset appears in multiple shots.
Anime 3D modelling works best as a production-first pipeline. You're building reusable infrastructure for character construction, rigging, staging, rendering, and revision, not just a digital sculpture. A single mesh may need to support a turntable, a trailer, a game export, a physical figure, or a revised shot. The model has to survive those demands before a polished still image matters.
Table of Contents
- Why Anime 3D Modelling Is a Production Pipeline, Not a Style
- Blocking Silhouettes and Building a Clean Anime Base Mesh
- Retopology, Edge Loops, and Stylized Normal Shading
- PBR Texturing Versus Hand-Painted Cel Shading
- Rigging Basics and Validation for Anime Characters
- Rendering, Turntables, and Cost-Per-Reuse Economics
- Putting the Anime 3D Modelling Pipeline Together
Why Anime 3D Modelling Is a Production Pipeline, Not a Style
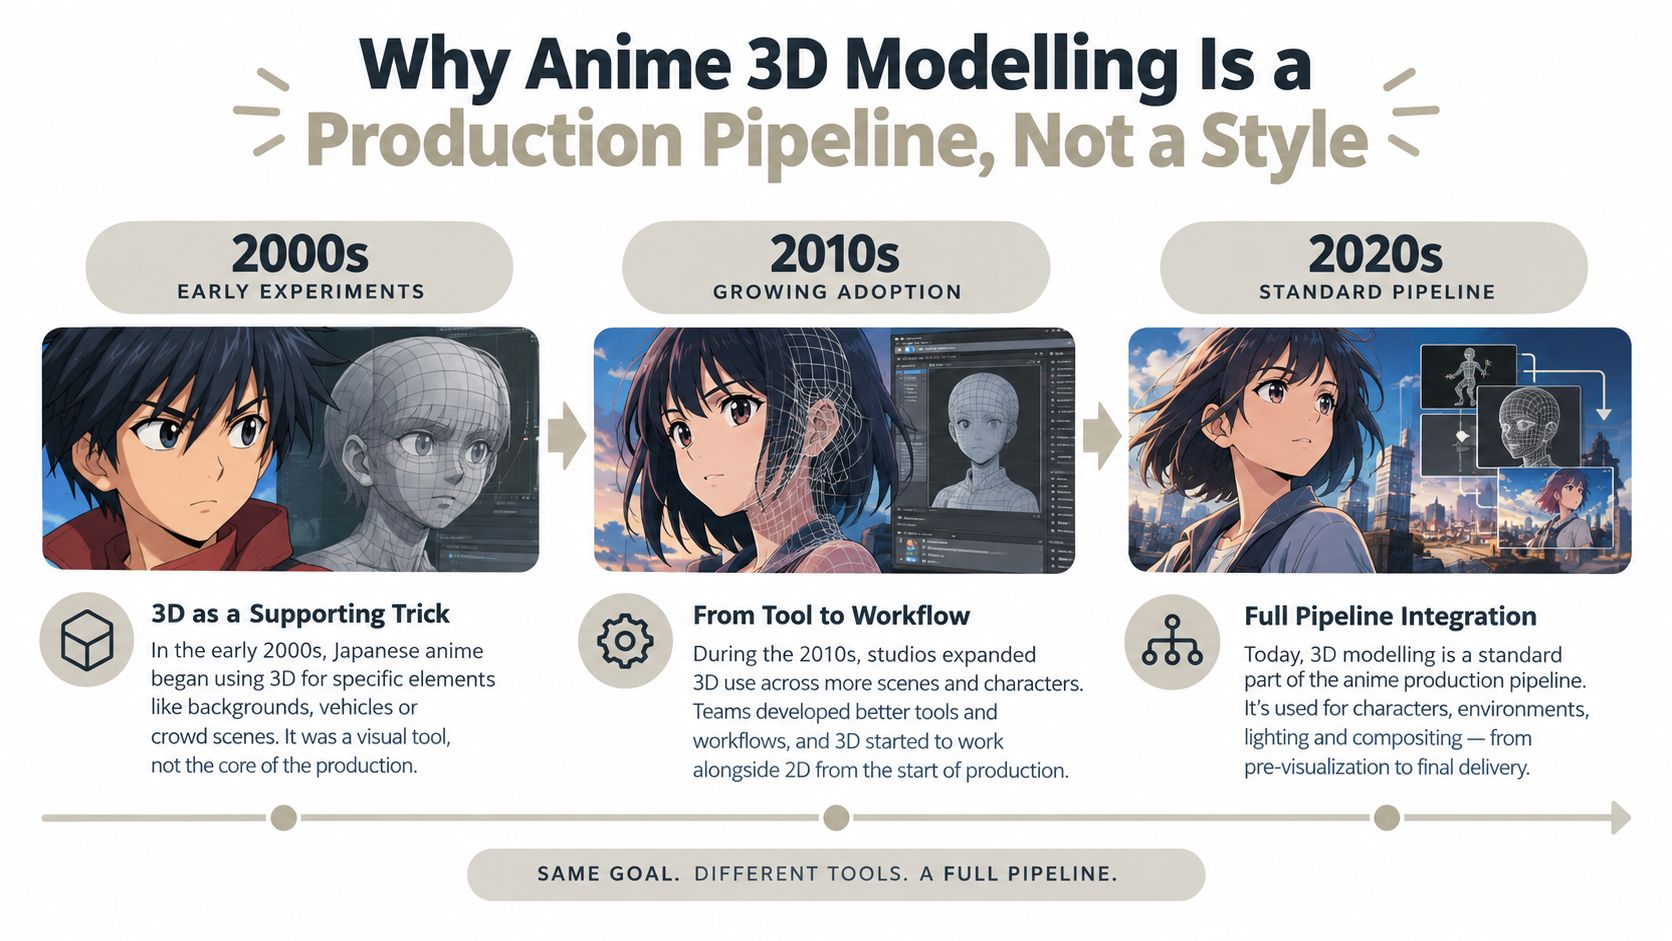
Anime 3D modelling gets mislabeled as a look. In production, it works as a set of constraints. The job is to build assets that hold anime proportions, line treatment, and facial readability while surviving rigging, camera changes, revisions, and compositing. Japanese production history makes that clear. As studios shifted from cel workflows to digital ones, 3D became a practical method inside anime production rather than a replacement for anime drawing language. Appleseed (2004) and Hottarake no Shima: Haruka to Maho no Kagami (2009) are documented examples of Japanese productions using 3D computer graphics for characters and environments (historical discussion of Japanese digital animation).
That history matters because it shows why anime 3D assets are usually hybrid by design. Studios use 3D to keep viewpoint changes stable, to manage complex props and environments, and to revise shots without rebuilding every frame from scratch. Then they shape the result with toon shading, hand-drawn effects, selective motion, and compositing choices that keep the image readable as anime. The finished frame may look simple. The pipeline under it usually is not.
The asset is infrastructure
A sculpt made for a still image and a model made for production solve different problems. The still-image sculpt can hide weak topology under one flattering camera. A production model cannot. If the cheeks collapse in a three-quarter view, if the bangs clip through the collar on a head turn, or if the eyelid shapes only work from the front, the asset is not ready no matter how polished the render looks.
I treat the model as infrastructure. It has to support repeatable posing, stable shading, and predictable fixes. That changes what gets prioritized. Clean deformation zones beat micro-detail. Controlled silhouette changes beat dense sculpt noise. Materials and line work have to stay coherent across shots, not just in a portfolio render.
The broader animation field keeps pushing work in that direction, with studios serving more formats, platforms, and reuse cases across production and promotion (market context for global animation). For anime 3D modelling, that usually means one character asset may need to function in a turntable, a trailer, in-game presentation, merchandise development, or localized marketing art.
Production rule: If the model only works in one camera angle, it isn't finished. It's a render setup.
Good anime 3D modelling starts with choices that survive use. Shape first. Topology early. Shader tests under motion, not only in stills. That production-first order is what makes the style hold up.
Blocking Silhouettes and Building a Clean Anime Base Mesh
Start with the concept art, not the mesh. Reduce the character to a few readable masses and identify the shapes that carry recognition: the head profile, hair outline, shoulder width, coat volume, leg spacing, footwear, and any signature prop. Anime design often depends on simplified planes and strong negative space, so a detailed model with a weak silhouette fails before texturing begins.
Build the shape before the surface
Use primitive forms to block the torso, pelvis, limbs, hands, feet, and head. Spheres, cylinders, boxes, and low-resolution custom volumes are enough at this stage. Match the front, side, and three-quarter views as closely as the reference allows, then check the character as a dark silhouette. If the outline doesn't read without materials, more texture won't fix it.
A reliable build order is:
- Analyze the concept and silhouette. Mark the dominant contours and the proportions that distinguish the character.
- Block the body with primitives. Keep the forms simple while you solve the overall pose and mass distribution.
- Set anatomical proportions. Establish shoulder, elbow, wrist, hip, knee, and ankle landmarks before adding clothing detail.
- Construct a clean quad base mesh. Keep the surface organized around deformation and subdivision rather than sculpted accident.
- Add the face, hair, and clothing. Treat each as a designed volume, not as noise layered over an unresolved body.
- Check the model from multiple views. Front, side, and three-quarter silhouettes should agree before retopology or UV work.
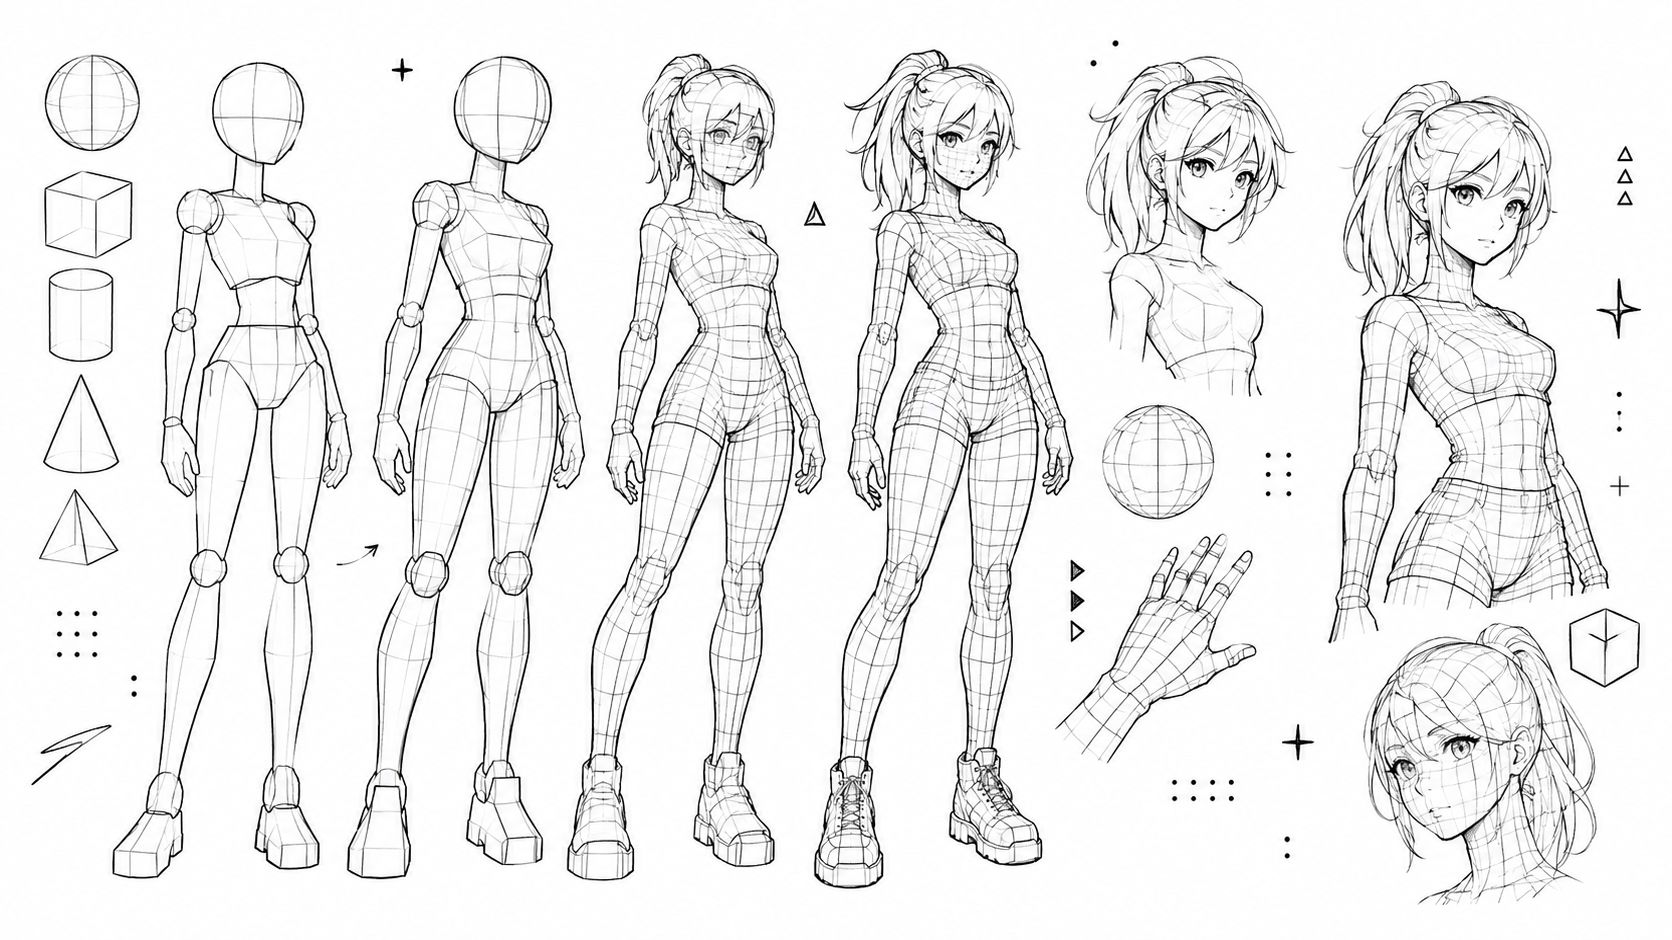
The head deserves special discipline. Anime faces are simple, but simplicity leaves little room for proportion errors. Place the eye line, jaw, cheek planes, nose indication, and mouth position as large graphic decisions. Don't carve tiny features into a head whose width, tilt, or facial spacing is still changing. For hair, build the major clumps as intentional volumes first, then split them into bangs, side locks, rear masses, and accessories.
Why quads still matter
A quad-based base mesh gives subdivision a predictable surface and makes deformation easier to control. The goal isn't to maximize density. It's to place loops where the face and body need to bend, compress, or change expression. The eyes, mouth, shoulders, elbows, hips, and knees all deserve topology designed around movement rather than decorative detail.
The most expensive shortcut is detailing too early. If you sculpt folds, strands, eyelashes, and ornamental seams before the proportions and edge flow are stable, every later correction creates downstream rework. A production artist should be willing to throw away an attractive blockout when the silhouette says the character is wrong.
Practical test: Hide the materials, flatten the lighting, and inspect the model as a silhouette from front, side, and three-quarter views. If the character loses identity, return to blocking.
Retopology, Edge Loops, and Stylized Normal Shading
A sculpt or AI-generated mesh can provide useful volume quickly, but it rarely provides production topology automatically. It may contain unnecessary density, stretched polygons, intersecting shells, flat surfaces where volume is needed, or edge flow that ignores the face and joints. Retopology isn't cosmetic cleanup. It converts a visually promising object into a mesh that can deform and shade consistently.
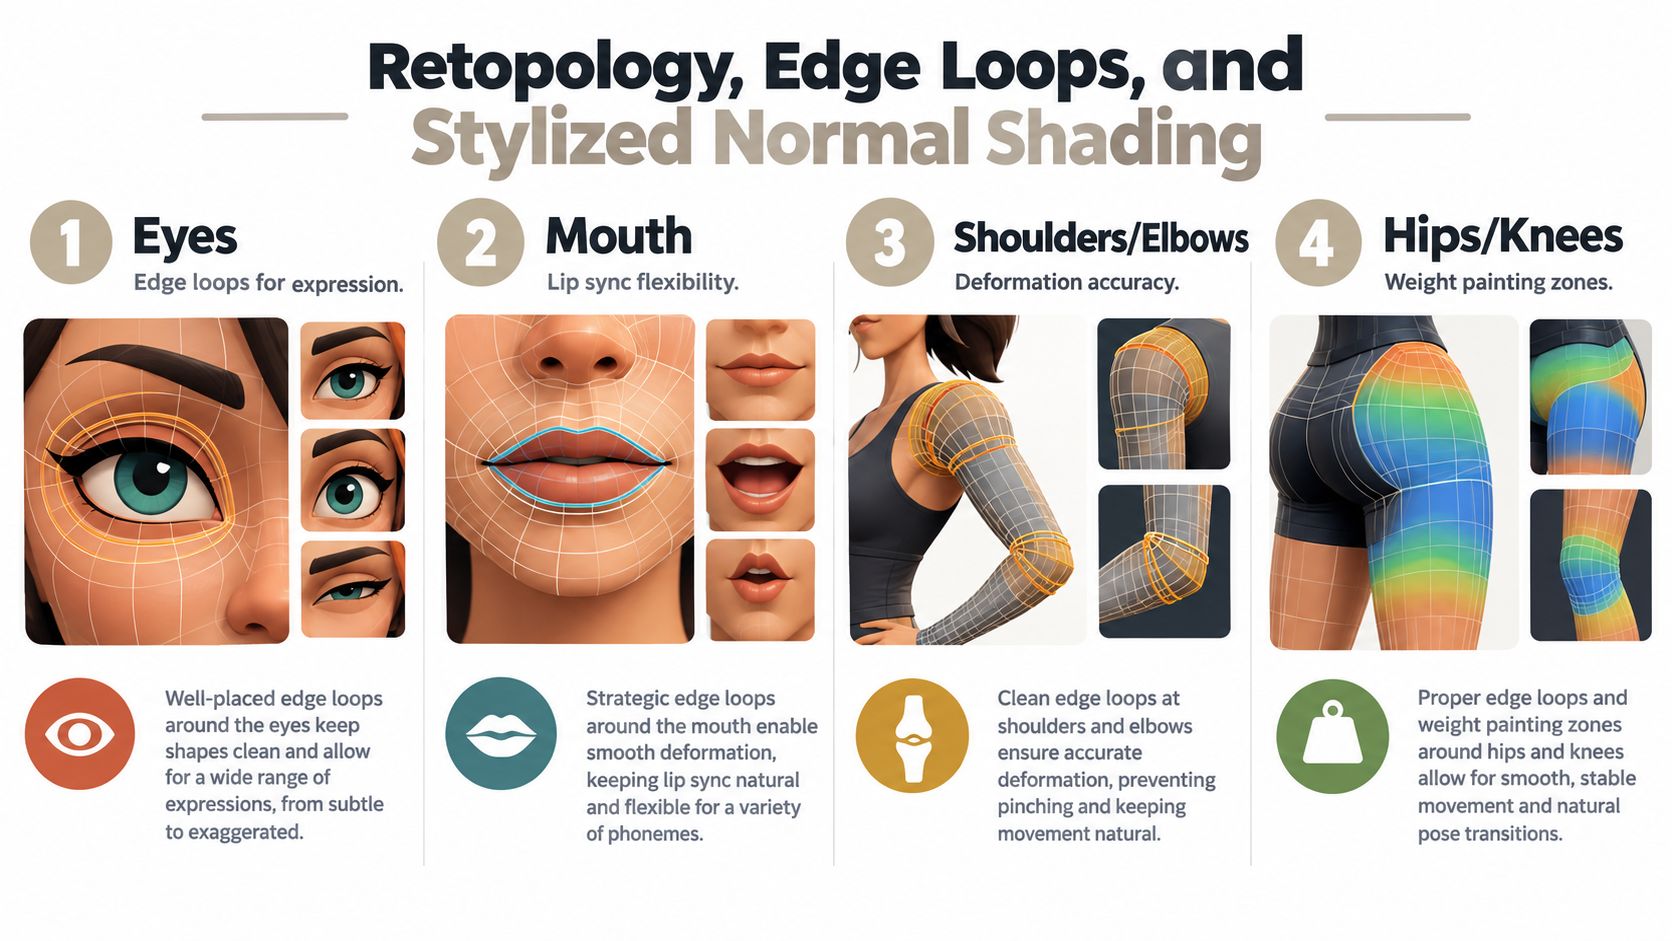
Start by preserving the approved silhouette. Build the new surface over the usable volume, then simplify where the form is broad and add loops where movement demands control. The critical regions are the eyelids, mouth, jaw, shoulders, elbows, hips, and knees. Facial loops need enough structure for expressions and lip movement without forcing the cel shader to create unstable highlights across poorly shaped planes.
Design topology around motion
For anime characters, facial topology and shading are closely connected. A broad cheek plane should produce a deliberate tonal region, not a random gradient caused by uneven normals. Around the eyes, loops should support blinking, squinting, and exaggerated expressions. Around the mouth, they should permit phoneme shapes and emotional compression without tearing the painted forms.
Use subdivision where it supports the intended surface, not as a substitute for good topology. Quad flow is preferred because Catmull–Clark subdivision produces predictable results, but a clean low-density mesh with deliberate planes may look better than a dense surface that smooths away the design. Anime forms often need controlled flatness.
For sculpted or generated detail, bake normal or displacement information only after the animation mesh holds the correct proportions. The high-resolution source can retain pores, cloth breakup, or sculpted accents, while the retopologized mesh carries the silhouette and deformation. The topology workflow guidance is useful when deciding how to separate those responsibilities.
Validate before you unwrap
A topology pass isn't complete when the wireframe looks tidy. Test the extremes that expose failure:
- Face: Push the eyes, brows, mouth, and cheeks through exaggerated expressions.
- Joints: Rotate shoulders, elbows, hips, and knees through their full intended ranges.
- Silhouette: Compare front, side, and three-quarter views in neutral and action poses.
- Surface: Check for pinching, collapsing planes, broken normals, and shading discontinuities.
- Geometry: Inspect UV seams, non-manifold edges, hidden intersections, and duplicated shells.
These checks matter because stylized characters communicate through large graphic changes. A small collapse at the elbow can destroy the clean shape language more visibly than a comparable error on a realistic character. Silhouette retention and predictable deformation are stronger completion criteria than polygon count.
PBR Texturing Versus Hand-Painted Cel Shading
Anime shading isn't one material preset. It's a decision about how much information should come from physically based maps, how much should come from lighting, and how much should be authored directly into the design. PBR materials can provide a fast base for skin, cloth, metal, and props. Hand-painted maps, toon ramps, stylized normals, and controlled outlines can then push the result toward the intended anime language.
The wrong choice usually becomes obvious in motion. A physically plausible highlight may travel across the face in a way that changes the character's expression. A screen-space outline may flicker when the camera turns. A painted shadow can preserve the design, but it may look locked to the surface when the lighting direction changes. The strongest results often combine methods rather than treating one as universally correct.
Choose the shading system by use case
| Approach | Best Use Case | Animation Stability | Setup Effort |
|---|---|---|---|
| PBR materials | Fast props, environments, and mixed-style assets | Generally predictable, but highlights can fight anime design | Low to moderate |
| Hand-painted cel maps | Fixed designs, controlled shots, and graphic character looks | Stable when maps follow the model and UVs remain consistent | Moderate |
| Toon ramps | Reusable characters with deliberate light bands | Strong when normals and shadow thresholds are controlled | Moderate to high |
| Hybrid stylized shading | Characters needing both reuse and authored graphic control | Often the most flexible, but requires careful testing | High |
UV layout matters more than the texture software. Place seams where the design can tolerate them, keep the face and visible clothing regions continuous, and test the texture under bending. A sleeve pattern that aligns in a bind pose may slide or split at the elbow. Hair cards need deliberate direction and consistent alpha treatment, while eyes usually need separate geometry or carefully controlled planes so their highlights and line treatment remain readable.
AI-assisted texturing helps with material drafts and variation, but it doesn't remove the need for art direction. Prompt-driven PBR output may create plausible surface noise that undermines a clean anime costume. Use it to explore color and material ideas, then simplify the maps that will be evaluated in motion. Tools such as Beam image generation can help generate visual references or texture directions, but the production artist still has to decide which information belongs in the mesh, the texture, or the shader.
Shading principle: If the eyes, outline, and shadow boundary are unstable, a more detailed texture won't rescue the shot.
Line treatment deserves its own test. Mesh-based lines can remain attached to the character, while screen-space lines can offer a crisp graphic result but may vary with camera angle and occlusion. Rim lighting should support the silhouette instead of outlining every object indiscriminately. The practical comparison is not “realistic versus stylized.” It's which system keeps the character legible across the intended camera range.
For texture construction and material organization, this texturing workflow reference provides a useful companion to the topology decisions above.
Rigging Basics and Validation for Anime Characters
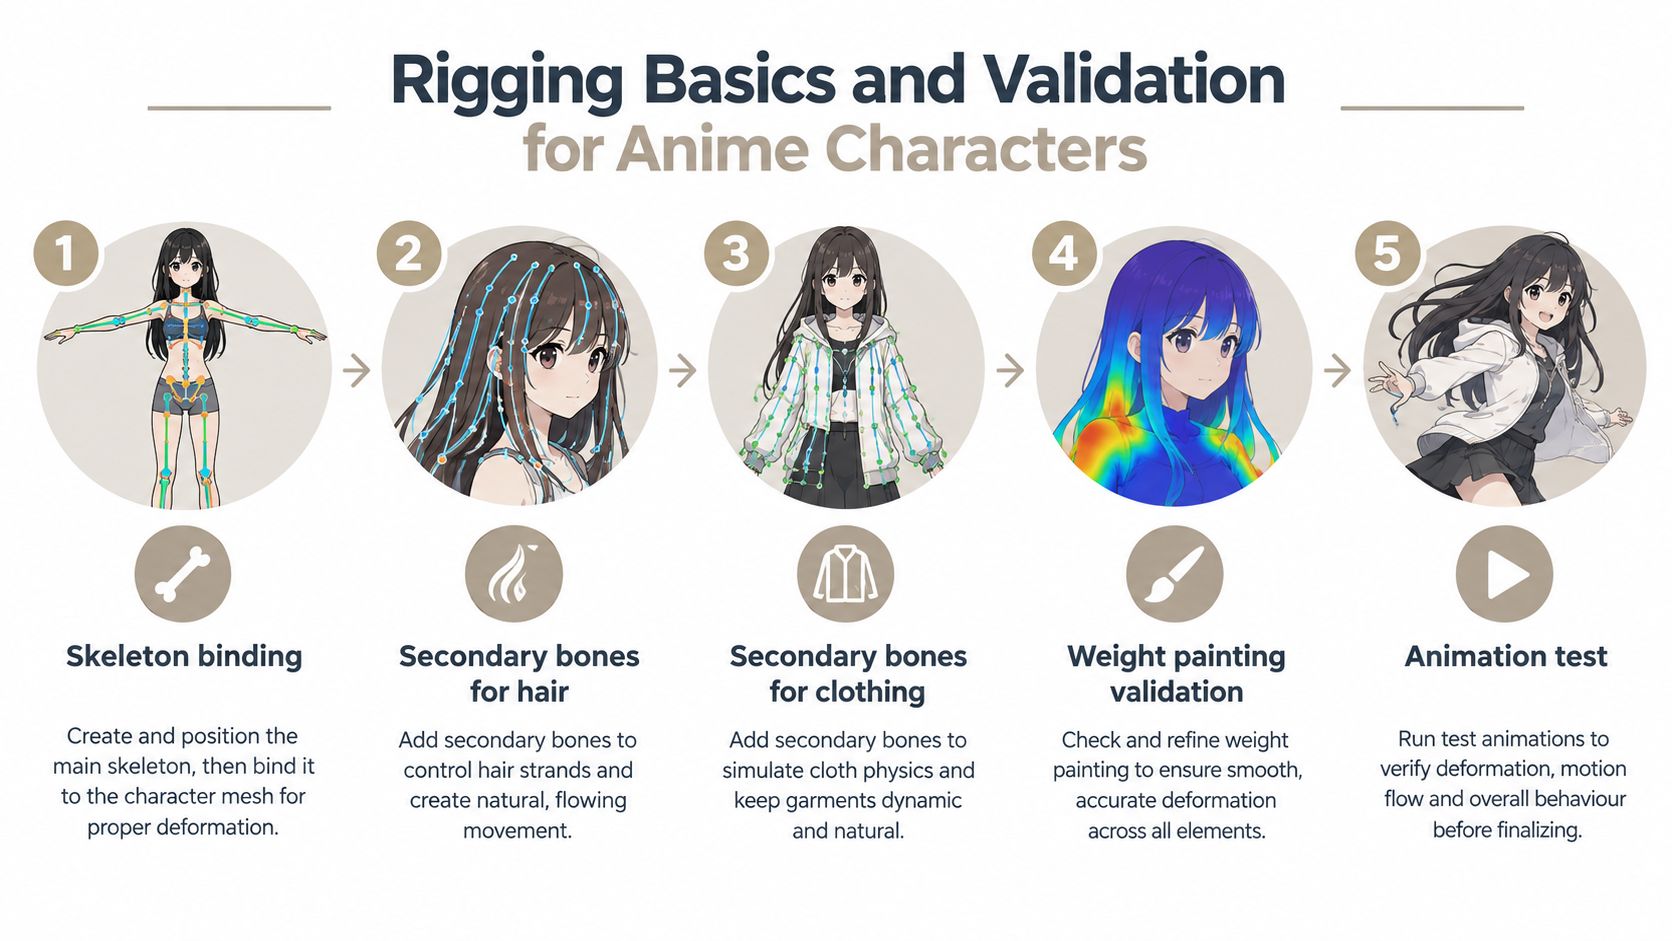
Rigging reveals whether the model was designed for animation or merely posed for a render. Bind the mesh to a consistent skeleton, establish clean joint orientations, and paint weights while watching the silhouette rather than only the vertex colors. Anime characters often use large costume shapes and simplified anatomy, so a technically smooth deformation can still be visually wrong if it destroys the designed contour.
Build controls for the performance
The base skeleton handles the major body motion. Secondary bones give hair, ribbons, sleeves, coats, and accessories their own controlled movement. These bones shouldn't create random simulation noise. They should preserve the graphic rhythm of the design, especially in shots where hair and clothing need to trail behind a fast turn without obscuring the face.
Facial controls need to cover more than a smile and blink. Plan for brow compression, eyelid shapes, eye direction, mouth openness, lip-sync poses, cheek movement, jaw motion, and the exaggerated expressions the character's story requires. Blendshapes can deliver authored anime expressions, while bone controls can handle broader adjustments. Many productions use both.
A generated or sculpted asset may need structural correction before rigging. Recent anime-rendering research used 80 VRM-format 3D characters to generate 395 sequences, with 24,230 training frames, 720 validation frames, and 4,320 test frames. The researchers reported manual corrections such as replacing planar hair strips with volumetric geometry, optimizing skeletons, and adding supplementary bones for anime-like hair and clothing movement (anime rendering dataset and structural corrections). The specific dataset isn't a universal production requirement, but it illustrates why a visually attractive source mesh can still need substantial preparation.
Test the rig as an animator would
A useful validation pass includes:
- Extreme facial expressions, including compressed eyes, open-mouth shapes, and asymmetry.
- Full joint rotations for shoulders, elbows, hips, knees, wrists, and ankles.
- Front, side, and three-quarter silhouette checks during motion.
- Texture continuity across bending regions and UV seams.
- Hair and clothing motion with secondary bones enabled and disabled.
- Inspection for non-manifold geometry, intersections, broken normals, and unexpected line changes.
A posed statue can pass a beauty render. A rigged character passes when an animator can push it into an extreme pose, recover cleanly, and keep the face readable. That standard catches failures before they become shot-specific fixes.
Rendering, Turntables, and Cost-Per-Reuse Economics
A polished still can hide a weak asset. Rendering needs to function as a stress test, with lighting and camera choices that expose failure instead of flattering it. Set a controlled key, fill, and rim setup, rotate the character through a full turntable, and watch what breaks. Hair cards clip through shoulders, facial ink lines pop at three-quarter view, texture seams show up on bends, and hard normal changes can make cel shadows chatter from frame to frame.
That pass matters because anime 3D modelling gets expensive in the wrong place if you only judge the first beauty frame. The question is how many times the asset can pay back the setup work. A character with clean shading, stable outlines, reusable materials, and a rig that survives revisions can serve a trailer, social clips, promo stills, alternate costumes, and later shot pickups. A sculpt built only for one camera angle usually cannot.
Compare the job before choosing the method
For a one-off illustration, 2D art or a carefully directed AI image can be the cheaper route. Building topology, UVs, materials, facial controls, and validation adds labor that may never appear on screen again. I would only push a full 3D character for a single image if the design is likely to come back in another format.
A short video changes the math. Five shots from the same rigged character often cost less than rebuilding five separate images once camera motion, pose revisions, expression changes, and continuity fixes are on the table. A practical comparison makes the trade-off clear. If a reusable character takes the heavier upfront build, then only needs shot prep and lighting adjustments afterward, the cost per final output drops with each approved reuse. If every deliverable starts from scratch, it never does.
A game asset usually needs the complete pipeline because deformation, export reliability, texture continuity, and performance limits affect every downstream department. A 3D-printable collectible has a different target. Watertight geometry, wall thickness, keyed part separation, and a pose that reads well as an object matter more than real-time rig behavior.
Economic rule: Judge an AI-generated model by cleanup time and reuse value, not by the quality of its first thumbnail.
Use a direct filter before committing production hours:
- Will the character be seen from multiple angles?
- Will it need new poses, expressions, or costume changes?
- Will the same asset support a game, trailer, turntable, or print export?
- Can the team keep the rig and materials intact when the design changes?
- Does cleanup take less time than building the needed structure correctly?
Teams producing trailers and promotional media should also document downstream deliverables using shared video repurposing terms. That does not mean forcing every model into every format. It means identifying likely reuse before you decide how much pipeline work the character deserves.
Putting the Anime 3D Modelling Pipeline Together
A production-ready anime 3D modelling workflow follows a strict sequence because each stage protects the next one:
- Analyze the concept, silhouette, proportions, and camera needs.
- Block the body and major costume volumes with simple forms.
- Establish the face and anatomical landmarks.
- Build a clean quad-based base mesh around deformation zones.
- Add hair, clothing, facial details, and accessories as intentional volumes.
- Retopologize generated or sculpted geometry while preserving the approved silhouette.
- Unwrap UVs, assign materials, and choose a PBR, cel, or hybrid shading system.
- Bind the skeleton, add facial controls and secondary bones, then paint weights.
- Test extreme expressions, joint rotations, turntables, and animation poses.
- Render controlled lighting passes and verify that lines, shadows, textures, and silhouettes remain stable.
AI is most useful when it accelerates exploration, blocking, texture drafts, or alternate asset directions. Manual work still carries the decisions that affect identity and animation: proportions, facial readability, edge flow, topology, rig behavior, and final cleanup. A browser-based studio such as Sculpty can support text-to-3D and image-to-3D generation, AI PBR texturing, remeshing, retopology, 4K rendering, and 360-degree turntable export, but those outputs still need the same production validation as any other generated mesh.
The model is ready to ship when it works beyond the hero frame. If the silhouette survives, the face deforms intentionally, the shader stays stable, and the asset can serve its planned downstream uses, you have built anime 3D modelling as a pipeline rather than as a single attractive image.
Use Sculpty to explore anime-oriented text-to-3D or image-to-3D concepts, generate material drafts, and move promising assets through remeshing, retopology, rendering, and turntable review. Start with a fast blockout, then apply the deformation and reuse checks from this guide before committing the model to production.