
AI Image to 3D Model: Step-by-Step Guide for 2026
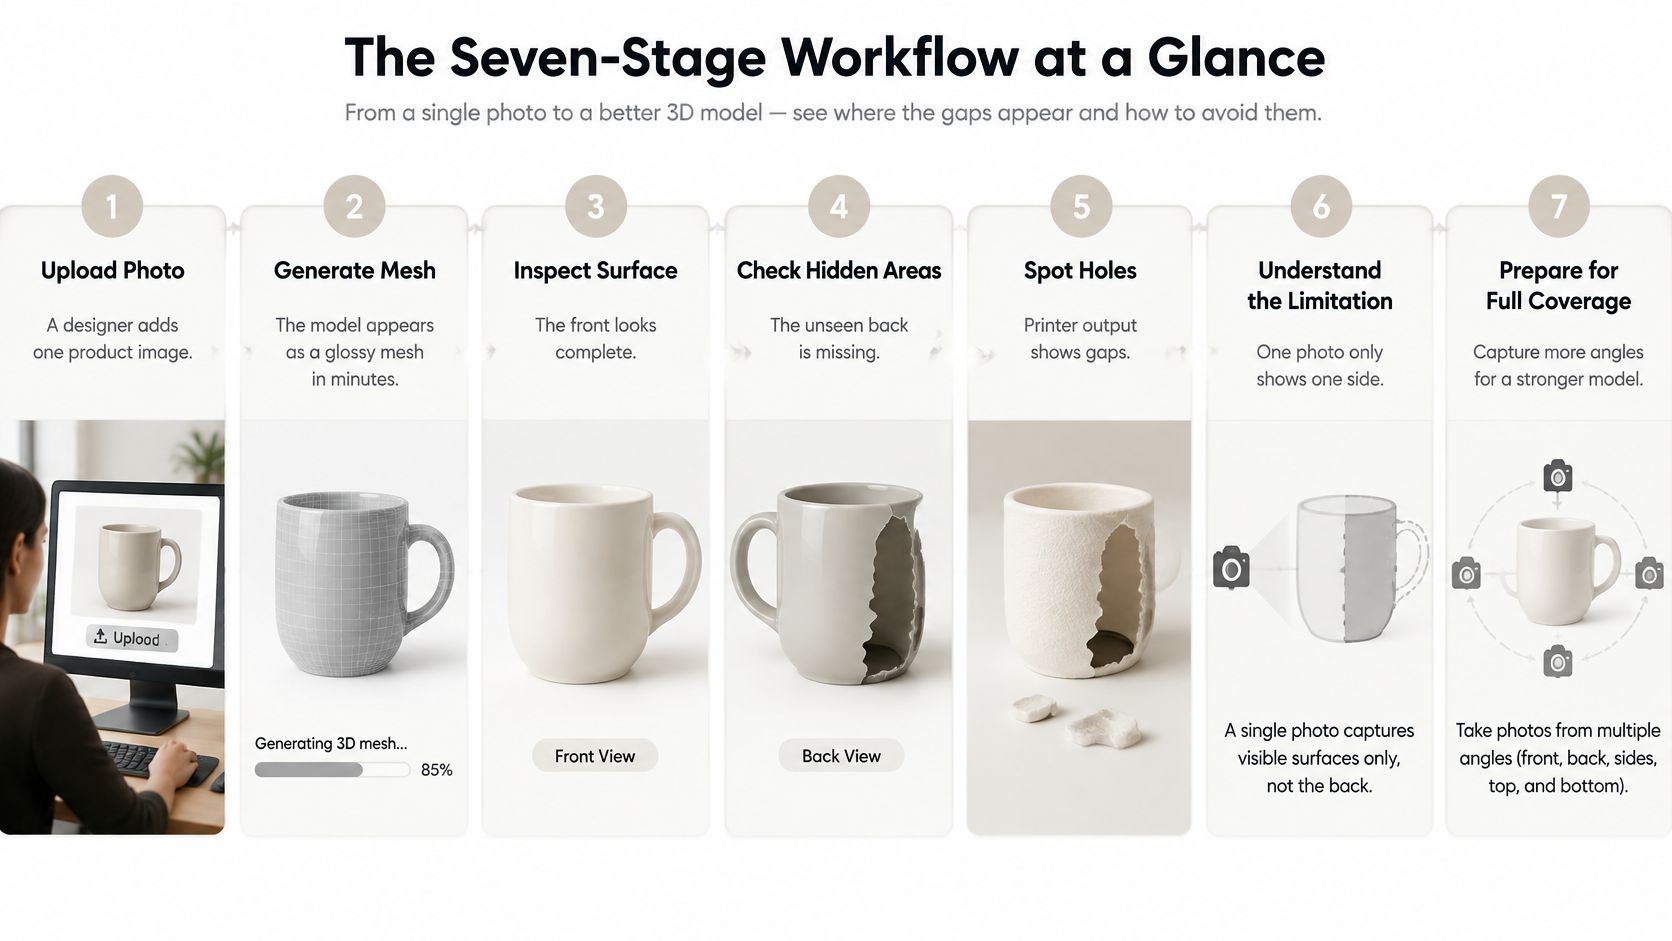
You upload a clean product photo, get a glossy mesh back in minutes, and feel done. Then you rotate it. The back is invented, the base is open, and your slicer or game engine rejects a file that looked perfect from the front. That's the normal state of an AI image to 3D model workflow, not a sign you picked the wrong tool.
Table of Contents
- The Seven-Stage Workflow at a Glance
- How to Prepare Your Photo for Clean Geometry
- How to Generate the Model and Pick Settings
- Clean Up Holes, Normals and Topology
- Texture the Asset
- Choose the Export Format for Each Destination
- Validate the Exported File Before Handoff
- Run One Test Photo Through the Full Workflow
The Seven-Stage Workflow at a Glance
A model can match its source photo and still fail in the destination app. Treat image-to-3D as a pipeline: check the shape, repair the mesh, export it, then test the exported file where it will be used.
Why the front view lies
A single view cannot confirm the unseen side, underside, cavities, or true depth. Silhouette overlap helps assess whether the visible outline matches, but it cannot establish that the whole model is sound. Inspect the mesh from multiple angles, then open the exported file in its destination app.
| Stage | What you do | Output | Pass check |
|---|---|---|---|
| 1. Normalize the image | Crop, straighten and remove the background | Clean square PNG | Whole subject fits inside the frame with a margin |
| 2. Estimate and mask | Create a subject mask and check its silhouette | Subject mask | Edge follows the subject without a visible halo |
| 3. Generate coarse shape | Run image-to-3D in the chosen engine | Raw mesh or point cloud | Visible silhouette matches the photo |
| 4. Convert to explicit surface | Confirm the output is a triangle mesh | Triangle mesh | Mesh opens in a viewer without errors |
| 5. Repair | Fix holes, inverted normals, self-intersections and loose pieces | Repaired mesh | Manifold check passes |
| 6. UV and texture | Create or regenerate UVs and bake PBR maps | Textured asset | No stretched or visibly broken texture seams |
| 7. Validate and export | Inspect new angles, export, then open the file in its destination app | Final file | Target app opens the file and displays the model correctly |
Generation is often quick; cleanup and validation take more work. A clean render does not prove that the mesh is watertight, correctly oriented, or compatible with its destination. If the concept still needs shaping before modeling, design products with AI to clarify the intended proportions and materials before generating the asset.
How to Prepare Your Photo for Clean Geometry
Most bad meshes start as bad inputs. Fix the photo before you blame the engine, because every flaw below turns into geometry you'll have to repair later.
The preparation sequence
- Pick one subject in matte, even light. A three-quarter or straight-on view works best. A sneaker on a glossy table pulls reflections into the shape, so move it to a dull surface.
- Crop square with a margin. The whole subject must fit without edge clipping. A cropped toe or handle gets invented, usually badly.
- Remove the background and check the mask at 100% zoom. Hair-thin halos around the edge become thin wall artifacts in the mesh. Clean the mask edge, don't trust the automatic cutout.
- Reduce perspective distortion. Shoot at eye level or step back and use a longer lens. A mug photographed from above gets a wider rim and squashed proportions that no setting fixes.
- Keep the short side around 1024 px or more. Don't upscale a blurry original and expect detail, since upscaling invents false edges. If you must improve a soft shot first, this guide to enhancing portraits and landscapes covers sensible cleanup before generation.
- Save a PNG with transparent background. Keep the untouched original beside it so you can compare the mesh against reality later.
| Photo condition | Effect on mesh | Fix before generating |
|---|---|---|
| Strong perspective, shot from above | Distorted proportions and wrong depth | Reshoot at eye level or crop to reduce distortion |
| Busy or shadowed background | Background or cast shadow baked into shape | Remove background and mask the subject |
| Glossy or transparent surface | Holes, glass-like gaps or wrong geometry | Use matte lighting or add more views |
| Part of subject hidden | Hidden surfaces guessed by the model | Add side or back views, or accept a prior-driven back |
Practical rule: if you can't trace the silhouette cleanly with your eye, the engine can't either.
How to Generate the Model and Pick Settings
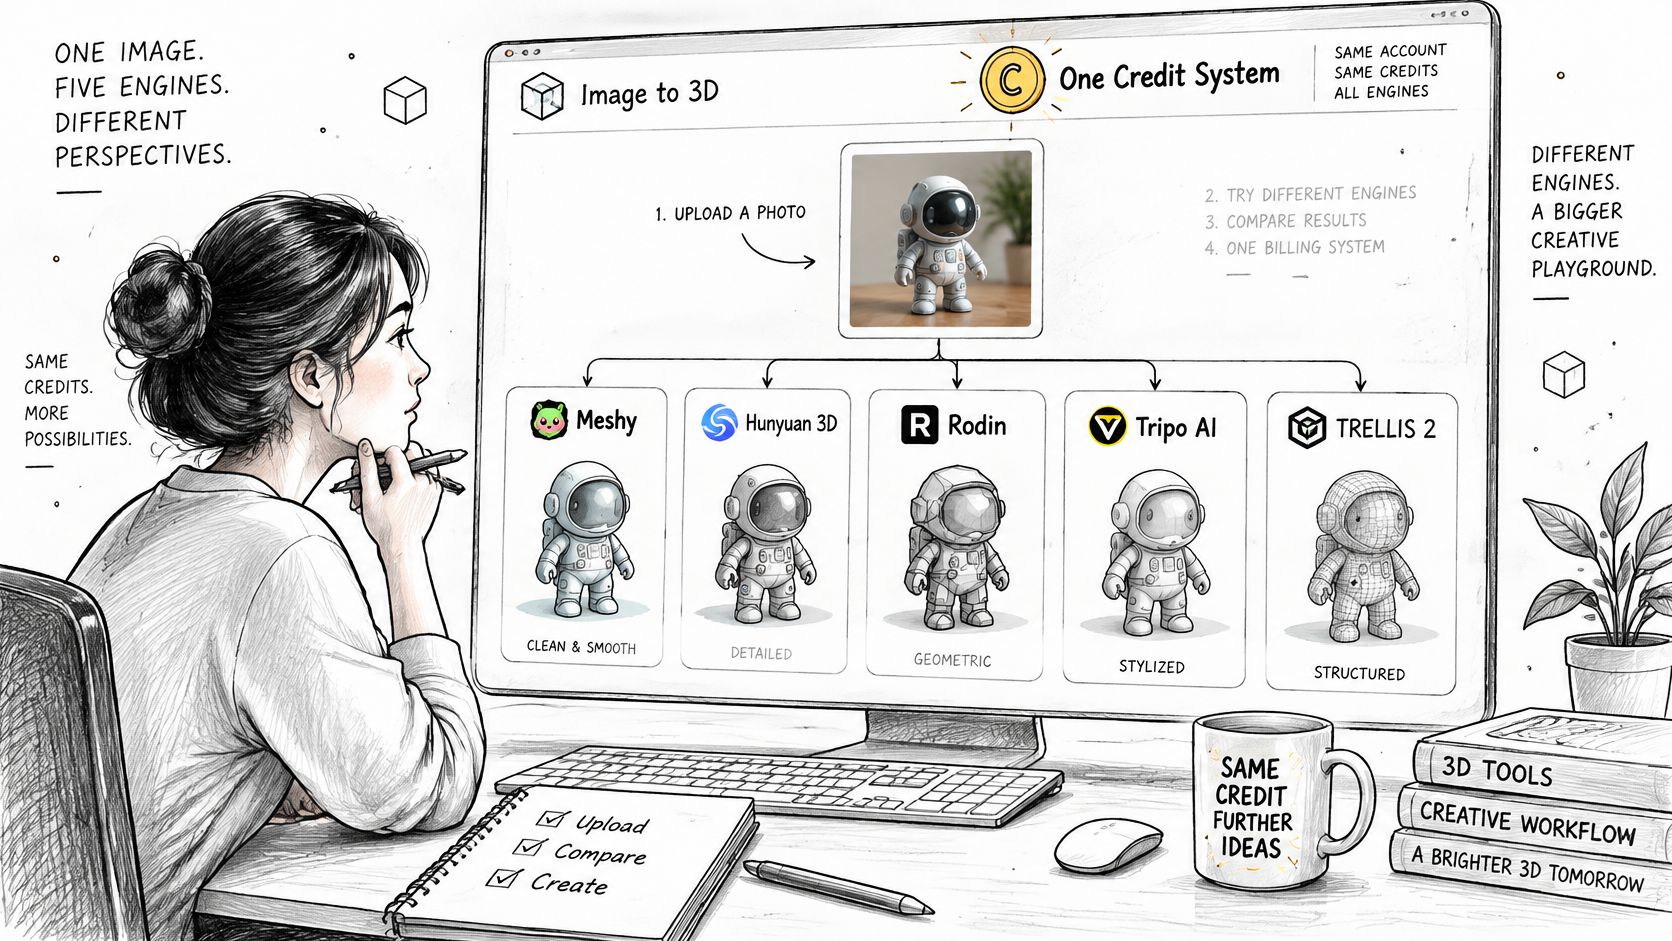
Different engines read the same photo differently, so engine choice is a test you run, not a ranking you trust. The workflow below uses one credit system to run jobs through engines including Meshy, Hunyuan 3D, Rodin, Tripo AI and TRELLIS 2, which makes side-by-side comparison cheap.
Compare two engines on one photo
Run the same image through two engines and judge three things. Check silhouette overlap against the photo, the plausibility of the hidden side, and how much repair each output needs. I would pick the mesh needing fewer repairs over the one with the prettier preview render every time.
The photo does the shape work, so keep the text prompt for material and constraints. Something like "brushed aluminum body, matte black handle, symmetric, closed base" helps. Contradictory adjectives like "thin and heavy" just confuse the result.
Multi-view and polygon density
When you can supply a side or back view, do it. A leather boot generated from the front alone often gets a plausible but wrong heel, while front plus back views pin the heel shape down and cut the hidden-surface guessing sharply.
Start polygon density at a middle setting. Very high density multiplies cleanup work without adding detail the photo supports. Save the photo, prompt, engine, and settings with each output so a failed asset can be diagnosed and regenerated instead of guessed at.
The short walkthrough below shows a typical generation pass so you can see the order of operations before running your own.
Clean Up Holes, Normals and Topology
Beginners mix up two different operations. Remesh rebuilds an even triangle layout to fix topology while keeping the form. Retopology rebuilds the surface as cleaner quads for animation or as a lighter triangle budget for games. They solve different problems, covered in this guide to 3D modeling topology.
Set the target before you repair anything
- 3D printing: requires a closed solid, no internal shells, and walls at least 1 mm thick for FDM or resin.
- Real-time game asset: requires a triangle count within the project budget and clean quads if it deforms. It does not need to be watertight.
- CAD or measurement: requires accurate scale matching the actual object and is usually watertight.
- Product visualization: requires smooth normals, detailed UVs, and 2K to 4K textures for hero shots. Watertightness is not important.
Repair in this order
- Fill holes first. Normal recalculation and booleans behave badly on open meshes, so close boundaries before anything else.
- Recalculate normals outward. Then look for flipped patches showing as dark areas.
- Delete floating shells. Generators leave stray fragments that break slicers and inflate triangle counts.
- Fix self-intersections and non-manifold edges. An edge shared by three faces will fail downstream even if the render looks fine.
- Remesh to destination density. Even triangles make every later step more predictable.
- Retopologize if needed. Build quads for deformation or cut triangles to budget.
- Compare the silhouette after each pass. Repair tools eat shape if you don't check.
One-click remesh speeds this up, but automation shrinks thin parts. A figurine remeshed too aggressively can lose arm thickness until the arms fall below printable width, so measure thin features after every pass.
Texture the Asset
Prompt-driven PBR texturing produces albedo, roughness, metalness, and normal maps, typically at 2K or 4K. If you need the map roles explained, this overview of PBR texture maps and how they work is a solid reference. Your main job is checking that the color is material color, not lighting copied from the photo.
What to inspect before export
Compare the textured model against the original photo under neutral light. A shadow from the photo becoming dark paint on a leather boot is a common miss, and it only shows when the lighting changes. Rotate to the hidden side too, because texture stretched across a guessed back shows seams at the first angle change.
If a texture smears or stretches, regenerate the UVs and rebake rather than repainting by hand. Hand painting over bad UVs wastes hours and still seams. Once the texture reads as material color with no baked lighting and no visible seams from the front, the asset is ready for format choice and final validation.
| Symptom | Likely cause | Fix |
|---|---|---|
| Holes or open edges visible in viewer | Non-manifold or open boundaries | Fill holes, then recheck watertightness |
| Dark or flipped patches on surface | Inverted normals | Recalculate normals outward |
| Stretched or smeared texture | Poor or overlapping UVs | Regenerate UVs and rebake textures |
| Front matches, side looks wrong | Hidden surfaces were guessed | Add a side view and regenerate that part |
| Slicer rejects the file | Zero-thickness or non-manifold parts | Repair, thicken thin walls, re-export as 3MF or STL |
Choose the Export Format for Each Destination
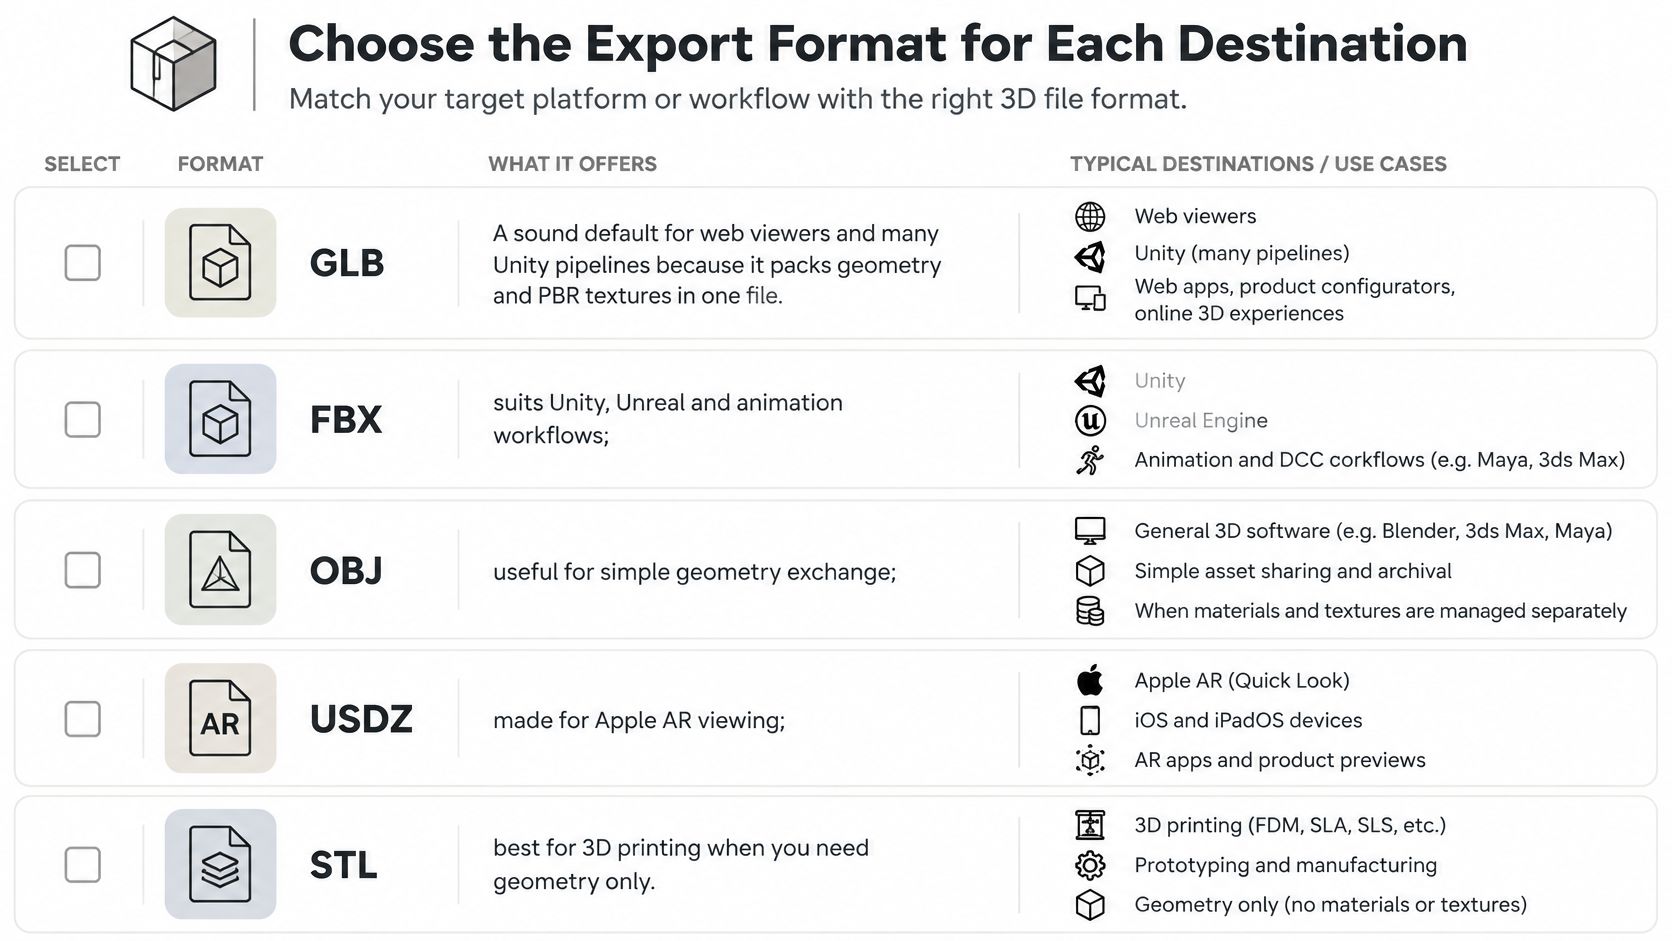
Format choice isn't a preference, it's a destination decision. Pick wrong and color, scale, or units disappear. This comparison of 3D file formats and their uses goes deeper if your pipeline mixes several tools.
| Format | Best for | Carries color | Watch for |
|---|---|---|---|
| GLB | Web viewers, Unity pipelines, AR previews | Yes, PBR textures | Single file, a sound default |
| FBX | Unity, Unreal and animation pipelines | Yes | Check scale and axis on import |
| OBJ | Broad DCC tools such as Blender | Through MTL and image files | Textures ship as separate files |
| STL | Desktop 3D printing | No | Geometry only, no units or color |
| 3MF | Modern slicers and colored printing | Yes | Preferred over STL where the slicer supports it |
| USDZ | Apple AR Quick Look on iOS | Yes | Choose when the target is iOS AR |
GLB is my default for web and many Unity pipelines because geometry and textures travel in one file. STL strips everything except geometry, so a colored model exported as STL arrives in the slicer with no color at all. Where your slicer supports it, 3MF is the better print format since it can carry color and units.
If your subject is a vehicle and you need consistent angles for multi-view input, it pays to plan a 360 vehicle photo shoot so every view shares lighting and distance.
Pre-export checklist
- Units set: confirm millimeters or meters before export, not after import surprises you.
- Scale verified: measure one known dimension against the object.
- Origin at the base: essential for printing so the model sits on the bed.
- Triangle count recorded: write it down for the handoff note.
- Textures named and packed: no missing image files for OBJ deliveries.
- Test import done: open the exported file once before sending it anywhere.
Validate the Exported File Before Handoff
A model can match its preview and still fail in the destination app. Validate the exported file itself, in order. Each check catches a different problem.
The validation ladder
- Silhouette overlap: Overlay the mesh on the input view. If the front matches but the side drifts, the shape is not faithful.
- Hidden geometry inspection: Check at least four angles, including the underside, where incomplete geometry can go unnoticed.
- Manifoldness and watertightness: For 3D printing and CAD, run the check in your repair tool and fix flagged edges. For game and visualization assets, check manifoldness where deformation or the engine requires it. Watertightness is not a universal requirement.
- Normals: Use a viewer that displays backfaces so flipped patches are visible.
- Wall thickness: For printing, measure the walls against the intended material and nozzle.
- Target application test: Import the exact exported file into the slicer, engine, or AR viewer. Confirm that color, scale, and units survive the import.
If the file has not opened cleanly in its destination app, it is not ready for handoff, regardless of how the preview render looks.
| Symptom | Likely cause | Fix |
|---|---|---|
| Holes or open edges visible in viewer | Open boundaries or non-manifold geometry | For printing or CAD, fill holes and recheck watertightness |
| Dark or flipped patches on surface | Inverted normals | Recalculate normals outward |
| Stretched or smeared texture | Poor or overlapping UVs | Regenerate UVs and rebake textures |
| Front matches, side looks wrong | Hidden surfaces were guessed | Add a side view and regenerate that part |
| Slicer rejects the file | Zero-thickness or non-manifold parts | Repair the mesh, thicken thin walls, and re-export as 3MF or STL |
Fix the diagnosed defect before regenerating. A new generation can reproduce the same structural flaw while changing only the surface detail.
Run One Test Photo Through the Full Workflow
Pick one object you already own, a mug, shoe, or small tool, and run all seven stages with a timer running. Log how long each stage takes and which one eats the most time. In many workflows that's cleanup, not generation, and knowing that changes how you quote client work.
Decision rules for the test
- Silhouette matches but the back is guessed: add a side view and regenerate only that part instead of starting over.
- Slicer rejects the mesh: repair holes and walls first, since a fresh generation repeats the same structural flaw.
- Asset is for a game: measure triangle count against the budget before texturing, not after.
- Result is for printing: print a small test piece first and check thin features at real scale.
Running the same photo through several engines and comparing repair load is the fastest way to learn which engine suits your subjects. Paid plans grant commercial usage rights, so check the license before selling prints or assets. Keep the saved photo, prompt, settings, and export log together as your reference for the next model, and your second asset will take a fraction of the time.
Turn your test photo into a validated, export-ready mesh with generation, PBR texturing, remesh, and retopology in one browser studio, then export to GLB, STL, OBJ, FBX, USDZ, or 3MF for your destination app. Run the same image through multiple engines, compare the cleanup each one needs, and keep only the file that passes your validation ladder. Start your first test today at Sculpty.